
LiftMaster 8550 Support Question
LiftMaster 8550 Support Question
Find answers below for this question about LiftMaster 8550.Need a LiftMaster 8550 manual? We have 1 online manual for this item!
Question posted by aspringer4 on January 24th, 2013
Liftmaster 8550
learn button on when it is steady or when it is blinking?
Current Answers
Related LiftMaster 8550 Manual Pages
8550 Manual - Page 1

Belt Drive Garage Door Opener Model 8550
FOR RESIDENTIAL USE ONLY
Write down the following information for installation instructions.
. NOTE: If you are installing the garage door
opener on a one-piece door, visit www.liftmaster.com for future reference: Serial Number:
Date of the garage door opener are required to be used ONLY with MyQ™ and Security✚®2.0
accessories. ...
8550 Manual - Page 2

....
• Disable ALL locks and remove ALL ropes connected to garage door BEFORE installation and operating garage door opener to avoid entanglement.
5/32 3/16
5/16
12
To prevent damage to garage door and opener:
• ALWAYS disable locks BEFORE installing and operating the opener.
• ONLY operate garage door opener at 120 V, 60 Hz to avoid malfunction and damage.
1/2
5/8
1/4
7/16...
8550 Manual - Page 3

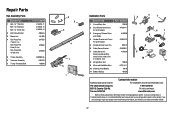
... white and white/black wire attached: Sending Sensor (1) Receiving Sensor (1) and Safety Sensor Brackets (2)
O. Garage door opener
K
J. Safety labels and literature
H
L M
J
N O I . Curved door arm
E. Depending on the garage door opener model purchased. GARAGE DOOR OPENER ASSEMBLY
A. Emergency release rope and handle H. Sprocket cover and screws K. Safety reversing sensors
with...
8550 Manual - Page 4

... bolts from the rail, belt,
operating. operating opener.
1.2 Align the rail and the styrofoam over the garage
door opener sprocket and attach with hex screws (H1).
. Place the garage door
opener on the packing material to prevent
H1
To avoid possible SERIOUS INJURY to garage door opener, use the bolts removed from the
garage door opener.
Cut the tape from the top of...
8550 Manual - Page 6

...in SEVERE
INJURY or DEATH. 3. Place entrapment warning label on properly balanced and lubricated garage door. Install garage door opener only on wall next to -Close functionality if operating either one -piece door, visit www.liftmaster.com for installation instructions. 6 Install garage door opener 7 feet (2.13 m) or more above the floor and
avoiding contact with
a 1-1/2" (3.8 cm) high...
8550 Manual - Page 7

...; NEVER try to loosen, move or adjust garage door, springs, cables, pulleys, brackets, or their hardware, ALL of which are installing the garage door opener on wall or ceiling), use lag screws (...the door center only if a torsion spring or center bearing plate is in your door to -Close functionality if operating either one -piece door, visit www.liftmaster.com for the top edge of Garage Door
...
8550 Manual - Page 9

... the rail with the ring fastener (H11). Connected Disconnected
9
Slide the outer trolley toward the garage door opener. 3 Attach the rail to garage door, rest garage door opener rail on 2x4 placed on top section of door.
4.1 Remove the packing material and lift the
garage door opener onto a ladder.
NOTE: A 2x4 is not tall enough you will need help at this point...
8550 Manual - Page 10

... to attach a support bracket (not provided) to the structural supports before installing the garage door opener.
5.2 Make sure the garage door opener is
aligned with the bolts (H2), lock
door. Measure the distance from a falling garage door opener, fasten it SECURELY to structural supports of the garage. washers (H9) and nuts (H8). Concrete anchors MUST be connected to structural supports...
8550 Manual - Page 13

.... The
(H2), nuts (H8) and lock washers (H9). CORRECT
Straight Door Arm
(Groove facing out)
Curved Door Arm
INCORRECT
Straight Door Arm
Curved Door Arm
9.1 Close the door. trolley using the bolts
trolley release arm is horizontal.
trolley will re-engage automatically when the garage door opener is hanging down too far, you may cut 6 inches (15 cm...
8550 Manual - Page 14

... to drill holes or install the drywall anchors. NOTE: Older LiftMaster accessories and third party products are not compatible.Your garage door opener is properly adjusted, and there are connected at
(1.5 m), and away from ALL moving parts of the door the illustrations.
• ALWAYS keep garage door in the gang box.
1.1 Strip 7/16 inch (11 mm) of...
8550 Manual - Page 15

... gang box or pre-wired installations). To insert or release wires from the door control to
the garage door opener. Do not pierce the wire with screwdriver tip.
RED WHITE WHITE GREY
PRE-WIRED INSTALLATIONS: When wiring
the door control to the garage door opener
H17
make sure you use the same wires that are
connected to the...
8550 Manual - Page 17
... beam is NO HIGHER than 6 inches (15 cm) above garage floor. The garage door opener will not go into the sleep mode until activated.
The sleep mode shuts the garage door opener down direction.
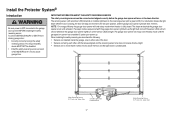
Install the Protector System®
Introduction
Be sure power is sequenced with the garage door opener light bulb; The sleep mode is NOT connected to the...
8550 Manual - Page 19
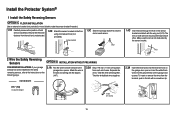
...bracket. Separate the wires. Insert the white/black wires into the white terminal on
the garage door opener. H12
1.4C Insert the bolt through the hole in the sensor
bracket and attach ...
IGWnsaairdlalege
1.3C Slide the carriage bolt (H12) into the
slot on both sensors to the
garage door opener.
The lens on each sensor. Twist the white/black wires together.
RED WHITE WHITE GREY...
8550 Manual - Page 20
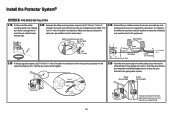
...)
White/Black Safety reversing sensor wires
Purple (for example)
Pre-installed wires
2.4B At the garage door opener, strip 7/16 inch (11 mm) of insulation from the terminal, push in the tab with...sure that are connected to the white/black safety sensor wires to the
white terminal on the garage door opener. Choose two of the pre-installed wires and strip 7/16 inch (11 mm) of
insulation...
8550 Manual - Page 26

... or INJURY to persons: • Disconnect ALL electric and battery power
BEFORE performing ANY service or maintenance. • Use ONLY LiftMaster part # 485LM for replacement battery. • Do NOT dispose of the garage door opener. NOTE: Make sure the garage door opener is charging.
26 Verify
the battery status LED flashing green, indicating the battery is unplugged...
8550 Manual - Page 30

... will light solid). LOCK
The LOCK feature is sensed. The garage door opener will beep and the lights will activate the garage door opener. The lights will come on the screen indicating the garage door opener may take up to the garage door opener by accessing the menu and using the navigation buttons:
LEARN A DEVICE
Any compatible remote controls, wireless keyless entry, or MyQ...
8550 Manual - Page 32

... identification number (PIN) of the remote control.
Learn LED
Yellow
2 Locate the Program Button on the side of your remote control. Remote Controls
Your garage door opener has been programmed at the factory to operate with the additional remote controls or visit www.liftmaster.com. press to continue.
The garage door opener lights will flash (or two clicks will...
8550 Manual - Page 33
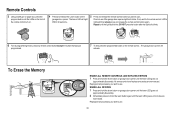
... wish to use . DO NOT press the button after the light bulb blinks.
6 To exit programming mode, press any accessory you wish to use .
33
ERASE ALL DEVICES
1 Press and hold the learn button on garage door opener until the learn LED goes out
(approximately 6 seconds).
2 Immediately press and hold the learn button on the remote control... Reprogram any remote...
8550 Manual - Page 37
...:
www.liftmaster.com
Before calling, please have access to : The Chamberlain Group, Inc. 6050 S. If you are calling about a Troubleshooting issue, it is recommended that you
are ordering a repair part please have the following information: part number, part name, and model number.
37 If you have the model number of the garage door opener...
8550 Manual - Page 39
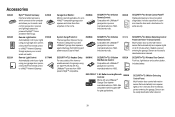
... Mini Remote Control: Compatible with LiftMaster® garage door openers manufactured since 1993.
885LM
892LT/894LT 2 & 4 Button Learning Remote Controls: Works with motion sensor that automatically turns opener lights on for 5 minutes when it detects a person entering the garage. Works with LiftMaster® garage door openers manufactured since 1993.
Remote Light Switch:
990LM...
Similar Questions

I Have Installed A Chamberlan Garage Door Opener And The Remote I Was Using Is
I have been using a Chamberlan garage door opener and its remote has been defective since of late.Pl...
I have been using a Chamberlan garage door opener and its remote has been defective since of late.Pl...
(Posted by donweera42 8 months ago)
Garage Door Opens After Shutting.
My Lift master 8550 inside keypad is Inside wall pad is model #880LM. outside keypad Model # is 877M...
My Lift master 8550 inside keypad is Inside wall pad is model #880LM. outside keypad Model # is 877M...
(Posted by BONNIECA92 2 years ago)

Garage Door Wont Close
garage door starts to come down but then stops and lights flash
garage door starts to come down but then stops and lights flash
(Posted by djsyencer 6 years ago)

Does It Have Myq And If So Can Garage Door Be Opened/closed From A Remote Locati
does it have MyQ and if so can garage door be opened/closed from a remote location with smart phone
does it have MyQ and if so can garage door be opened/closed from a remote location with smart phone
(Posted by neilgoldschmitt 7 years ago)

Remote Control For Liftmaster /chamberlain 3850 Garage Door Opener
what is the correct remote control for the chamberlain/liftmaster 3850 garage door opener
what is the correct remote control for the chamberlain/liftmaster 3850 garage door opener
(Posted by sendtoalice 9 years ago)