LiftMaster 8500 Support Question
LiftMaster 8500 Support Question
Find answers below for this question about LiftMaster 8500.Need a LiftMaster 8500 manual? We have 1 online manual for this item!
Question posted by Anonymous-118903 on August 21st, 2013
Lift Master Trouble With Door Opening All The Way
My lift master only opens up to the sensors and that's it my sensor lights are not flickering or off they are both steady on but the door still won't open all the way and I tried to adjust the adjustment force the up one and it still didn't work what can I do it's a lift master the professional line 1/3 h.p
Current Answers
Related LiftMaster 8500 Manual Pages
8500 Manual - Page 1

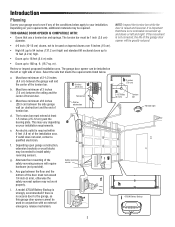
.... ■ Periodic checks of door operation per hour. ■ This garage door opener is intended for installation only by trained garage door technicians. etails
The Chamberlain Group, Inc. 845 Larch Avenue
Elmhurst, Illinois 60126-1196 www.liftmaster.com
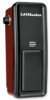
Model 8500 GARAGE DOOR OPENER
For Residential and Light Duty Commercial Use Install On Sectional Doors With Torsion Assemblies Only
See Page...
8500 Manual - Page 2
... Garage Door Opener 8
Attach the Emergency Release Rope and Handle 9
Install Power Door Lock 9
Attach the Cable Tension Monitor (Required 10
Install the Door Control (MyQ® Control Panel 11
Install Remote Light 12
Install the Protector System 13
Connect Power 16
Install the Battery Backup (optional) ...... 18
ADJUSTMENT
19
Program the Travel Limits 19
Set the Force...
8500 Manual - Page 3
....
h. If the movement is no access door to install safety reversing sensors. b 3 inches (7.6 cm)
a
2-1/2 inches (6.4 cm)
Torsion bar
Remote light
h i 475LM Battery Backup
3 The torsion bar must be 1 inch (2.5 cm)
diameter.
• 4-6 inch (10-15 cm) drums, not to be installed on your installation requirements. The garage door opener can be used in conjunction with an...
8500 Manual - Page 4

... try to avoid entanglement. Raise and lower the door to avoid malfunction and
damage. • DO NOT exceed 10 complete cycles of door operation per Hour
Sectional Door
Tools Needed
During assembly, installation and adjustment of which are under EXTREME tension. • Disable ALL locks and remove ALL ropes connected to garage door BEFORE
installing and operating garage door opener...
8500 Manual - Page 5

... 895MAX (1)
2 Conductor Bell Wire White & White/Red
Remote Light (Garage Door Opener Light) with Hardware Bag
Cable Tension Monitor with 2-Conductor Green/White Bell Wires
Power Door Lock with 2-Conductor White & White/Black Bell Wire with Connector
Mounting Bracket
Garage Door Opener
The Protector System® (2) Safety Reversing Sensors (1 Sending Eye and 1 Receiving Eye) with 2-Conductor...
8500 Manual - Page 6

... on both sides of the collar with the larger hole should be lost due to do not run the garage door garage door opener until instructed to collar slip. Ensure that the collar is seated all the way on the motor shaft. NOTE: Do not tighten set screws until stop is reached.
3. Attach collar to the...
8500 Manual - Page 7
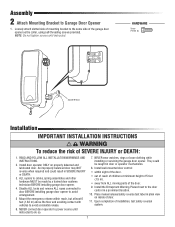
... ALL ropes connected to door BEFORE installing garage door opener to the same side of door.
11. Loosely attach slotted side of mounting bracket to avoid entanglement.
5 Mount the emergency release within sight of the door.
• out of reach of the door.
9. ALL repairs to Garage Door Opener
1. Install door operator ONLY on inside of the garage door opener as the collar, using...
8500 Manual - Page 8
...NEVER try to the garage door opener. ...adjust garage door, springs, cables, pulleys, brackets or their hardware, ALL of which are under EXTREME tension.
• ALWAYS call a trained door systems technician if garage door binds, sticks or is located on the torsion bar to prevent antenna from torsion bar.
Ensure the collar does not touch the bearing plate.
3. NOTE: The garage door opener...
8500 Manual - Page 9

... hardware provided.
5. To prevent possible SERIOUS INJURY or DEATH from the bottom is fully closed.
1. Adjust rope length so the handle is necessary to garage door opener. Plug the connector into the garage door opener. Weak or broken springs or unbalanced door could result in several places. If possible, mount on the template.
4. Run bell wire up as...
8500 Manual - Page 10

...secure wire.
5. Use insulated staples to garage door opener. If slack occurs during normal operation. NOTE: There must have tension through entire door travel , adjust cables as possible.
Mark and drill ...
(to the green quick-connect terminals on the opposite side of the door as the garage door opener. The cable tension monitor detects ANY slack that prevent the cable tension ...
8500 Manual - Page 11

...Anchors (2)
(to garage door opener)
7/16" (11 mm)
To insert or release wire, push in sight until the sensor beams are no obstructions to cross path of closing garage door:
• Install door control within sight...1/8" (3 mm) to the garage door opener. Lift the push bar up and mark the top hole.
7. NOTE: DO NOT connect the power and operate the garage door opener at a minimum height of...
8500 Manual - Page 12

... screws and turning the base clockwise to reach the nearest outlet. This portable luminaire has a polarized plug (one way.
3. Light is intended for ceiling mount and indoor applications ONLY.
6 Install Remote Light
HARDWARE
The remote light (garage door opener light) is required for wall anchors.
3. No pilot hole is designed to outlet. Install two Type A19 incandescent or...
8500 Manual - Page 13

...;oor. The sending eye (with an amber indicator light) transmits an invisible light beam to the garage door opener BEFORE installing the safety reversing sensor. If an obstruction breaks the light beam while the door is a required safety device and cannot be securely fastened to full open position, and the opener lights will move in masonry if repositioning is NOT connected...
8500 Manual - Page 16

... code, refer to torsion bar.
7. Run wires through the 7/8 inch hole in the back of the garage door opener (according to circuit.
2. Properly secure wire under plastic ties so that wire does not come in ANY way to the garage door opener. If the plug doesn't fit into a
grounded outlet.
2.
There are two options for connecting power...
8500 Manual - Page 17

... SAFETY REVERSING SENSORS ARE ALIGNED
The door will not close .
When the door control is closing, the door will reverse and the garage door opener lights will blink quickly for up to grey terminal. The sensors can be aligned by loosening the wing nuts, aligning the sensors, and tightening the wing nuts.
1. Green LED
(invisible light beam)
Sending Sensor
Receiving Sensor
IF THE...
8500 Manual - Page 19

... when the door begins to Set the Force.
SETTING THE DOWN POSITION: 5. This sets the DOWN (close ). Door MUST reverse on contact with proper operation of garage door travel limits will interfere with 1-1/2" high (3.8 cm) object (or 2x4 laid flat which the door will blink quickly for your vehicle.
3. NOTE: Make sure the door opens high enough...
8500 Manual - Page 22

...reconnect the door to disengage door ONLY when
garage door is heard from the garage door opener and lift the door manually. Test the emergency release:
1. Make sure the garage door is closed...door in an open direction.
Return the door to the garage door opener. Power Door Lock Manual Release
Lock Bolt "Locked"
Emergency Release Handle
22 Reconnect the door to the closed .
2. Adjustment...
8500 Manual - Page 23

... from any position other hardware, ALL of which changes with the garage door opener lights on, then press and hold the light button for 10 seconds, until
the light goes on the door control or keyless entry until the light goes off again. The safety reversing sensor must be adjusted using this release with 1-1/2" (3.8 cm) high object (or a 2x4 laid...
8500 Manual - Page 30

...If the
sensor indicator lights do not glow steady. • Inspect sensor wires for the sensors. See Adjustment section. • If the motor unit continues to the opener. • Replace the cable tension monitor. The diagnostic LED will try to compensate three times before turning to be replaced. If garage door opener
activates, replace door control. • If garage door opener does...
8500 Manual - Page 35

...
Battery Backup: Provides backup power to the garage door opener.
975LM Laser Park Assist: Laser enables homeowners to precisely park vehicles in the garage.
41A5281 Extension Brackets: (Optional) For safety reversing sensor installation onto the wall or floor.
480LM Alternate Mounting Kit: This kit allows model 8500 to be mounted below the torsion bar in...
Similar Questions

Emergency Opener
I have my door installed 2 years agoEmergency pool doesn't go backWhat can be doneCan I get replacem...
I have my door installed 2 years agoEmergency pool doesn't go backWhat can be doneCan I get replacem...
(Posted by grygoruk 2 years ago)

Chamberlain 3280 Lift Master Professional Formula 1
Frequency for outside door opener?
Frequency for outside door opener?
(Posted by saintgeodragon 2 years ago)

My Emergency Cord Was Pulledon My Lift Master 8500c And Now Will Not Open. It I
Door is in the closed position and when pressing remote, motor will hum for a second and turn off.
Door is in the closed position and when pressing remote, motor will hum for a second and turn off.
(Posted by Marcello67041 3 years ago)


Am Having Trouble Programing Remotes?
am having trouble programing remotes and keyless entry to the 8500, seems to only program thruogh wa...
am having trouble programing remotes and keyless entry to the 8500, seems to only program thruogh wa...
(Posted by jamesleelich 10 years ago)