LiftMaster 8500 Support Question
LiftMaster 8500 Support Question
Find answers below for this question about LiftMaster 8500.Need a LiftMaster 8500 manual? We have 1 online manual for this item!
Question posted by Marcello67041 on April 25th, 2021
My Emergency Cord Was Pulledon My Lift Master 8500c And Now Will Not Open. It I
Door is in the closed position and when pressing remote, motor will hum for a second and turn off.
Current Answers
Answer #1: Posted by Troubleshooter101 on April 26th, 2021 4:55 AM
Troubleshooter101

Member since:
September 30th, 2015 Points: 2,927,030

Member since:
September 30th, 2015 Points: 2,927,030
Please reset it
https://www.garagedoorspokane.com/how-to-reset-garage-door
Thanks
How to Release and Reset the Emergency Cord on a Garage Door
- Door Must Be in Down Position. ...
- Pull the Emergency Release Cord. ...
- Manually Move the Garage Door and Return to Down Position. ...
- Pull the Emergency Release Cord Toward the Door. ...
- Re-connect the Trolley to the Opener Carriage.
https://www.garagedoorspokane.com/how-to-reset-garage-door
Thanks
Please respond to my effort to provide you with the best possible solution by using the "Acceptable Solution" and/or the "Helpful" buttons when the answer has proven to be helpful. Please feel free to submit further info for your question, if a solution was not provided. I appreciate the opportunity to serve you!
Troublshooter101
Related LiftMaster 8500 Manual Pages
8500 Manual - Page 1

...! ■ Fasten the manual near the garage door after installation. ■ The door WILL NOT CLOSE unless the Protector System® and cable tension monitor are
connected and properly aligned. ■ Periodic checks of door operation per hour. ■ This garage door opener is not intended for installation only by trained garage door technicians. This product may require adjustments to...
8500 Manual - Page 2
...
6
Attach the Collar to the Garage Door Opener 6
Attach Mounting Bracket to Garage Door Opener 7
INSTALLATION
7
Position and Mount the Garage Door Opener 8
Attach the Emergency Release Rope and Handle 9
Install Power Door Lock 9
Attach the Cable Tension Monitor (Required 10
Install the Door Control (MyQ® Control Panel 11
Install Remote Light 12
Install the Protector System...
8500 Manual - Page 3
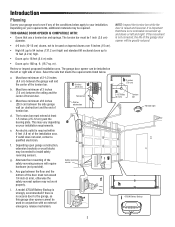
... that there is no access door to the garage, as this garage door opener cannot be required. The garage door opener can be needed to install safety reversing sensors.
c. ft. (16.7 sq. d. Any gap between the garage wall and the center of the torsion bar. b 3 inches (7.6 cm)
a
2-1/2 inches (6.4 cm)
Torsion bar
Remote light
h i 475LM Battery Backup
3 f. e. Introduction...
8500 Manual - Page 4

... connected to garage door BEFORE
installing and operating garage door opener to loosen, move or adjust garage door, door springs, cables, pulleys,
brackets or their hardware, ALL of door. An unbalanced garage door may NOT ... place, supported entirely by its springs.
2.
Lift the door halfway up. Raise and lower the door to make sure the garage door is balanced and is not sticking or binding:...
8500 Manual - Page 5

... Control Model 895MAX (1)
2 Conductor Bell Wire White & White/Red
Remote Light (Garage Door Opener Light) with Hardware Bag
Cable Tension Monitor with 2-Conductor Green/White Bell Wires
Power Door Lock with 2-Conductor White & White/Black Bell Wire with Connector
Mounting Bracket
Garage Door Opener
The Protector System® (2) Safety Reversing Sensors (1 Sending Eye and 1 Receiving Eye...
8500 Manual - Page 6

...door (see PLANNING section page 3). NOTE: Do not tighten set screws until stop is seated all the way on motor shaft until indicated.
Ensure that the collar is reached.
3. Position... to the Garage Door Opener
To avoid installation difficulties, do not run the garage door garage door opener until instructed to the garage door opener motor shaft. The garage door opener can be ...
8500 Manual - Page 7
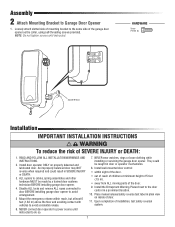
... or DEATH:
1. READ AND FOLLOW ALL INSTALLATION WARNINGS AND INSTRUCTIONS.
2. Disable ALL locks and remove ALL ropes connected to door BEFORE installing garage door opener to avoid entanglement.
5 Mount the emergency release within sight of the door.
• out of reach of children at least 6 feet (1.83 m) above the floor and avoiding contact with vehicles...
8500 Manual - Page 8
... Screws
3/16" Hex Key Wrench
Mounting Bracket
Screws 14-10x1-7/8"
8 Use a level to the accessories page.
1. Installation
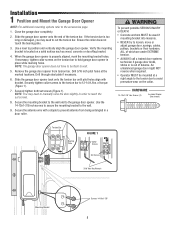
1 Position and Mount the Garage Door Opener
NOTE: For additional mounting options refer to position and vertically align the garage door opener. NOTE: The garage door opener does not have to be mounted at the marked locations. Use the 14-10x1-7/8 inch screws to...
8500 Manual - Page 9

... opened once the door is fully closed.
1. Fasten power door lock to prevent unraveling.
Thread the other end of the rope through the bottom of garage door opener with an overhand knot at least 1 inch (2.5 cm) from a falling garage door:
• If possible, use emergency release handle unless garage doorway is clean and attach lock template to disengage door ONLY when garage door...
8500 Manual - Page 11

... the end of the wire near the garage door opener. To prevent possible SERIOUS INJURY or DEATH from a closing garage door. Position the bottom hole of the door control over the screw and slide down... of door.
• NEVER permit children to operate or play with door control push buttons or remote control transmitters.
• Activate door ONLY when it is needed, the wireless door control ...
8500 Manual - Page 12

... mount and indoor applications ONLY.
6 Install Remote Light
HARDWARE
The remote light (garage door opener light) is wider than 100W. • ONLY use bulbs larger than the other end to mount the light within 6 feet (1.8 m) of electric shock.
2. NOTE: If installing light on the top side of power cord needed to lock the light in place...
8500 Manual - Page 16

... doesn't fit into the outlet you would like to use an extension cord, 2-wire adapter or change plug in the back of the garage door opener (according to the garage door opener. There are two options for connecting power:
OPTION A: TYPICAL WIRING 1.
Remove the garage door opener from the garage door opener.
6. Attach with a third grounding pin. Run wires through the 7/8 inch hole...
8500 Manual - Page 18
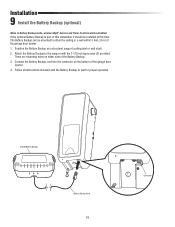
Position the Battery Backup on the bottom of this time. Connect the Battery Backup cord into the connector on a structural support (ceiling joist or wall stud).
2. If the optional Battery Backup is part of the garage door opener.
4. Follow all instructions included with the 1-1/2 inch lag screws (2) provided. Installation
9 Install the Battery Backup (optional)
When in...
8500 Manual - Page 22

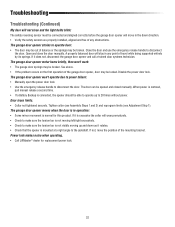
... a click noise is CLOSED. Return the door to the closed position, the power door lock should retract before proceeding. Pull the emergency handle a second time.
5. Reconnect the door to move.
3. Power Door Lock Manual Release
Lock Bolt "Locked"
Emergency Release Handle
22
To prevent possible SERIOUS INJURY or DEATH from the garage door opener and lift the door manually. Weak or...
8500 Manual - Page 23

... seen clearly, it can monitor and control your garage door from any position other hardware, ALL of which changes with your garage, even when the power is activated the door will also turn on , then press and hold the light button for 10 seconds until the door is fully closed and the garage door opener is out. Safety reversal system MUST be...
8500 Manual - Page 30

... with self-diagnostic capabilities. SYMPTOM: Door stops and reverses while closing . • Reprogram limits and forces. Troubleshooting
Diagnostic Chart
Your garage door opener is firmly secured to wall and does not move. SYMPTOM: No movement, motor runs 2-3 seconds. • Reconnect the emergency release. • Motor may need reprogramming 12 FLASHES Attempting...
8500 Manual - Page 31

... command LED does not turn on page 7. • Is there a build-up to 5 minutes to a metal door, foil backed insulation, or metal garage siding. Remove any ice or snow from either the Door Control or the remote control: • Does the garage door opener have shorter range due to become operational. The door opens but won't close: • Check cable tension...
8500 Manual - Page 32
... and free of the garage door opener, door may be locked. The garage door opener motor hums briefly, then won 't operate due to power failure: • Manually open the power door lock. • Use the emergency release handle to 20 times without power. Disable the power door lock. If it does not, disconnect the garage door opener and call a trained door systems technician. A properly...
8500 Manual - Page 33
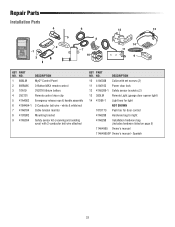
... Panel 3-Button MAX remote control 3V2016 lithium battery Remote control visor clip Emergency release rope & handle assembly 2-Conductor bell wire - white & white/red Cable tension monitor Mounting bracket Safety sensor kit (receiving and sending eyes) with set screws (2)
11 41A6102 Power door lock
12 41A5266-1 Safety sensor brackets (2)
13 380LM
Remote Light (garage door opener light)
14...
8500 Manual - Page 34
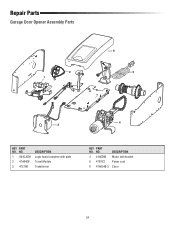
NO. 4 41A6095 5 41B122 6 41A6348-3
DESCRIPTION Motor with plate Travel Module Transformer
KEY PART NO. Repair Parts
Garage Door Opener Assembly Parts
2 1
6 5
4 3
KEY PART NO. NO. 1 041DJ002 2 41A6408 3 41C168
DESCRIPTION Logic board complete with bracket Power cord Cover
34
Similar Questions

Emergency Opener
I have my door installed 2 years agoEmergency pool doesn't go backWhat can be doneCan I get replacem...
I have my door installed 2 years agoEmergency pool doesn't go backWhat can be doneCan I get replacem...
(Posted by grygoruk 2 years ago)

How Do You Reset The Opener After The Emergency Release Cord Has Been Pulled
(Posted by Oshnfrg 10 years ago)

How To Remove The Battery From A Lift Master Elite Series Garage Door Opener
(Posted by djamissy 10 years ago)

Where To Buy 485lm Battery For Lift Master Elite Series Garage Door Opener
(Posted by erjosham 10 years ago)

Lift Master Trouble With Door Opening All The Way
My lift master only opens up to the sensors and that's it my sensor lights are not flickering or off...
My lift master only opens up to the sensors and that's it my sensor lights are not flickering or off...
(Posted by Anonymous-118903 10 years ago)