Get support for LiftMaster 8355

LiftMaster 8355 Support Question

LiftMaster 8355 Support Question

Find answers below for this question about LiftMaster 8355.
Need a LiftMaster 8355 manual? We have 1 online manual for this item!
Question posted by jjdavenprt3 on July 15th, 2021

Replaced Bad Capacitor On My 8355 Still Not Working Just Hums For A Second What

The person who posted this question about this LiftMaster product did not include a detailed explanation. Please use the "Request More Information" button to the right if more details would help you to answer this question.

Current Answers

Answer #1: Posted by Odin on July 15th, 2021 5:27 PM
This answer was accepted by the poster of the original question.
Odin

Member since:
April 10th, 2010

Points: 41,236,710
1,100
points
Look for the flashing diagnostic code as interpreted starting at https://www.manualslib.com/manual/508816/Chamberlain-8355.html?page=33, and note the solution.

If the issue persists or if you require further advice, you may want to consult the company: use the contact information at https://www.contacthelp.com/liftmaster.


Hope this is useful. Please don't forget to click the Accept This Answer button if you do accept it. My aim is to provide reliable helpful answers, not just a lot of them. See https://www.helpowl.com/profile/Odin.
Answer #2: Posted by SonuKumar on July 18th, 2021 5:07 AM
SonuKumar

Member since:
May 9th, 2021

Points: 16,596,890
100
points
How do I reset my LiftMaster garage door opener?

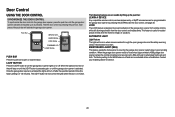
Hold the remote in one hand and press the "Learn" button on the motor near the toggle switches. The indicator light will illuminate. Press and hold the button on the remote until the light bulb on the opener blinks, indicating the opener has been reset.

How do I reset my garage door transmitter?

Erase your remote controls and keypads using the LEARN button on the garage door opener

Locate the LEARN button on the garage door opener.

Press and hold the LEARN button on the door control until the LED turns off (approximately 6 seconds).

All previous codes are now erased.

Do garage door openers have a reset button?

Most newer garage door openers function by learning the frequency of the handheld openers. To reset the system, you will need to first locate the button on the motor that reads "Learn" or "Home." In many cases, this button is located on the same side as the device's antenna and next to an LED.

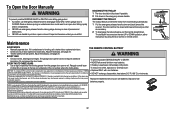
How do I reset my garage door opener manually?

Below are some simple instructions so you know exactly how to quickly reset your garage door.

Door Must Be in Down Position. ...

Pull the Emergency Release Cord. ...

Manually Move the Garage Door and Return to Down Position. ...

Pull the Emergency Release Cord Toward the Door. ...

Re-connect the Trolley to the Opener Carriage.


Please respond to my effort to provide you with the best possible solution by using the "Acceptable Solution" and/or the "Helpful" buttons when the answer has proven to be helpful.

Regards,
Sonu
Your search handyman for all e-support needs!!

Related LiftMaster 8355 Manual Pages

8355 Manual - Page 1

... feature* when the garage door opener is installed on a sectional door. (*Not available on all models) NOTE: If you are installing the garage door opener on a one-piece door, visit www.liftmaster.com for future reference: Serial Number: . Write down the following information for installation instructions. PREMIUM Series Belt Drive Garage Door Opener Model 8355 - 1/2 hp FOR RESIDENTIAL...
8355 Manual - Page 2

The hazard may not work properly. 5. Read the warnings carefully. Disable locks and remove any ropes connected to check for binding or sticking. If your garage door and/or the garage door opener if you do not comply with the instructions and warnings contained in this Signal Word on the bottom of balance. The opener should stay in...
8355 Manual - Page 3

... Lock Washer 5/16" (4) Self-Threading Screw 1/4"-14 x 5/8" (2) Ring Fastener (3) Carriage Bolt 1/4"-20 x 1/2" (2) Wing Nut 1/4"-20 (2) Door Control Hardware Screw 6AB x 1" (2) Screw 6-32 x 1" (2) Drywall Anchors (2) Insulated Staples 3 Depending on the garage door opener model purchased. Curved door arm E. White and red/white wire N. The instructions for reference and your product may be...
8355 Manual - Page 4

... with the sprocket cover) 4 Washered Bolt 5/16"-18x1/2" Hex Screw #8x3/8" Lock Nut Place the garage door opener on the packing material to garage door opener, use the bolts removed from the garage door opener. Cut the tape from the top of the garage door opener. 1.2 Align the rail and the styrofoam over the garage door opener sprocket and attach with the previously removed bolts.
8355 Manual - Page 6

... NOT enable the Timer-to avoid entanglement. 5. Disable ALL locks and remove ALL ropes connected to garage door BEFORE installing opener to -Close functionality if operating either one -piece door, visit www.liftmaster.com for installation instructions. 6 Install garage door opener ONLY on wall next to do so. 8. Place entrapment warning label on properly balanced and lubricated...
8355 Manual - Page 7

... required. • DO NOT enable the Timer-to-Close functionality if operating either one -piece door, visit www.liftmaster.com for installation instructions. 1.1 Close the door and mark the inside vertical centerline of which are installing the garage door opener on wall or ceiling), use the maximum height possible, or refer to page 8 for the...
8355 Manual - Page 9

..., pull the trolley release arm down to disconnect the inner and outer trolley. 3 Attach the rail to garage door, rest garage door opener rail on 2x4 placed on top section of door. 4.1 Remove the packing material and lift the garage door opener onto a ladder. The trolley can remain disconnected until instructed. Connected Disconnected 9 Secure with the header bracket. NOTE...
8355 Manual - Page 10

.... NOTE: DO NOT connect power to provide rigid support. Hanging brackets should be angled (Figure 1) to opener at this time. Instructions below are for attaching the garage door opener directly to structural supports. 5.1 Measure the distance from a falling garage door opener, fasten it SECURELY to structural supports of each side of the motor unit to the structural...
8355 Manual - Page 13

... Slide the outer trolley back (away from the ring fastener. trolley using the trolley release arm is activated. Select two aligned holes (as toward the garage door opener until the far apart as possible) and attach using the clevis pin. Select two aligned holes (as far apart as possible) and attach using the...
8355 Manual - Page 14

... gang box. 1.1 Strip 7/16 inch (11 mm) of insulation from 1.2 Connect one wire to 2 Smart Control Panels or 4 of the door the illustrations. closing garage door: and third party products are connected at the garage door opener in a later step. 1.4 Install the bottom screw, allowing 1/8 inch (3 mm) to connect, note which wires are used so the...
8355 Manual - Page 15

... mm) of insulation from the wall and drill a 5/32 inch (4 mm) hole for the top screw. 1.8 Position the bottom hole of the wire near the garage door opener. 7/16" (11 mm) 2.3 Connect the wire to the wall and ceiling with the staples (not applicable for gang box or pre-wired installations). Attach the...
8355 Manual - Page 17

... sunlight. • Sensors are no more than 6" (15 cm) above the floor and the light beam is unobstructed. The sleep mode shuts the garage door opener down direction. The garage door opener will flash 10 times. IMPORTANT INFORMATION ABOUT THE SAFETY REVERSING SENSORS The safety reversing sensors must be disabled. • Install the safety reversing sensor...
8355 Manual - Page 19

...Twist the white/black wires together. 2.3A Insert the white wires into the white terminal on the garage door opener. RED WHITE WHITE GREY Insulated Staple (Not shown) 7/16" (11 mm) 19 Wing Nut ...(not provided) IGWnsaairdlalege 1.3C Slide the carriage bolt into the grey terminal on the garage door opener. Attach the wire to sensors, see page 20. To insert or remove the wires...
8355 Manual - Page 28

... of the garage door opener from remote controls while still allowing activation from the door control and keyless entry. When the garage door opener needs to be activated at time of time (the factory setting is in good working condition. LOCK The LOCK feature is designed to 3 presses). Once the garage door opener is activated the lights will activate the garage door opener. vacation...
8355 Manual - Page 29

... Panel Setup LOCK NOTE: Your remote controls will NOT work when LOCK mode is active however your keyless entry will still allow access to be deactivated. Active is 2 flashes and deactivated is Active) Deactivate: Press and hold the LOCK button until the garage door opener lights turn on, then off , then on 1 1 1/2 Minutes 2 2 1/2 Minutes...
8355 Manual - Page 32

The garage door opener does not require additional lubrication. of the rail surface where the trolley slides. THERE • Replace ONLY with FCC and/orIndustry Canada (IC) rules, adjustment or modificationsof thistransceiver are prohibited. Any changes or modifications not expresslyapproved by using the door control or remote control. AVIS: Lesrèglesde la FCC et/ou...
8355 Manual - Page 33

... Arrow Flash(es) 1 1 1 2 1 3 1 4 1 5 1 6 2 1-5 3 2 SYMPTOM SOLUTION The garage door opener will not close and the light bulbs flash. Manually open and close and the light bulbs flash. The garage door opener will not function. The UP and DOWN arrows on the door that would interrupt the sensors path while closing. Opener hums for proper assembly, replace if necessary. 33
8355 Manual - Page 34

... CODE Up Arrow Flash(es) Down Arrow Flash(es) 4 1-4 4 5 4 6 SYMPTOM SOLUTION Door is set the time properly. Communication error to page 24 ). Manually open : The garage door opener is working properly. My door will not close the door. Visit www.homelink.com for several reasons: • Garage door opener has been activated through a device or feature such as needed...
8355 Manual - Page 35

... 1993. 886LM 892LT/894LT 2 & 4 Button Learning Remote Controls: Compatible with LiftMaster® garage door openers manufactured since 1993. SECURITY✚ 2.0™ compatible. Garage and Gate Monitor: Monitor open and close them from anywhere in the garage. Works with Encrypted DIP for gate applications. Accessories 828LM LiftMaster® Internet Gateway: Internet...
8355 Manual - Page 38

...number, part name, and model number. © 2012, The Chamberlain Group, Inc. MODEL 8355 4 3 15 14 6 7 13 114A4419E 1 2 10 8 11 5 9 6 7... Line Cord 5 Front End Panel 6 Light Socket 7 Light Lens 8 Capacitor 9 Capacitor Bracket 10 Terminal Block 11 Motor 12 Travel Module 13 Cover 14 Logic...Information Address repair parts order to your garage door opener while calling. Country Club Rd. Tucson...

Similar Questions

Ask a New Question
Use the box below to post a new question about this LiftMaster product .
Points & Prizes
  • You can earn points for nearly everything you do on HelpOwl.com
  • You can trade in those points for gift cards at leading retailers such as Amazon.com and Walmart
  • It's that simple!
See How it Works
Create a Free Account

LiftMaster Manuals

Find free LiftMaster 8355 manuals and user guides available at ManualOwl.com. Try out our unique manual viewer allowing you to interact with manuals from directly within your browser!

LiftMaster Reviews

View thousands of LiftMaster user reviews and customer ratings available at ReviewOwl.com.

Contact Information

Complete LiftMaster customer service contact information including steps to reach representatives, hours of operation, customer support links and more from ContactHelp.com.

Scoreboard Ratings

See detailed LiftMaster customer service rankings, employee comments and much more from our sister site.