
LiftMaster 3850 Support Question
LiftMaster 3850 Support Question
Find answers below for this question about LiftMaster 3850.Need a LiftMaster 3850 manual? We have 1 online manual for this item!
Question posted by 191775 on August 7th, 2012
Liftmaster 3850 'alarm' Beeping
Liftmaster 3850 'alarm' Beeping
Current Answers
Related LiftMaster 3850 Manual Pages
3850 Elite Series Manual - Page 1

...;
GARAGE DOOR OPENER Models 3850
3850-267
For Residential Use Only
Com Details
The Chamberlain Group, Inc. 845 Larch Avenue Elmhurst, Illinois 60126-1196 www.liftmaster.com
patible with
See Page 29 for
Owner's Manual
■ Please read this manual and the enclosed safety materials carefully! ■ Fasten the manual near the garage door after installation. ■ The door...
3850 Elite Series Manual - Page 2

... Set the force 24 Test the safety reversal system 25 Test the Protector System 25
Operation
26-33
Operation safety instructions 26
Using garage door opener 26
Using the wall-mounted door control 27
Using the remote control 28
Troubleshooting 28
The remote control battery 28
EverCharge® Standby Power System (optional 29
To...
3850 Elite Series Manual - Page 3

... ALL ropes connected to garage door BEFORE installing and operating garage door opener to avoid entanglement. Lift the door about halfway as illustrated below. Raise and lower the door to loosen, move or adjust garage door, door springs, cables, pulleys, brackets or their hardware, ALL of the opener, instructions will call a trained door systems technician if garage door binds, sticks, or...
3850 Elite Series Manual - Page 5

...parts illustrated below . LOCK
LIGHT
SLmCaDrtMCootniotrnolDPeatencetli®ng Door Control Console
SECURITY✚® 3-Button Remote Control
Models 3850 (1) 3850-267 (2)
SECURITY✚® Keyless Entry Model 3850-267 (1) ONLY
Motor Unit with Light Lenses
2-... purchased.
If anything is also listed below . Carton Inventory
Your garage door opener is packaged in the foam.
3850 Elite Series Manual - Page 6

...STEP 1 Attach the Rail to the Motor Unit
To avoid installation difficulties, do not run the garage door opener until instructed to do so. • Remove the two washered bolts mounted on top of motor... over the motor unit belt pulley. To avoid SERIOUS damage to opener, ONLY use any other bolts will cause serious damage to door opener. • Position belt over belt pulley. Rotate about 1/4 turn...
3850 Elite Series Manual - Page 7

... on wall next to fingers from electrocution, disconnect ALL electric and battery power BEFORE performing ANY service or maintenance.
7 You have now finished assembling your garage door opener. Please read the following warnings before proceeding to do so.
8. Place entrapment warning label on inside of SEVERE INJURY or DEATH:
1. ASSEMBLY STEP 3 Attach the...
3850 Elite Series Manual - Page 11

... ceiling. Slide the outer trolley toward the motor unit. Do not position the opener more than 4" (10 cm) above this point. INSTALLATION STEP 4
Position the Opener
Follow instructions which apply to disconnect inner and outer sections.
To prevent damage to garage door, rest garage door opener rail on 2x4 placed on the trolley release arm to your...
3850 Elite Series Manual - Page 12

... CEILING
(Not Provided) Bolt 5/16"-18x7/8" Lock Washer 5/16" Nut 5/16"-18
12 This bracket and fastening hardware are shown. Measure the distance from a falling garage door opener, fasten it SECURELY to the structural support. 2. Drill 3/16" pilot holes in line
with rail grease. NOTE: DO NOT connect power to provide rigid support...
3850 Elite Series Manual - Page 13

... installations (as in new home construction), it can be mounted to each garage door opener.
CAUTION: Continuous exposure of the door control to temperatures below -22° F (-30° C) may...white/red to secure. If additional wall controls are no obstructions to operate the same garage door opener, it is connected and properly aligned.
SPECIAL NOTE: Only one end of insulation ...
3850 Elite Series Manual - Page 14

...the lens hinge is connected.
The use A19 size bulbs. To prevent damage to the opener: • DO NOT use bulbs larger than 100W. • ONLY use of short... procedure to close the lens.
• Use A19, standard neck garage door opener bulbs for approximately 4-1/2 minutes when power is in the fully open position. Use ONLY incandescent. Channel
Battery
Battery Cover
INSTALLATION STEP 8...
3850 Elite Series Manual - Page 15

... adapter, or change plug in ANY way to make a permanent connection through the hole in an open door falling rapidly and/or unexpectedly. • NEVER use handle to disengage
trolley ONLY when garage door is required by your garage door opener has a grounding type plug with an overhand knot. PERMANENT WIRING CONNECTION
Ground Tab Green Ground Screw...
3850 Elite Series Manual - Page 16

... and aligned, the sensor will detect an obstacle in the down direction. Be sure power is closing. Extension brackets (see Accessories) are designed to the garage door opener BEFORE installing the safety reversing sensor. Safety Reversing Sensor 6" (15 cm) max.
If it is NO HIGHER
than 6" (15 cm) above floor
Invisible Light Beam...
3850 Elite Series Manual - Page 24

... a properly installed safety reversal system, persons (particularly small children) could be SERIOUSLY INJURED or KILLED by a closing garage door.
• Too much force on floor. If the garage door opener cannot open and close the door fully, inspect the door to ensure that it is balanced properly and is not stopping exactly where you would like it, repeat...
3850 Elite Series Manual - Page 25
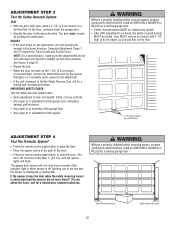
... sensors are made, the safety reversal system
MUST be SERIOUSLY INJURED or KILLED by a closing garage door. The garage door opener will flash.
NOTE: On a sectional door, make sure limit adjustments do not force the door arm beyond a straight up and down position.
Door MUST reverse on contact with 1-1/2" high (3.8 cm) object (or 2x4 laid flat) on the...
3850 Elite Series Manual - Page 26

..., spring assemblies and other control may not reverse when required and could result in a partially open , the door will close when the beam is clear of the following conditions: when the opener is CLOSED. Your opener will open garage door. Activate your garage door opener, it will operate with the safety reversing sensor correctly installed and aligned)
1. If the sensor...
3850 Elite Series Manual - Page 31

...: • Check battery connections.
8. My garage door opener beeps: • A solid LED with beep, sounding approximately every 2 seconds, indicates the motor unit is activating the door and is normal. Weather conditions in particular can affect door travel towards the door and stop bolt. • Release the door from the remote control or door control. Decrease down direction. •...
3850 Elite Series Manual - Page 32

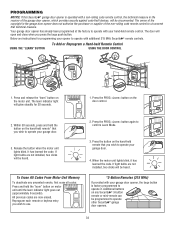
... Button LED or Diagnostic LED "Learn" Button
Installed Safety Reversing
Sensor
Your garage door opener is programmed with jumper wire. OR
2 FLASHES
Safety reversing sensors wire shorted ...or black/white wire reversed.
Consult Diagnostic Chart below.
1 FLASH
Safety reversing sensors wire open (broken or disconnected). See Adjustment section. • If the motor unit continues to...
3850 Elite Series Manual - Page 34
... MHz Security✚® remote controls. The door will glow steadily for programming your opener to operate with your garage door opener, the large button is operated with a non-rolling code remote control, the technical measure in the garage door opener does not authorize the purchaser or supplier of the garage door opener, which provides security against code-theft devices, will...
3850 Elite Series Manual - Page 35
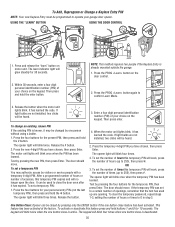
... four buttons for 10 seconds. To set the number of hours this temporary PIN will no longer open the door.
To activate or deactivate this temporary PIN expires and will work , press the number of your garage door opener.
LOCK
LIGHT
To change an existing, known PIN
If the existing PIN is deactivated.
35 Press...
3850 Elite Series Manual - Page 38

... a programmable number of your garage door is designed to protect LiftMaster® garage door openers against damage from outside by disengaging trolley.
373P
41A5281
Extension Brackets:
(Optional) For safety reversing sensor installation onto the wall or floor.
374LM
377LM
SECURITY✚® Keyless Entry :
Enables homeowner to operate garage door opener from lightning and power...
Similar Questions

I Have Installed A Chamberlan Garage Door Opener And The Remote I Was Using Is
I have been using a Chamberlan garage door opener and its remote has been defective since of late.Pl...
I have been using a Chamberlan garage door opener and its remote has been defective since of late.Pl...
(Posted by donweera42 7 months ago)
Garage Door Opens After Shutting.
My Lift master 8550 inside keypad is Inside wall pad is model #880LM. outside keypad Model # is 877M...
My Lift master 8550 inside keypad is Inside wall pad is model #880LM. outside keypad Model # is 877M...
(Posted by BONNIECA92 2 years ago)

How Do I Get A Liftmaster 3850 Garage Door Opener To Stop Beeping
(Posted by nordddste 9 years ago)

What Is Beeping Sound From Liftmaster Garage Door Opener Model 3850
(Posted by mellilc 9 years ago)

Replacing Backup Battery In Garage Door Opener.
How do I replace the backup battery in the LiftMaster 3850 garage door opener? Are there instruction...
How do I replace the backup battery in the LiftMaster 3850 garage door opener? Are there instruction...
(Posted by melindanannin 12 years ago)