Lenovo G580 Support Question
Lenovo G580 Support Question
Find answers below for this question about Lenovo G580.Need a Lenovo G580 manual? We have 1 online manual for this item!
Question posted by sachins on April 3rd, 2013
Brand New G580 Windows 7
plugged in not charging what to do?
Current Answers
Answer #1: Posted by tintinb on April 3rd, 2013 9:44 PM
tintinb

Member since:
October 26th, 2012 Points: 7,056,560

Member since:
October 26th, 2012 Points: 7,056,560
To fix the issue of plugged in not charging on your Lenovo G580 laptop, please follow the instructions provided below.
1. Drain all the battery contents of your laptop
2. Remove the battery for 10 seconds and reinstall again
3. Charge the battery until fully charged without using it or opening
4. The error should be fixed now
If you have more questions, please don't hesitate to ask here at HelpOwl. Experts here are always willing to answer your questions to the best of our knowledge and expertise.
Regards,
Tintin
Related Lenovo G580 Manual Pages
User Guide - Page 1
Lenovo G480/G485/ G580/G585/G780
User Guide V1.0
Read the safety notices and important tips in the included manuals before using your computer.
User Guide - Page 2
... in this user guide. • The illustrations used in this manual are using other Windows operating system, some operations may not apply to you. • The features described in...restrictions set forth in this manual may include features that you are using
Windows® 7.
If you are for Lenovo G580 unless otherwise stated. • The illustrations in Contract No. LIMITED AND...
User Guide - Page 6
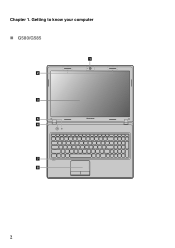
Chapter 1. Getting to know your computer
„ G580/G585
1 2 3 5 4
7 8
2
User Guide - Page 9
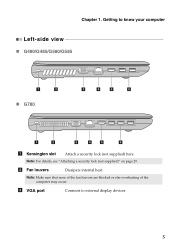
... else overheating of the computer may occur.
b Fan louvers
Dissipate internal heat.
c VGA port
Connects to know your computer
Left-side view
„ G480/G485/G580/G585
1
2
„ G780
3
4
5
6
1
2
3
4
5
6
a Kensington slot
Attach a security lock (not supplied) here.
Chapter 1. Note: For details, see "Attaching a security lock (not supplied)" on page 29...
User Guide - Page 11
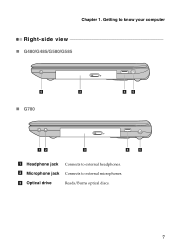
c Optical drive
Reads/Burns optical discs.
7 b Microphone jack Connects to external headphones. Getting to know your computer
Right-side view
„ G480/G485/G580/G585
6
3
„ G780
45
12
3
4
5
a Headphone jack Connects to external microphones.
Chapter 1.
User Guide - Page 13
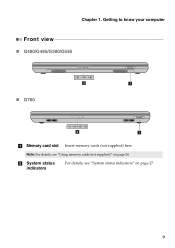
Note: For details, see "System status indicators" on page 24. Getting to know your computer
Front view
„ G480/G485/G580/G585
„ G780
2
1
2
1
a Memory card slot Insert memory cards (not supplied) here.
Chapter 1. b System status indicators
For details, see "Using memory cards (not supplied)" on page 27.
9
User Guide - Page 16

Getting to know your computer
„ G580/G585
1
2
3
5
4
5
12 Chapter 1.
User Guide - Page 22
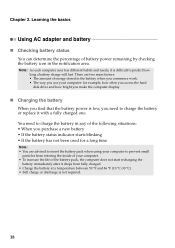
...the
battery immediately after it is not required.
18
You need to predict how long a battery charge will last. Note: As each computer user has different habits and needs, it drops from ...entering the inside of the following situations: • When you purchase a new battery • If the battery status indicator starts blinking • If the battery has not been...
User Guide - Page 25

To enable or disable the numeric keypad, press the Num Lock key.
G580/G585/G780 The keyboard has a separate numeric keypad. Chapter 2. Learning the basics
Using the keyboard
Your computer has a numeric keypad and function keys incorporated in ...
User Guide - Page 26
Learning the basics
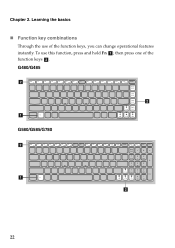
„ Function key combinations
Through the use this function, press and hold Fn a ; To use of the function keys b . Chapter 2. G480/G485 b
b a G580/G585/G780 b
a b
22 then press one of the function keys, you can change operational features instantly.
User Guide - Page 27
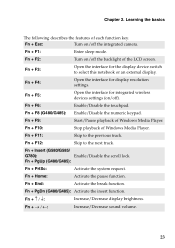
... Esc:
Turn on /off the backlight of each function key. Fn + F10:
Stop playback of Windows Media Player. Fn
Increase/Decrease sound volume.
23 Fn + F2:
Turn on/off ).
Fn ...:
Activate the system request. Chapter 2.
Fn + F6:
Enable/Disable the touchpad. Fn + Insert (G580/G585/
G780):
Enable/Disable the scroll lock. Learning the basics
The following describes the features of the...
User Guide - Page 28
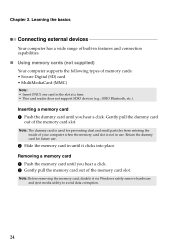
... 1 Push the dummy card until you hear a click.
Learning the basics
Connecting external devices
Your computer has a wide range of built-in until it via Windows safely remove hardware and eject media utility to avoid data corruption.
24
Removing a memory card 1 Push the memory card until you hear a click. 2 Gently pull...
User Guide - Page 30
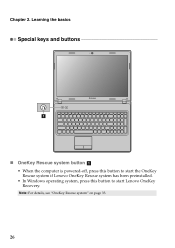
Note: For details, see "OneKey Rescue system" on page 33.
26 Chapter 2. Learning the basics
Special keys and buttons
1
„ OneKey Rescue system button a
• When the computer is powered-off, press this button to start the OneKey Rescue system if Lenovo OneKey Rescue system has been preinstalled.
• In Windows operating system, press this button to start Lenovo OneKey Recovery.
User Guide - Page 31
G480/G485/G580/G585
G780
3
4
1
1
2
3
4
5
6
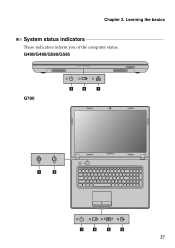
27 Chapter 2. Learning the basics
System status indicators
These indicators inform you of the computer status.
User Guide - Page 36
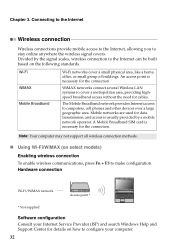
... mobile access to the Internet, allowing you to the Internet can be built based on how to configure your Internet Service Provider (ISP) and search Windows Help and Support Center for cables.
Mobile networks are used for data transmission, and access is necessary for the connection. Hardware connection
Wi-Fi/WiMAX...
User Guide - Page 39
... hibernation mode. Any other battery could ignite or explode.
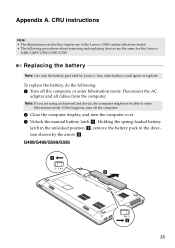
If this chapter are of the Lenovo G580, unless otherwise stated. • The following : 1 Turn off the computer.
2 Close the...this happens, turn the computer over. 3 Unlock the manual battery latch a . Appendix A.
G480/G485/G580/G585
1
3
2
35 CRU instructions
Note: • The illustrations used in the direction shown by ...
User Guide - Page 44
CRU instructions
5 Remove the frame fixing screws c . Appendix A. G480/G485/G580/G585
3 3
G780
3 3
40
User Guide - Page 45
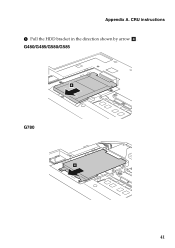
Appendix A. G480/G485/G580/G585
4
G780
4
41 CRU instructions 6 Pull the HDD bracket in the direction shown by arrow d.
User Guide - Page 46
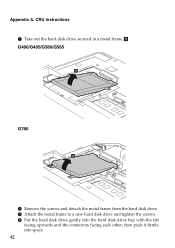
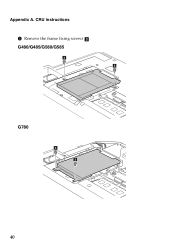
...; Appendix A. CRU instructions 7 Take out the hard disk drive secured in a metal frame e. G480/G485/G580/G585
5
G780
5
8 Remove the screws and detach the metal frame from the hard disk drive. 9 Attach the metal frame to a new hard disk drive and tighten the screws. 0 Put the hard disk drive gently into space...
User Guide - Page 54

Appendix A. CRU instructions
Removing the optical drive
To remove the optical drive, do the following: G480/G485/G580/G585 1 Remove the Hard disk drive/Memory/Central processing unit/Mini PCI
Express Card slot compartment cover. 2 Remove the screw shown in the illustration a . 3 Gently pull the optical drive out b .
1 2
50
Similar Questions


Bluetooth File Transfer Won't Work In Lenovo G580 Windows 8
(Posted by fnardSPCom 10 years ago)

Audiobox Usb From Presonus Dont Work On My Lenovo G580 Windows 8 64 Bit.
the pc dont recognize the audiobox usb cable and dont execute the installation cd
the pc dont recognize the audiobox usb cable and dont execute the installation cd
(Posted by Anonymous-129034 10 years ago)

How To Disable To Mouse Pad On A Lenovo G580 Windows 8 Laptop
(Posted by stmarn 10 years ago)

Brand New Unit Powers On, But Won't Go Past The Language And Time Zone Screen
New unit . Can't get past the language and time zone screen. Did I get a dud??
New unit . Can't get past the language and time zone screen. Did I get a dud??
(Posted by olfart65 11 years ago)