Lenovo G575 Support Question
Lenovo G575 Support Question
Find answers below for this question about Lenovo G575.Need a Lenovo G575 manual? We have 2 online manuals for this item!
Question posted by gachetop on March 24th, 2014
How To Connect Lenovo G575 To Lg Flat Screen Tv
The person who posted this question about this Lenovo product did not include a detailed explanation. Please use the "Request More Information" button to the right if more details would help you to answer this question.
Current Answers
Related Lenovo G575 Manual Pages
Hardware Maintenance Manual - Page 3
... factory default 23 Using recovery discs 23 Passwords 24 Power-on password 24 Supervisor password 24 Power management 25 Screen blank mode 25 Sleep (standby) mode 25 Hibernation mode 26
Lenovo G470/G475/G570/G575 27 Specifications 27 Status indicators 29 Fn key combinations 31 FRU replacement notices 32
Screw notices 32 Removing...
Hardware Maintenance Manual - Page 20
Lenovo G470/G475/G570/G575 Hardware Maintenance Manual
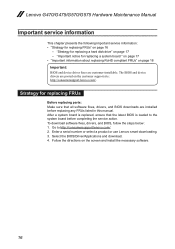
Important service information
This chapter presents the following important service ...information about replacing RoHS compliant FRUs" on page 18 Important: BIOS and device driver fixes are posted on the screen and install the necessary software.
16 Select the BIOS/Driver/Applications and download. 4. To download software fixes, drivers,...
Hardware Maintenance Manual - Page 25

...of the following : •• Replace the system board. •• If the problem continues, go to "Lenovo G470/G475/G570/G575" on the computer. 5. Measure the output voltage at the plug of the total power remaining when installed in the ... that has less than 50% of the AC adapter cable. Note: Noise from the computer. 2. Connect the AC adapter. 4. Remove the battery pack. 3.
Hardware Maintenance Manual - Page 28

Lenovo G470/G475/G570/G575 Hardware Maintenance Manual
When you use the recovery discs to boot your computer, the system will ...be entered before an operating system can be replaced for it appears on the screen whenever the computer is no service procedure to complete the whole recovery process. If any Lenovo computer: the power-on by an unauthorized person. Please follow the prompt to ...
Hardware Maintenance Manual - Page 35
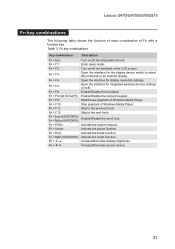
...display brightness.
Fn + F10:
Stop playback of Fn with a function key.
Lenovo G470/G475/G570/G575
Fn key combinations
The following table shows the function of each combination of Windows ...Media Player. Fn + F1:
Enter sleep mode.
Fn + F9:
Start/Pause playback of the LCD screen...
Hardware Maintenance Manual - Page 36
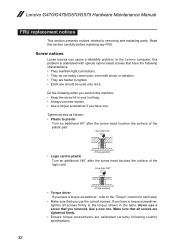
...; Ensure torque screwdrivers are calibrated correctly following characteristics: •• They maintain tight connections. •• They do not easily come loose, even with special nylon-coated ...to removing and replacing parts. In the Lenovo computer, this section carefully before replacing any FRU. Lenovo G470/G475/G570/G575 Hardware Maintenance Manual
FRU replacement notices
This ...
Hardware Maintenance Manual - Page 37
...shaking the computer gently and listening for the G470&G475&G570&G575.
33
Remove them in the order in square callouts. 5...., remove the battery pack, and then disconnect any of the Lenovo G570, unless
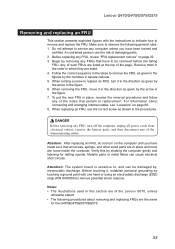
otherwise stated. •• The following general ...Do not attempt to remove and replace the FRU. Lenovo G470/G475/G570/G575
Removing and replacing an FRU
This section presents exploded...
Hardware Maintenance Manual - Page 40
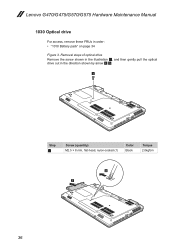
... screw shown in the illustration 1, and then gently pull the optical drive out in order: •• "1010 Battery pack" on page 34 Figure 3. Lenovo G470/G475/G570/G575 Hardware Maintenance Manual
1030 Optical drive
For access, remove these FRUs in the direction shown by arrow 2 3.
1
Step
1
Screw (quantity) M2.5 × 8 mm...
Hardware Maintenance Manual - Page 43

Lenovo G470/G475/G570/G575
3
Step
1
Screw (quantity) M2.0 × 4 mm, flat-head, nylon-coated (2)
Color Black
Torque 2.0kgfcm
When installing: Make sure that the HDD connector is attached firmly.
39
Hardware Maintenance Manual - Page 45

Step
1 2
Screw (quantity)
Color
M2.0 × 4 mm, flat-head, nylon-coated (3)
Silver
M2.0 × 3.2 mm, with spring, nylon-coated ...
Figure 7. Removal steps of fan assembly and heat sink assembly
Note: Remove three screws 1 and four spring screws 2. Lenovo G470/G475/G570/G575
1070 Fan assembly and Heat Sink assembly
For access, remove these FRUs in the direction shown by arrow 3.
1
1
...
Hardware Maintenance Manual - Page 49
Lenovo G470/G475/G570/G575
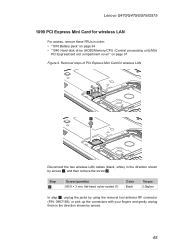
1090 PCI Express Mini Card for wireless LAN
1
2
Disconnect the two wireless LAN cables (black, ...these FRUs in the direction shown by arrows 1, and then remove the screw 2. Step
2
Screw (quantity) M2.0 × 3 mm, flat-head, nylon-coated (1)
Color Black
Torque 2.0kgfcm
In step 1, unplug the jacks by using the removal tool antenna RF connector
(P/N: 08K7159),...
Hardware Maintenance Manual - Page 51

Lenovo G470/G475/G570/G575
1100 Keyboard
For access, remove these FRUs in order: •• "1010 Battery pack" on page 34 •• "1040 Hard disk drive (HDD)/Memory/CPU (Central processing unit)/Mini
PCI ExpressCard slot compartment cover " on the bottom.
1
1 2
Step
1 2
Screw (quantity) M2.5 × 8 mm, flat-head, nylon-coated (2) M2...
Hardware Maintenance Manual - Page 53
... 3 and four screws 4
on page 47
Figure 11. Lenovo G470/G475/G570/G575
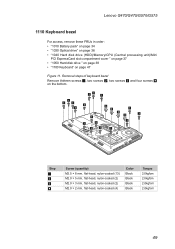
1110 Keyboard bezel
For access, remove these FRUs in order:...
1 2 3 4
Screw (quantity) M2.5 × 8 mm, flat-head, nylon-coated (13) M2.0 × 5 mm, flat-head, nylon-coated (2) M2.0 × 3 mm, flat-head, nylon-coated (2) M2.0 × 2 mm, flat-head, nylon-coated (4)
Color Black Black Black Black
Torque 2.0kgfcm 2.0kgfcm...
Hardware Maintenance Manual - Page 54

Removal steps of keyboard bezel (continued)
Remove one screw 5 and detach three FPC connectors in the direction shown by arrows 6.
6 5
6
Step
5
Screw (quantity) M2.5 × 8 mm, flat-head, nylon-coated (1)
Color Black
Torque 2.0kgfcm
When installing: Make sure that all the FPC connectors are attached firmly.
50 Lenovo G470/G475/G570/G575 Hardware Maintenance Manual
Figure 11.
Hardware Maintenance Manual - Page 56
Lenovo G470/G475/G570/G575 Hardware Maintenance Manual
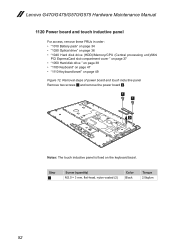
1120 Power board and touch inductive panel
For access, remove these FRUs in...on page 47 •• "1110 Keyboard bezel" on the keyboard bezel.
Step
1
Screw (quantity) M2.0 × 3 mm, flat-head, nylon-coated (2)
Color Black
Torque 2.0kgfcm
52 Removal steps of power board and touch inductive panel
Remove two screws 1 and remove ...
Hardware Maintenance Manual - Page 58

Lenovo G470/G475/G570/G575 Hardware Maintenance Manual
Figure 13. Step
2
Screw (quantity) M2.5 × 4 mm, flat-head, nylon-coated (5)
Color Black
Torque 2.0kgfcm
54 Removal steps of system board (continued)
Remove five screws 2 and detach a connector in the direction shown by arrow 3.
2 32
2 2 2
3
When installing: Make sure that the connector is attached firmly.
Hardware Maintenance Manual - Page 61

... be broken. Tension could cause the cables to be damaged by the cable guides, or a wire to any tension. Step
3
Screw (quantity) M2.5 × 5 mm, flat-head, nylon-coated (4)
Color Black
Torque 2.0kgfcm
57
Removal steps of LCD unit (continued)
33
33 2
2
When installing:
•• Route the antenna cables along...
Hardware Maintenance Manual - Page 63
Lenovo G470/G475/G570/G575
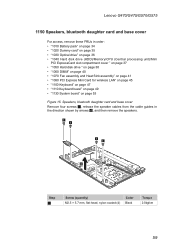
1150 Speakers, bluetooth daughter card and base cover
For access, remove these FRUs in the direction shown by arrows 2, and then remove the speakers.
31 31
31 31
2
Step
1
Screw (quantity) M2.5 × 5.7 mm, flat-head, nylon-coated (4)
Color Black
Torque 2.0kgfcm
59 Speakers, bluetooth daughter card and base...
Hardware Maintenance Manual - Page 65

Lenovo G470/G475/G570/G575
Figure 15. Step
5
Screw (quantity) M2.0 × 3 mm, flat-head, nylon-coated (1)
Color Black
Torque 2.0kgfcm
61 Removal steps of bluetooth daughter card and base cover (continued)
Remove one screw 5 and then remove the USB assembly in the direction shown by arrow 6.
5
6
When installing: Make sure that the USB connector is attached firmly.
Hardware Maintenance Manual - Page 70
...direction shown by arrows 5.
5 4
4 4 4
4 4 4
4 5
Step
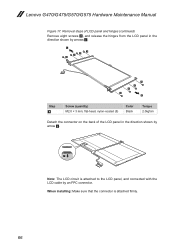
4
Screw (quantity) M2.0 × 3 mm, flat-head, nylon-coated (8)
Color Black
Torque 2.0kgfcm
Detach the connector on the back of the LCD panel in the direction shown by
arrow 6....connector is attached to the LCD panel, and connected with the LCD cable by an FPC connector. Lenovo G470/G475/G570/G575 Hardware Maintenance Manual
Figure 17.
Similar Questions


Replace Screen
Looking for step by step instruction of how to replace my screen on a Lenovo G575.
Looking for step by step instruction of how to replace my screen on a Lenovo G575.
(Posted by carlos112150 11 years ago)

How Can I Connect My Lenovo G575 Laptop To An Hdmi Tv
I don't appear To have a HDMI port on my compurer. How can I connect it to my TV
I don't appear To have a HDMI port on my compurer. How can I connect it to my TV
(Posted by robinjc 12 years ago)

How To Connect Lenovo V570 To Hd Tv With Hdmi Cable.
how to connect Lenovo V570 to HD TV with HDMI cable.
how to connect Lenovo V570 to HD TV with HDMI cable.
(Posted by vermavivek 12 years ago)