Konica Minolta bizhub C35 Support Question
Konica Minolta bizhub C35 Support Question
Find answers below for this question about Konica Minolta bizhub C35.Need a Konica Minolta bizhub C35 manual? We have 7 online manuals for this item!
Question posted by mjdbig on October 3rd, 2013
How To Add Favorites To Konica Minolta Bizhub
The person who posted this question about this Konica Minolta product did not include a detailed explanation. Please use the "Request More Information" button to the right if more details would help you to answer this question.
Current Answers
Related Konica Minolta bizhub C35 Manual Pages
bizhub C35 Printer/Copier/Scanner User Guide - Page 165
... working with step 8.
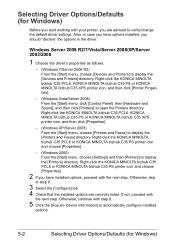
5 Click the [Acquire Device Information] to display the [Devices and Printers] directory. If not, proceed with the next step. Also, in the driver. Otherwise, continue with your printer, you have installed options, proceed with
the next step. Right-click the KONICA MINOLTA bizhub C35 PCL6 or KONICA MINOLTA bizhub C35 PS printer icon and choose [Properties].
2 If...
bizhub C35 Printer/Copier/Scanner User Guide - Page 168
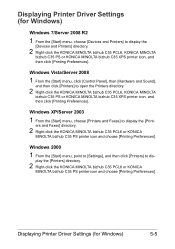
...and then click [Printers] to display the
[Devices and Printers] directory.
2 Right-click the KONICA MINOLTA bizhub C35 PCL6, KONICA MINOLTA
bizhub C35 PS or KONICA MINOLTA bizhub C35 XPS printer icon, and then click [Printing Preferences].
play the [Printers] directory.
2 Right-click the KONICA MINOLTA bizhub C35 PCL6 or KONICA
MINOLTA bizhub C35 PS printer icon and choose [Printing Preferences...
bizhub C35 Reference Guide - Page 38
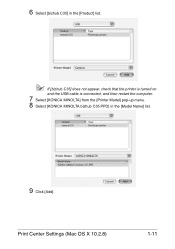
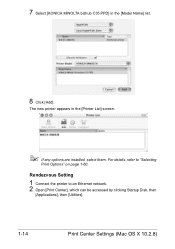
6 Select [bizhub C35] in the [Product] list.
" If [bizhub C35] does not appear, check that the printer is turned on
and the USB cable is connected, and then restart the computer.
7 Select [KONICA MINOLTA] from the [Printer Model] pop-up menu. 8 Select [KONICA MINOLTA bizhub C35 PPD] in the [Model Name] list.
9 Click [Add]. Print Center Settings (Mac OS X 10.2.8)
1-11
bizhub C35 Reference Guide - Page 41
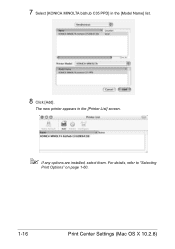
7 Select [KONICA MINOLTA bizhub C35 PPD] in the [Printer List] screen.
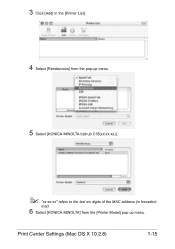
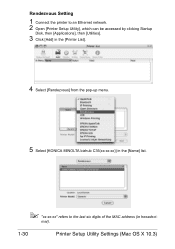
" If any options are installed, select them. Rendezvous Setting
1 Connect the printer to "Selecting
Print Options" on page 1-60. The new printer appears in the [Model Name] list.
8 Click [Add]. For details, refer to an Ethernet network. 2 Open [Print Center], which can be accessed by...
bizhub C35 Reference Guide - Page 42
mal).
6 Select [KONICA MINOLTA] from the pop-up menu.
5 Select [KONICA MINOLTA bizhub C35(xx:xx:xx)].
" "xx:xx:xx" refers to the last six digits of the MAC address (in the [Printer List]. 4 Select [Rendezvous] from the [Printer Model] pop-up menu. 3 Click [Add] in hexadeci-
Print Center Settings (Mac OS X 10.2.8)
1-15
bizhub C35 Reference Guide - Page 43
7 Select [KONICA MINOLTA bizhub C35 PPD] in the [Printer List] screen.
" If any options are installed, select them. The new printer appears in the [Model Name] list.
8 Click [Add].
For details, refer to "Selecting
Print Options" on page 1-60.
1-16
Print Center Settings (Mac OS X 10.2.8)
bizhub C35 Reference Guide - Page 45
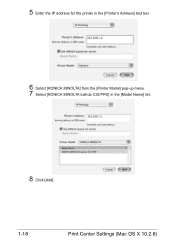
5 Enter the IP address for the printer in the [Printer's Address] text box.
6 Select [KONICA MINOLTA] from the [Printer Model] pop-up menu. 7 Select [KONICA MINOLTA bizhub C35 PPD] in the [Model Name] list.
8 Click [Add].
1-18
Print Center Settings (Mac OS X 10.2.8)
bizhub C35 Reference Guide - Page 49
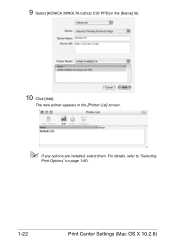
The new printer appears in the [Name] list.
10 Click [Add].
For details, refer to "Selecting
Print Options" on page 1-60.
1-22
Print Center Settings (Mac OS X 10.2.8) 9 Select [KONICA MINOLTA bizhub C35 PPD] in the [Printer List] screen.
" If any options are installed, select them.
bizhub C35 Reference Guide - Page 52
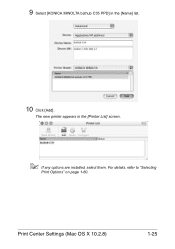
Print Center Settings (Mac OS X 10.2.8)
1-25 For details, refer to "Selecting
Print Options" on page 1-60. The new printer appears in the [Name] list.
10 Click [Add].
9 Select [KONICA MINOLTA bizhub C35 PPD] in the [Printer List] screen.
" If any options are installed, select them.
bizhub C35 Reference Guide - Page 54
... turned on page 1-60.
For details, refer to "Selecting
Print Options" on
and the USB cable is connected, and then restart the computer.
7 Check that [KONICA MINOLTA bizhub C35 PPD] is selected in the [Printer List] screen.
" If any options are installed, select them. The new printer appears in the
[Printer Model] list.
8 Click...
bizhub C35 Reference Guide - Page 56
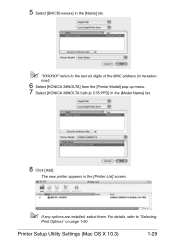
....3)
1-29 The new printer appears in hexadec- 5 Select [BHC35-xxxxxx] in the [Name] list.
" "XXXXXX" refers to "Selecting
Print Options" on page 1-60.
imal).
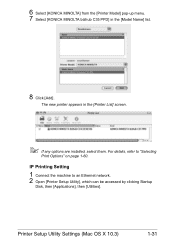
6 Select [KONICA MINOLTA] from the [Printer Model] pop-up menu. 7 Select [KONICA MINOLTA bizhub C35 PPD] in the [Model Name] list.
8 Click [Add].
bizhub C35 Reference Guide - Page 57
... Ethernet network. 2 Open [Printer Setup Utility], which can be accessed by clicking Startup
Disk, then [Applications], then [Utilities].
3 Click [Add] in the [Printer List].
4 Select [Rendezvous] from the pop-up menu.
5 Select [KONICA MINOLTA bizhub C35(xx:xx:xx)] in the [Name] list.
" "xx:xx:xx" refers to the last six digits of the MAC...
bizhub C35 Reference Guide - Page 58
...], then [Utilities]. Printer Setup Utility Settings (Mac OS X 10.3)
1-31 The new printer appears in the [Model Name] list.
8 Click [Add].
6 Select [KONICA MINOLTA] from the [Printer Model] pop-up menu. 7 Select [KONICA MINOLTA bizhub C35 PPD] in the [Printer List] screen.
" If any options are installed, select them. IP Printing Setting
1 Connect the machine to "Selecting...
bizhub C35 Reference Guide - Page 60
Printer Setup Utility Settings (Mac OS X 10.3)
1-33
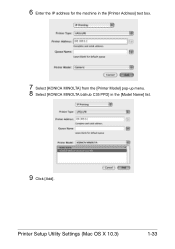
6 Enter the IP address for the machine in the [Printer Address] text box.
7 Select [KONICA MINOLTA] from the [Printer Model] pop-up menu. 8 Select [KONICA MINOLTA bizhub C35 PPD] in the [Model Name] list.
9 Click [Add].
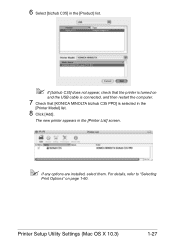
bizhub C35 Reference Guide - Page 63
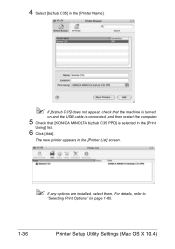
4 Select [bizhub C35] in the [Printer Name].
" If [bizhub C35] does not appear, check that [KONICA MINOLTA bizhub C35 PPD] is selected in the [Printer List] screen.
" If any options are installed, select them. For details, refer to
"Selecting Print ...on page 1-60.
1-36
Printer Setup Utility Settings (Mac OS X 10.4)
The new printer appears in the [Print
Using] list.
6 Click [Add].
bizhub C35 Reference Guide - Page 65
decimal).
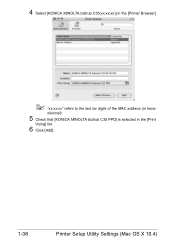
5 Check that [KONICA MINOLTA bizhub C35 PPD] is selected in hexa- 4 Select [KONICA MINOLTA bizhub C35(xx:xx:xx)] in the [Printer Browser].
" "xx:xx:xx" refers to the last six digits of the MAC address (in the [Print
Using] list.
6 Click [Add].
1-38
Printer Setup Utility Settings (Mac OS X 10.4)
bizhub C35 Reference Guide - Page 68
Printer Setup Utility Settings (Mac OS X 10.4)
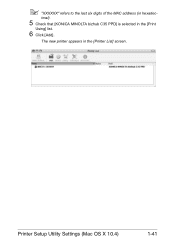
1-41 imal).
5 Check that [KONICA MINOLTA bizhub C35 PPD] is selected in the [Printer List] screen.
The new printer appears in the [Print
Using] list.
6 Click [Add]. " "XXXXXX" refers to the last six digits of the MAC address (in hexadec-
bizhub C35 Reference Guide - Page 71
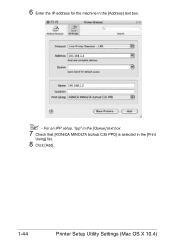
For an IPP setup, "ipp" in the [Queue] text box.
7 Check that [KONICA MINOLTA bizhub C35 PPD] is selected in the [Address] text box.
" - 6 Enter the IP address for the machine in the [Print
Using] list.
8 Click [Add].
1-44
Printer Setup Utility Settings (Mac OS X 10.4)
bizhub C35 Reference Guide - Page 75
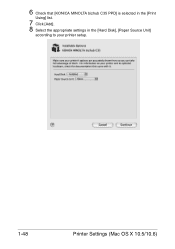
6 Check that [KONICA MINOLTA bizhub C35 PPD] is selected in the [Print
Using] list.
7 Click [Add]. 8 Select the appropriate settings in the [Hard Disk], [Paper Source Unit]
according to your printer setup.
1-48
Printer Settings (Mac OS X 10.5/10.6)
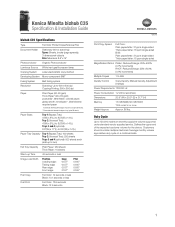
Installation Guide - Page 1
...volume approaches duty cycle on a continual basis.
1 Konica Minolta bizhub C35 Specification & Installation Guide
bizhub C35 Specifications
Type
Full Color Printer/Copier/Scanner/Fax
Document...100 sheets Tray 2 (Universal Tray): 250 sheets Trays 3 and 4 (optional): 500 sheets each (add up to two)
Exit Tray Capacity Plain Paper: 250 sheets Thick Paper: 10 sheets
Warm-up... for the device.
Similar Questions


