Hitachi VB16Y Support Question
Hitachi VB16Y Support Question
Find answers below for this question about Hitachi VB16Y - Rebar Cutter And Bender.Need a Hitachi VB16Y manual? We have 1 online manual for this item!
Question posted by kaylamcconnell17 on September 25th, 2014
Dial Is Set To 90 Degrees But Wont Bend Past 65-70 Degree Help!
So I tried to bend and i had the dial set to 90 degrees but after it was finished the bar was only bent to 65- 70 degree bend. but like i said the dial was set to 90. How do i fix this? could it be possible the dial got thrown off some how? if so how could i fix it to bend all the way to 90?
Current Answers
Related Hitachi VB16Y Manual Pages
Instruction Manual - Page 3
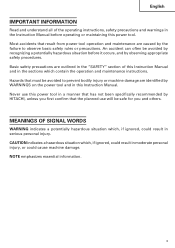
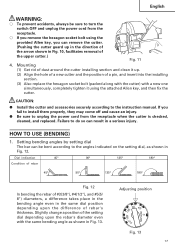
...this Instruction Manual. Basic safety precautions are identified by WARNINGS on the power tool and in this power tool.
CAUTION indicates a hazardous situation which , if ignored, could cause machine damage...instructions. Hazards that must be safe for you first confirm that result from power tool operation and maintenance are caused by HITACHI, unless you and others. Most accidents...
Instruction Manual - Page 4
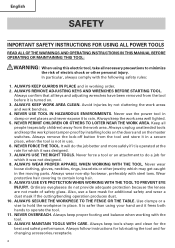
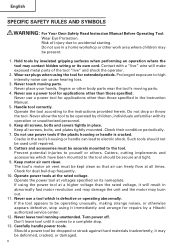
...bending operation produces dust. 10. Always confirm that all people (especially children) away from the tool and store it in a secure place, when the tool is turned on the master switches. Never use the power tool... the following safety rules:
1. ALWAYS REMOVE ADJUSTING KEYS AND WRENCHES BEFORE STARTING TOOL. It will do not provide adequate protection because the lenses are not made of...
Instruction Manual - Page 5
...
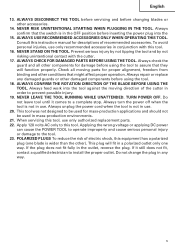
can cause the POWER TOOL to operate improperly and cause serious personal injury or damage to this tool. POLARIZED PLUGS To reduce the risk of the cutter in mass-production environments....ALWAYS CHECK FOR DAMAGED PARTS BEFORE USING THE TOOL. If it comes to prevent possible injury.
19. NEVER RISK UNINTENTIONAL STARTING WHEN PLUGGING IN THE TOOL. To avoid personal injuries, use only ...
Instruction Manual - Page 6
... otherwise appears defective, stop .
13. Keep all screws, bolts, and plates tightly mounted. Cutters, cutting implements and accessories which is cracked. Operate power tools at voltages specified on its operation or unauthorized personnel.
6. If the tool appears to the tool should not be securely mounted to high intensity noise can cause hearing loss.
3. Carefully...
Instruction Manual - Page 7
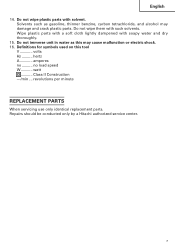
... conducted only by a Hitachi authorized service center.
7 Definitions for symbols used on this may damage and crack plastic parts. English 14. Solvents such as this tool V volts Hz .......... Do not wipe plastic parts with solvent.
Instruction Manual - Page 8
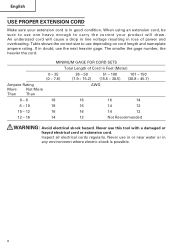
...use this tool with a damaged or
frayed electrical cord or extension cord. An undersized cord will draw. MINIMUM GAGE FOR CORD SETS
Total Length ...of power and overheating. The smaller the gage number, the heavier the cord. Never use depending on cord length and nameplate ampere rating. Table shows the correct size to carry the current your extension cord is possible...
Instruction Manual - Page 10
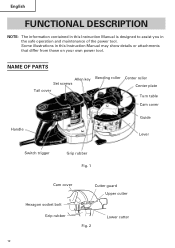
... differ from those on your own power tool. NAME OF PARTS
Allen key Set screws
Tail cover
Bending roller
Center roller Center plate Turn table
Cam cover
Handle
Guide Lever
Switch trigger
Grip rubber Fig. 1
Cam cover
Cutter guard Upper cutter
Hexagon socket bolt
Grip rubber
Fig. 2
Lower cutter
10 English
FUNCTIONAL DESCRIPTION
NOTE: The information...
Instruction Manual - Page 11
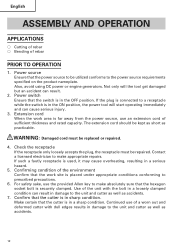
...-Phase, Series Commutator Motor
Single-Phase, 120 V AC 60 Hz
8 A
(1) Material: Concrete reinforcing bars only (for ASTM) GRADE 40, GRADE 60
(2) Bar Designation Size
#3, #4, #5 (3/8", 1/2", 5/8")
Cutting
Bending
#3 (3/8") ..... 2 pieces #4 (1/2") ..... 1 piece #5 (5/8") ..... 1 piece
#3 (3/8") .... 3 pieces #4 (1/2") .... 2 pieces #5 (5/8") .... 1 piece
0 - 16/min.
39.7 lbs (18.0 kg)
11
Instruction Manual - Page 12
...8540; Cutting of rebar ⅜ Bending of sufficient thickness and rated capacity. Extension cord When the work site is in a sharp condition. Also, avoid using DC power or engine generators. Power switch Ensure that the cutter is placed under appropriate... it may cause overheating, resulting in the ON position, the power tool will the tool get damaged but an accident can result.
2.
Instruction Manual - Page 13
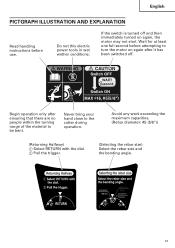
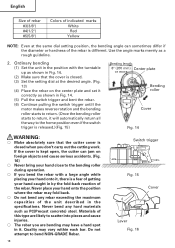
... material to the cutter during operation. Wait for at least one full second before use. Avoid any work exceeding the maximum capacities. (Rebar diameter: #5 (5/8"))
(Returning Halfway) 1 Select RETURN with the dial. 2 Pull the trigger.
(Selecting the rebar size) Select the rebar size and the bending angle.
13
Never bring your hand close to be bent.
If the...
Instruction Manual - Page 14
... so designed that it cannot sufficiently hold the rebar much longer, replace it with new one when replacing the cutter.
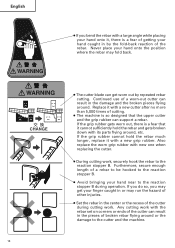
● During cutting work with the rebar set on corners or ends of the cutter can result in by repeated rebar cutting. Any cutting work , securely hook the rebar to the reaction stopper B. English
14
● If...
Instruction Manual - Page 15

... setting dial at a halfway position, jumming the rebar in the unit.
When this type are cutting may vary within each rebar. Normal cutting (Fig. 5) (1) Turn the lever in serious injury. WARNING:
Bending
roller
Grip
Reaction rubber
stopper A
⅜ While turning switches, never put your hand close to the cutter, reaction stopper, or bending roller.
⅜ Bringing your...
Instruction Manual - Page 16

... rebar can result in Fig. 8 and pull the switch trigger again.
0˚ RETURN
90˚ 45˚
CUT180˚ 135˚
Fig. 8
SERVICE LIFE AND REPLACEMENT OF THE CUTTER
1.
English
⅜ Removing (Fig. 8)
Set the setting dial to the "RETURN" position
as shown in the
following diagram. (Fig. 11)
Blade Fig. 9 Fig. 10
Cutter guard
Upper cutter
Lower cutter...
Instruction Manual - Page 17
... cord from the receptacle when the cutter is checked, cleaned, and replaced. Setting bending angles by setting dial The bar can result in a serious injury. CUT180˚ 135˚
0˚ RETURN
Adjusting position
90˚ 45˚
Fig. 13
17
Dial indication
45°
90°
135°
180°
Condition of rebar
45°
90°
135°
180°...
Instruction Manual - Page 18
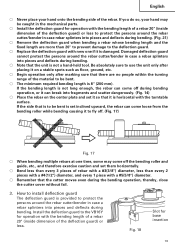
... are bending may vary within each bar. Quality may have a hard spot in by the fold-back reaction of this type are likely to bend NON-GRADE Rebar.
18
Switch trigger
Fig. 15 Cover
Lever Fig. 16 Never bend any rebar exceeding the maximum capacities of the rebar is closed . (3) Set the setting dial at the same dial setting position, the bending angle...
Instruction Manual - Page 19
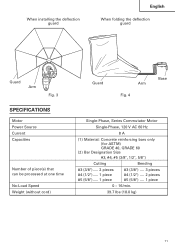
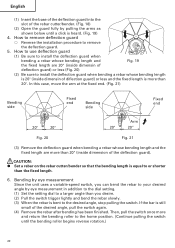
... that is to be bent is set inclined upward, the rebar can break into pieces and deflects during bending. (Fig. 21)
⅜ Remove the deflection guard when bending a rebar whose bending length and the fixed length are no people within the turning range of the material to protect the persons around the rebar cutter/bender in case a rebar splinters into pieces and...
Instruction Manual - Page 20
... rebar cutter/bender. (Fig. 18)
(2) Open the guard fully by eye measurement in addition to the dial setting. (1) Set the setting dial to a larger angle than you can bend the rebar to your desired angle by pulling the arms as
shown below until the bending roller begins reverse rotation.)
20 In this case, move the arm at the fixed end. (Fig. 21)
Bending...
Instruction Manual - Page 21
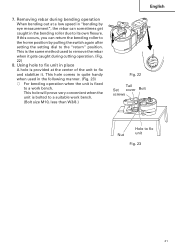
... center of the unit to fix and stabilize it gets caught during bending operation When bending out at a low speed in "bending by eye measurement", the rebar can return the bending roller to the home position by pulling the switch again after setting the setting dial to remove the rebar when it . Using hole to fix unit in place A hole is...
Instruction Manual - Page 22
... the
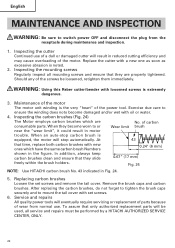
receptacle during maintenance and inspection.
1. Replacing carbon brushes Loosen the set screws.
6.
Replace the cutter with oil or water.
4. Maintenance of the power tool. Fig. 24
NOTE: Use HITACHI carbon brush No. 43 indicated in motor
trouble. WARNING: Using this Reber cutter/bender with loosened screws is the very "heart" of the motor
The...
Instruction Manual - Page 23
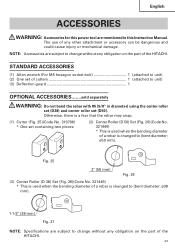
... is a fear that the rebar may snap.
(1) Cutter (Fig. 25)(Code No. 319706) * One set containing two pieces
(2) Center Roller (D 50) Set (Fig. 26)(Code No. 321446) * This is used when the bending diameter of a rebar is changed to (bent diameter: ø38 mm).
1-1/2" (38 mm)
Fig. 27
NOTE: Specifications are subject to (bent diameter: ø50 mm...
Similar Questions

Was Cutting And It Quit With Rebar Stuck In Jaw.
(Posted by mlemesany 2 years ago)

Nt65ga Will Not Fire
NT65GA Does not fire when trigger is pulled. Battery has full charge.
NT65GA Does not fire when trigger is pulled. Battery has full charge.
(Posted by dmcgeeoo6 6 years ago)
Try To Bend Bar And Don't Turn Wit No Bar A Will Turn
(Posted by pierrrerousseau1 9 years ago)

Angle Bending Not Precise . Please Help Asap
Angle bending not precise . PLEASE HELP ASAP I recently bought a new vb16y hitachi rebar bender and ...
Angle bending not precise . PLEASE HELP ASAP I recently bought a new vb16y hitachi rebar bender and ...
(Posted by palletfull36 10 years ago)

Adjusting The Bevel 90 Degree Stop On A C12rsh / Bevel Out Of Alignment.
where can I find directions to the above question title
where can I find directions to the above question title
(Posted by lanyalapunta 12 years ago)