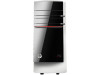
HP ENVY 700-327c Support Question
HP ENVY 700-327c Support Question
Find answers below for this question about HP ENVY 700-327c.Need a HP ENVY 700-327c manual? We have 6 online manuals for this item!
Question posted by Anonymous-139312 on July 2nd, 2014
How To Add An Optical Drive
The person who posted this question about this HP product did not include a detailed explanation. Please use the "Request More Information" button to the right if more details would help you to answer this question.
Current Answers


Related HP ENVY 700-327c Manual Pages
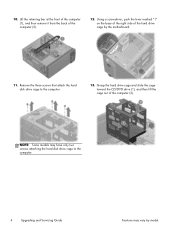
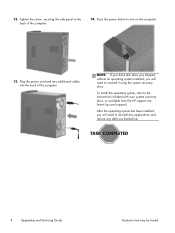
Upgrading and Servicing Guide - Page 3
Upgrading and Servicing Guide
HP Elite 7300 MT HP Pavilion HPE h8-1000 Series PC
Computer features may vary by model.
● Removing and Replacing a Hard Disk Drive on page 2
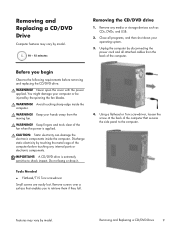
● Removing and Replacing a CD/DVD Drive on page 9
● Upgrading or Replacing Memory on page 14 ● Upgrading or Replacing an Add-in Card on
page 18
Features may vary by model.
1
Upgrading and Servicing Guide - Page 4
...Upgrading and Servicing Guide
Features may vary by model.
15 - 20 minutes
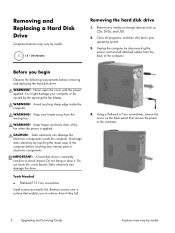
Removing the hard disk drive
1. Do not touch the circuit board. Before you to retrieve them if they fall.
4. ... Never open the cover with the power applied. CAUTION: Static electricity can damage the drive.
IMPORTANT: A hard disk drive is applied.
WARNING! Do not bang or drop it. Tools Needed
● Flathead/...
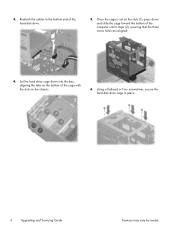
Upgrading and Servicing Guide - Page 5
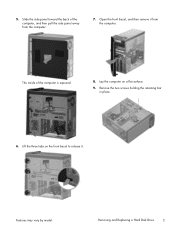
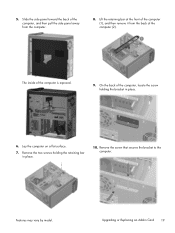
... the computer on the front bezel to release it from the computer.
7.
Open the front bezel, and then remove it . Removing and Replacing a Hard Disk Drive
3 The inside of the computer, and then pull the side panel away from the computer. Remove the two screws holding the retaining bar in place.
6.
5.
Upgrading and Servicing Guide - Page 6
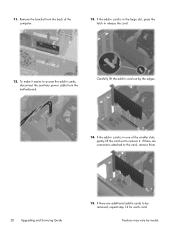
... then lift the cage out of the computer (2).
12. NOTE: Some models may have only two screws attaching the hard disk drive cage to the computer.
13. Lift the retaining bar at the front of the computer (1), and then remove it from the back of the computer (2). ...
Upgrading and Servicing Guide - Page 7
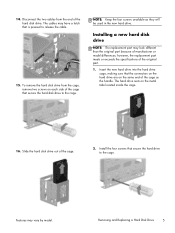
... or exceeds the specifications of the cage.
2. To remove the hard disk drive from the end of the cage that the connectors on the hard drive are on the same end of manufacturer or model differences; Installing a new hard disk drive
NOTE: The replacement part may vary by model. Features may look different...
Upgrading and Servicing Guide - Page 8
... on the bottom of the cage with the slots on the slots (1), press down and slide the cage toward the bottom of the hard disk drive.
5. 3. Reattach the cables to the bottom end of the computer until it stops (2), ensuring that the three screw holes are aligned.
4. Using a flathead or Torx...
Upgrading and Servicing Guide - Page 9
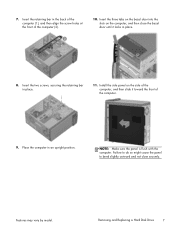
Install the side panel on the computer, and then close securely.
Features may vary by model. Removing and Replacing a Hard Disk Drive
7 Insert the two screws, securing the retaining bar in an upright position. Failure to do so might cause the panel to bend slightly outward and ...
Upgrading and Servicing Guide - Page 10
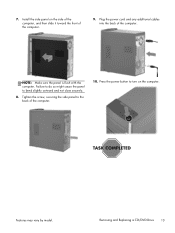
Press the power button to the back of the computer. To install the operating system, refer to the instructions included with your hard disk drive was shipped without an operating system installed, you will need to reinstall any applications and restore any additional cables into the back of the computer.
...
Upgrading and Servicing Guide - Page 11
... electronic components. Never open the cover with the power applied.
Remove screws over a surface that secures the side panel to the computer. IMPORTANT: A CD/DVD drive is applied. Do not bang or drop it.
4.
WARNING! Keep fingers and tools clear of the computer before removing and replacing the CD/DVD...
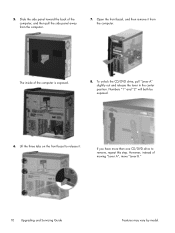
Upgrading and Servicing Guide - Page 12
...
10 Upgrading and Servicing Guide
Features may vary by model. If you have more than one CD/DVD drive to release it from the computer.
7. 5. However, instead of the computer is exposed.
8. Open the...the three tabs on the front bezel to remove, repeat this step. To unlock the CD/DVD drive, pull "Lever A" slightly out and release the lever in the center position.
Slide the side...
Upgrading and Servicing Guide - Page 13
... replacement part meets or exceeds the specifications of the computer. Pull the CD/DVD drive out the front of the original part.
1. Removing and Replacing a CD/DVD Drive
11 Remove the cables from behind.
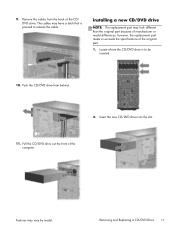
2. Installing a new CD/DVD drive
NOTE: The replacement part may look different than the original part because of the...
Upgrading and Servicing Guide - Page 14
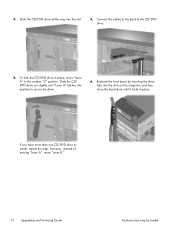
... the front bezel by model. 3. Connect the cables to the back of moving "Lever A", move "Lever A" to the number "2" position. Slide the CD/ DVD drive out slightly until it locks in place, move "Lever B."
12 Upgrading and Servicing Guide
Features may vary by inserting the three tabs into the slots ...
Upgrading and Servicing Guide - Page 15
... it toward the front of the computer.
9. Tighten the screw, securing the side panel to the back of the computer. Removing and Replacing a CD/DVD Drive
13
Press the power button to bend slightly outward and not close securely.
8. Plug the power cord and any additional cables into the back of...
Upgrading and Servicing Guide - Page 20

..., DVDs, and USB.
2.
Avoid touching sharp edge inside the computer.
IMPORTANT: A add-in card is applied. Remove any internal parts or electronic components.
Close all attached cables...screwdriver, loosen the screw at the back of the computer before removing and replacing the add-in card
1. Tools Needed
● Flathead/T15 Torx screwdriver
Small screws are easily...
Upgrading and Servicing Guide - Page 21
... then remove it from the computer.
8. Remove the screw that secures the bracket to the computer.
The inside of the computer (2). Upgrading or Replacing an Add-in place.
10. Slide the side panel toward the back of the computer, locate the screw holding the retaining bar in Card 19 On the...
Upgrading and Servicing Guide - Page 22
... of the computer.
13. To make it .
11. Remove the bracket from the motherboard. If there are additional add-in the large slot, press the latch to release the card.
12. If the add-in card is in cards, disconnect the auxiliary power cable from the back of the smaller slots, gently...
Upgrading and Servicing Guide - Page 24
... close securely.
22 Upgrading and Servicing Guide
Features may vary by model. NOTE: Make sure the panel is flush with the computer. To secure the add-in card in place.
5. Insert the two screws, securing the retaining bar in place, replace the bracket at the front of the computer.
6. Reattach the...
Quick Setup Guide - Page 14
...NVIDIA graphics cards. ATI graphics cards
1. This completes the steps to remove a check mark or add a check mark.
4. Setting up multiple displays
Use the following steps to adjust resolution for this...Select the resolution from the drop-down menu.
3.
Right-click an empty area of the desktop, and then click Catalyst™ Control Center. This completes the steps to connect and ...
Quick Setup Guide - Page 24
... have a problem that might be due to update or rollback. (For example, DVD/CD-ROM drives).
4. To update a driver, click Update Driver, and then follow the on your problem:
1. screen instructions. Click the Driver tab.
6. To add restore points manually: 1. NOTE: Always use this System Restore procedure before you want to software...
Troubleshooting and Maintenance Guide - Page 10
... System Restore to return the computer to a previous restore point. Erase and reformat the hard disk drive, and then reinstall the operating system, programs, and drivers. Select the arrow to expand the type... new one does not solve your computer to update or roll back. (For example, DVD/CD-ROM drives.)
3. This erases all open programs. 2. This is the easiest (and sometimes the best) way. ...
Similar Questions


Can You Install 2 Optical Drives In A Hp Z600
(Posted by sadonm 9 years ago)

Connect My Envy 700-327c To My Tv
How can I connect my Envy 700-327c to my tv?
How can I connect my Envy 700-327c to my tv?
(Posted by vrr486 9 years ago)

Hewlett-packard Neoware M100 Kh188aa Can We Install Optical Drive On It ?
HELP
HELP
(Posted by brijesh77 11 years ago)

How To Remove The Optical Drive From A Pavillon S3000
(Posted by james70 12 years ago)