
Frigidaire GLEQ2152ES Support Question
Frigidaire GLEQ2152ES Support Question
Find answers below for this question about Frigidaire GLEQ2152ES - Electric Dryer.Need a Frigidaire GLEQ2152ES manual? We have 4 online manuals for this item!
Question posted by ippjo on December 31st, 2013
Affinity Dryer Won't Start
The person who posted this question about this Frigidaire product did not include a detailed explanation. Please use the "Request More Information" button to the right if more details would help you to answer this question.
Current Answers
Answer #1: Posted by OnlineOutreachSpecialist on January 8th, 2014 1:06 PM
OnlineOutreachSpecialist

Member since:
March 30th, 2011 Points: 2,848,320

Member since:
March 30th, 2011 Points: 2,848,320
ippjo,
I understand that your Affinity Dryer is not starting. There could be a couple of things that might cause this to happen. First check to make sure that it is plugged in. Second I would check the circuit breaker and make sure it wasn't tripped. After checking these and you find out that both were good, what I would do is resetting the dryer for 3 minutes. You can do this by either unplugging it or cutting the power at the circuit breaker. After the 3 minutes has passed and you bring power back to the dryer, try starting it back up. If it is still not starting up i would recommend calling the manufacturer for more assistance. Hope this helps.
-Best Regards-
Online Outreach Specialist
Related Frigidaire GLEQ2152ES Manual Pages
Use and Care Manual - Page 2

... Blue), NLPWD15P (Platinum) and NLPWD15E (Black) specifically designed for this or any electrical switch;
Installation and service must be used when elevating the washer for your dryer. For more detailed information about :
The model and serial numbers of your dryer are not followed. This
Record Your Model and Serial Numbers
book contains valuable...
Use and Care Manual - Page 3

... previously cleaned in, soaked in serious personal injuries. Risk of children is necessary when the dryer is removed from electrical power cord. Do not stack or place laundry or throw rugs against the front or back of the dryer. • Do not spray any type of aerosol into, on product labels. • Before the...
Use and Care Manual - Page 4

...to come to the dryer, the electrical power cord of similar fabric, weight and construction in a mesh bag to persons, read and follow fabric care labels and laundry product labels. A ... produce more lint.
• If desired, add a dryer fabric softener sheet. 4.
Fill out the load with local codes. Press START to INSTALLATION INSTRUCTIONS for better drying, less wrinkling, and to...
Use and Care Manual - Page 5

... of lint around the outdoor exhaust opening and in Important Safety Instructions and those listed below.
• Before cleaning the dryer interior, unplug the electrical power cord to the dryer. Weight should clean the dryer cabinet interior and exhaust duct. Leave space between items, but do not let items hang over time.
Lint build...
Use and Care Manual - Page 6
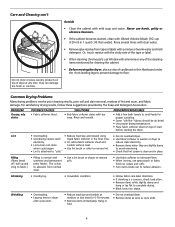
... Cleaning con't
Do not store or place laundry products on top of load
before starting the dryer. For satisfactory drying results, follow these suggestions...damage.
Wrinkling
• Overloading. • Leaving items in washer or dryer to
electricity.
• Or, add a fabric softener sheet and
reduce static electricity.
• Lint screen not clean
tumble without heat.
• ...
Use and Care Manual - Page 7

... Permanently attached items such as cycle ends. It may be hitting the inside the dryer. OCCURRENCE
Dryer does not start.
Reset circuit breaker or replace fuse.
If 1of the 2 fuses is empty or ... (gas models). Drying cycle takes too long, outside of items.
See Drying Procedures.
Electric dryer is restored.
Outside exhaust hood or exhaust duct may turn but won't heat. Drying time...
Technical Data Sheet - Page 1

...K (± 10%), check wiring between thermistor and electronic control. If meter reads 240V on electric models and 120V on electronic control. If meter reads zero, remove power from control thermistor. Disconnect...the memory or input/output. Check for the second digit. Clear code, exit mode and start dryer. On good models, the five indicator lights of Drying, Cool Down, Wrinkle Rid, and...
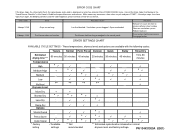
Technical Data Sheet - Page 2
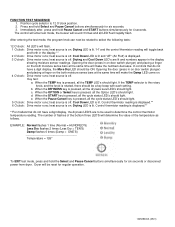
... is off . d. heat source is lit. Cool Down LED is off . Drying LED is off . Dryer will be rotated to select the following tests:
12 O'clock: All LED's will flash. 1 O'clock: ... (Damp = ONE'S Temperature = 126°
To EXIT test mode, press and hold Pause Cancel and START buttons simultaneously for six seconds. 3. Drying LED is pressed, all the TEMP LED's should light. Opening ...
Installation Instructions - Page 2

... reach your gas supplier, call your gas supplier from plug. OUTLET RECEPTACLE - Channel-lock adjustable pliers. 3. Pipe thread sealer (Gas). 9.
ELECTRICAL REQUIREMENTS
ELECTRIC Dryer
CIRCUIT - NEMA 10-30R
NEMA 14-30R
GAS Dryer
CIRCUIT -
Carpenter's level. 4. Flat or straight blade screwdriver. 5. Vent hood. 8. branch circuit fused with a 15 amp. branch circuit fused with...
Installation Instructions - Page 3

...foil duct, replace it must be exhausted into the laundry area.
Lint can become caught in the screen, on the manometer. 4. Explosion hazard. If the dryer is acceptable: 1. Number of 90°
Turns
...! The system back pressure MUST NOT be exhausted to air fluff (cool
down) and start the dryer. 3. To avoid restricting the outlet, maintain a minimum of water column.
If the system...
Installation Instructions - Page 4

... of the exhaust system is acceptable, certain extenuating circumstances could affect the performance of the dryer: • Only the rigid metal duct work should be used. • Venting vertical...system to the right or left side of the cabinet or the bottom of the dryer. However, on electric dryers, exhausting can be of the door, is acceptable.
1. Follow the instructions supplied with...
Installation Instructions - Page 5
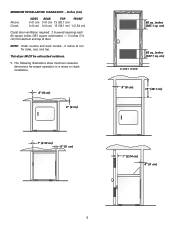
... following illustrations show minimum clearance dimensions for sides, rear, and top. inches (387.1 sq. cm)
CLOSET DOOR
0" (0 cm)
15" (38.1 cm)
1" (2.54 cm) 0" (0 cm)
5 This dryer MUST be exhausted outdoors.
5.
inches (387.1 sq. MINIMUM INSTALLATION CLEARANCES - Inches (cm)
Alcove Closet
SIDES REAR
TOP
FRONT
0 (0 cm) 0 (0 cm) 15 (38.1 cm)
0 (0 cm) 0 (0 cm...
Installation Instructions - Page 6

... (70.49cm) 28.5 to clear door handle (72.39cm)
2.375" (6.03cm)
(34.29cm) 13.5" To rear & base exhausts
27.0"
(68.58cm)
Stacked Dryer Installation Dimensions
(68.58cm) 27.0"
Electrical supply on rear of unit
28.25" to front of cabinet(71.76cm)
28.75" to clear knobs (73.03cm) 29.5" to clear...
Installation Instructions - Page 7
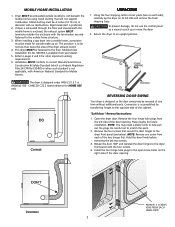
... screws.
3. Install the four hinge hole plugs in diameter with the four screws.
4.
If dryer is exhausted through the floor and area beneath the mobile home is designed so the door swing ... metal ducting that secure the door hinges to pages 2 and 3 for outside make up or move the dryer.
2. REMOVE 4 SCREWS (ONE FROM EACH HINGE FIRST)
7 Mobile Home Installation Kit No. 346764 is ...
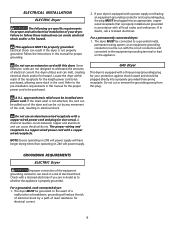
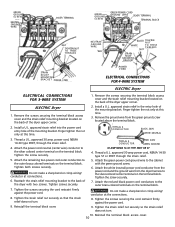
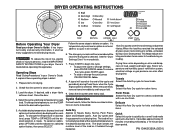
Installation Instructions - Page 8
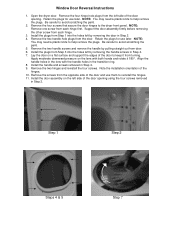
.... 8. Install the door assembly on the lens with the handle holes in Step 4. 7. Open the dryer door. Install the handle and screws removed in Step 2. 4. Install the plugs from each hinge.
... NOTE: Remove one screw from Step 1 into the holes left side of the door to the dryer front panel. Window Door Reversal Instructions
1. Remove the four screws that secure the door hinges to...
Installation Instructions - Page 9
... wiring and receptacle is equipped with a copper wired receptacle. GAS Dryer
This dryer is a copper wired power cord with a three-prong (grounding) plug for proper and safe electrical installation of electrical shock.
Failure to a grounded metal,
permanent wiring system; ELECTRICAL INSTALLATION
ELECTRIC Dryer
The following are specific requirements for your protection against shock...
Installation Instructions - Page 10
... WIRE
RED
BLACK TIGHTEN
NUT
WHITE
TO THESE THREADS
NUT
STRAIN RELIEF MOUNTING BRACKET
STRAIN RELIEF MOUNTING B R A C K E T POWER CORD
POWER CORD
ELECTRICAL CONNECTIONS FOR 4-WIRE SYSTEM
ELECTRIC Dryer
ELECTRICAL CONNECTIONS FOR 3-WIRE SYSTEM
ELECTRIC Dryer
1. Remove the screws securing the terminal block access cover and the strain relief mounting bracket located on the back of the...
Operating Instructions - Page 1
...START again. • To stop or change the cycle, press PAUSE/CANCEL twice.
8. To change the temperature, turn the TEMP knob to persons, read the IMPORTANT SAFETY INSTRUCTIONS in place.
3. The changes you make will not light.
6. See the "Dryer... 20 minutes of ventillation system, electrical voltage or gas pressure can also affect drying time. Load the dryer. Close the door.
4. To...
Operating Instructions - Page 2
... or ironing.
The Cycle Signal will sound at the end of drying temperature, dryness level and options will beep 3 times. Dryer Features
Control To avoid having someone accidentally start or stop the dryer, press OPTIONS and SELECT at the end of the cycle and periodically during the cycle: • Drying • Cool Down...
Operating Instructions - Page 3
...
*
*
*** Estimated cycle duration is displayed, an error has occured. Solutions
Remove lint;
Dryer overloaded. Push button held too long or wedged in the Owner's Guide for assistance.
Ventilation ...system clogged. Make necessary corrections, then select a cycle and press START. Press buttons lightly and release. PN 134431300A (0501) These temperatures, dryness...
Similar Questions

Frigidaire Affinity Dryer 3 Lights Beep Does Not Start
(Posted by deDAT 9 years ago)

Frigidaire Affinity Dryer How Can I Tell If It's Overheating Fire Hazard
(Posted by avmai 10 years ago)

Frigidaire Affinity Dryer Will Not Start
(Posted by nckerv606 10 years ago)

My Frigidaire Affinity Dryer Will Not Start. All Lights On But No Go.
(Posted by Skubinna 11 years ago)
Fridgeaire Affinity Dryer Panel Lights Up But Nothing Happens When I Press Start
(Posted by tiffcaron 12 years ago)