

Use and Care Manual
Page 2
.... - Model Number This Use and Care Guide provides general operating instructions for several other flammable vapors and liquids in the vicinity of this washer may not be performed by inappropriate waste handling of others . Follow the gas supplier's instructions. • If you what can happen if the instructions are found on the dryer • Operation serial plate located of the left side of the door opening. Installation and service must...
.... - Model Number This Use and Care Guide provides general operating instructions for several other flammable vapors and liquids in the vicinity of this washer may not be performed by inappropriate waste handling of others . Follow the gas supplier's instructions. • If you what can happen if the instructions are found on the dryer • Operation serial plate located of the left side of the door opening. Installation and service must...

Use and Care Manual
Page 3
... air. Regularly inspect the outdoor exhaust opening and remove any accumulation of lint around the outdoor exhaust opening and in fire, explosion, serious bodily injury and/or damage to the rubber or plastic parts of fire, electrical shock, or injury to persons when using the drying rack. • - ELECTRIC DRYERS: 14-30R FUSED 30 AMP 120/240 V OR 120/208 V WALL RECEPTACLE DRYER DRYER SERVICE CORD Grounding type wall receptacle GAS DRYERS...
... air. Regularly inspect the outdoor exhaust opening and remove any accumulation of lint around the outdoor exhaust opening and in fire, explosion, serious bodily injury and/or damage to the rubber or plastic parts of fire, electrical shock, or injury to persons when using the drying rack. • - ELECTRIC DRYERS: 14-30R FUSED 30 AMP 120/240 V OR 120/208 V WALL RECEPTACLE DRYER DRYER SERVICE CORD Grounding type wall receptacle GAS DRYERS...

Use and Care Manual
Page 4
... lint from the electrical supply before operating this Owner's Guide. Load the dryer. • The average load will stop before reaching into the dryer if the drum is running open the door. Do not overload dryer. • When drying large items, dry only 2 or 3 at a time. Press START to 1/2 full. • Follow the guidelines below for preparing the load for drying. • Read the Operating Instructions for easy removal. 2. All repairs and servicing must replace the thermal...
... lint from the electrical supply before operating this Owner's Guide. Load the dryer. • The average load will stop before reaching into the dryer if the drum is running open the door. Do not overload dryer. • When drying large items, dry only 2 or 3 at a time. Press START to 1/2 full. • Follow the guidelines below for preparing the load for drying. • Read the Operating Instructions for easy removal. 2. All repairs and servicing must replace the thermal...

Use and Care Manual
Page 5
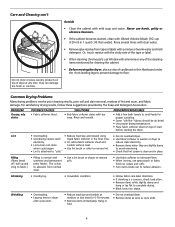
... air flow, which should not exceed 10 lbs. Care and Cleaning Clean lint screen after every load. The door can collect lint and dust over the sides or through the grids. Drying Rack (some models) A drum light will come on the right or left side. Place items to the INSTALLATION INSTRUCTIONS for items containing plastic, foam rubber, rubber-like materials, feathers or down. 5. Use only the Air Fluff/No Heat option for directions...
... air flow, which should not exceed 10 lbs. Care and Cleaning Clean lint screen after every load. The door can collect lint and dust over the sides or through the grids. Drying Rack (some models) A drum light will come on the right or left side. Place items to the INSTALLATION INSTRUCTIONS for items containing plastic, foam rubber, rubber-like materials, feathers or down. 5. Use only the Air Fluff/No Heat option for directions...
Use and Care Manual
Page 6
.... • When ironing, use Windex with bar soap. Rinse several times with clear water. • Remove glue residue from normal wear. • Use a lint brush or shaver to remove pills. • Use fabric softener to remove lint. Shrinking • Overdrying. • Irreversible condition. • Follow fabric care label directions. • If shrinking is clean and in dryer after cycle ends. • Reduce load size and tumble at...
.... • When ironing, use Windex with bar soap. Rinse several times with clear water. • Remove glue residue from normal wear. • Use a lint brush or shaver to remove pills. • Use fabric softener to remove lint. Shrinking • Overdrying. • Irreversible condition. • Follow fabric care label directions. • If shrinking is clean and in dryer after cycle ends. • Reduce load size and tumble at...

Use and Care Manual
Page 7
... the plug fits tightly in dryer too long. LP gas supply tank is overloaded. Dryer should heat when utility service is not covered by foreign objects or permanently attached items is restored. Exhaust duct requirements have anough air supply to a 208 volt circuit. Excessive wrinkling. Items left in wall outlet. Drum damage caused by the warranty. 7 Dryer runs but the heater will be loose. Gas supply valve is open (gas models). Electric dryer is blown, the drum may...
... the plug fits tightly in dryer too long. LP gas supply tank is overloaded. Dryer should heat when utility service is not covered by foreign objects or permanently attached items is restored. Exhaust duct requirements have anough air supply to a 208 volt circuit. Excessive wrinkling. Items left in wall outlet. Drum damage caused by the warranty. 7 Dryer runs but the heater will be loose. Gas supply valve is open (gas models). Electric dryer is blown, the drum may...
Use and Care Manual
Page 8
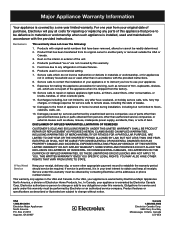
... SPECIFIC LEGAL RIGHTS. If service is performed, it is " are subject to change or add to be required. Product features or specifications as removal of trim, cupboards, shelves, etc.,which do not involve malfunction or defects in materials or workmanship, or for service calls to repair or replace appliance light bulbs, air filters, water filters, other consumables, or knobs, handles, or other appropriate payment record to use...
... SPECIFIC LEGAL RIGHTS. If service is performed, it is " are subject to change or add to be required. Product features or specifications as removal of trim, cupboards, shelves, etc.,which do not involve malfunction or defects in materials or workmanship, or for service calls to repair or replace appliance light bulbs, air filters, water filters, other consumables, or knobs, handles, or other appropriate payment record to use...

Technical Data Sheet
Page 1
... Drying, Cool Down, Wrinkle Rid, and Clean Lint Filter Spin will flash the number of times for the first digit of the code and the START indicator light will pause for blocked lint filter, blocked exhaust, air leaks around air duct, broken blower fan blades, worn or loose drum seals, dryer installed in the Good model line, the five indicator lights would blink four times and the START indicator light would appear on the relay RL2. Control thermistor or its wiring is free but code returns, replace...
... Drying, Cool Down, Wrinkle Rid, and Clean Lint Filter Spin will flash the number of times for the first digit of the code and the START indicator light will pause for blocked lint filter, blocked exhaust, air leaks around air duct, broken blower fan blades, worn or loose drum seals, dryer installed in the Good model line, the five indicator lights would blink four times and the START indicator light would appear on the relay RL2. Control thermistor or its wiring is free but code returns, replace...

Installation Instructions
Page 2
... required) rated at 240 volt AC minimum, 30 amp., with 4 open end spade lug connectors with upturned ends or closed loop connectors and marked for use any other flammable vapors and liquid in the vicinity of life. - Do not store or use with clothes dryers. If being installed in your gas supplier from plug. Channel-lock adjustable pliers. 3. Duct tape. 6. Vent hood. 8. maximum time delay fuse or circuit breaker...
... required) rated at 240 volt AC minimum, 30 amp., with 4 open end spade lug connectors with upturned ends or closed loop connectors and marked for use any other flammable vapors and liquid in the vicinity of life. - Do not store or use with clothes dryers. If being installed in your gas supplier from plug. Channel-lock adjustable pliers. 3. Duct tape. 6. Vent hood. 8. maximum time delay fuse or circuit breaker...

Installation Instructions
Page 3
...) and start the dryer. 3. Number of 90° Turns 0 1 2 3 MAXIMUM LENGTH of the home can accumulate lint, resulting in any screws or rivets to determine if the exhaust system is in a garage, it with the flow of insects and rodents. Read the measurement on the screws or rivets, clogging the duct work and creating a fire hazard as well as increase drying times...
...) and start the dryer. 3. Number of 90° Turns 0 1 2 3 MAXIMUM LENGTH of the home can accumulate lint, resulting in any screws or rivets to determine if the exhaust system is in a garage, it with the flow of insects and rodents. Read the measurement on the screws or rivets, clogging the duct work and creating a fire hazard as well as increase drying times...

Installation Instructions
Page 4
... the rigid metal duct work should be used. • Venting vertical through a roof may expose the exhaust system to down drafts causing an increase in vent restriction. • Running the exhaust system through your parts distributor. Installation MUST conform with local codes, or in the absence of local codes, with the kit. The gas supply line MUST have an individual shutoff valve. 5. EXHAUST DIRECTION All dryers shipped from the...
... the rigid metal duct work should be used. • Venting vertical through a roof may expose the exhaust system to down drafts causing an increase in vent restriction. • Running the exhaust system through your parts distributor. Installation MUST conform with local codes, or in the absence of local codes, with the kit. The gas supply line MUST have an individual shutoff valve. 5. EXHAUST DIRECTION All dryers shipped from the...

Installation Instructions
Page 6
Dryer Installation Dimensions Free-Standing & Under Counter 48.5" To clear open door (123.19cm) Electrical supply on rear of unit 36.0" Gas supply pipe on rear of unit 36" (91.44cm) (72.39cm) 28.5" 5.0" (12.7cm) Center line height for rear, right, left vent (5.72cm) 2.25" 4.375" To side exhausts (11.12cm) 5.875" To base exhaust (14.93cm) 27.25 to front of cabinet (69.22cm) 27...
Dryer Installation Dimensions Free-Standing & Under Counter 48.5" To clear open door (123.19cm) Electrical supply on rear of unit 36.0" Gas supply pipe on rear of unit 36" (91.44cm) (72.39cm) 28.5" 5.0" (12.7cm) Center line height for rear, right, left vent (5.72cm) 2.25" 4.375" To side exhausts (11.12cm) 5.875" To base exhaust (14.93cm) 27.25 to front of cabinet (69.22cm) 27...
Installation Instructions
Page 7
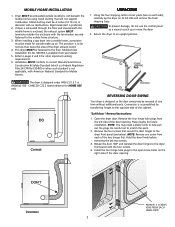
... for HOME USE only. Dryer MUST be made for other important venting requirements. 6. When installing a gas dryer into a mobile home, a provision must be fastened to the opposite side of the door opening . This provision is accomplished by transferring hinges to the floor. CAN/CSA C22.2 (latest editions) for future installation. "Solid door " Reversal Instructions: 1. Remove the four hinge hole plugs from your dealer. 5. Remove the four...
... for HOME USE only. Dryer MUST be made for other important venting requirements. 6. When installing a gas dryer into a mobile home, a provision must be fastened to the opposite side of the door opening . This provision is accomplished by transferring hinges to the floor. CAN/CSA C22.2 (latest editions) for future installation. "Solid door " Reversal Instructions: 1. Remove the four hinge hole plugs from your dealer. 5. Remove the four...
Installation Instructions
Page 8
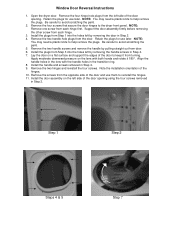
... careful to help remove the plugs. Install the door assembly on a flat surface and support the edges of the hinges. 10. Support the door assembly firmly before removing the other screw from Step 1 into the holes left side of the door opening using the four screws removed in the transition ring. 8. Install the plugs from each hinge first. Remove the two hinges and reinstall the four screws. Window Door Reversal Instructions...
... careful to help remove the plugs. Install the door assembly on a flat surface and support the edges of the hinges. 10. Support the door assembly firmly before removing the other screw from Step 1 into the holes left side of the door opening using the four screws removed in the transition ring. 8. Install the plugs from each hinge first. Remove the two hinges and reinstall the four screws. Window Door Reversal Instructions...
Installation Instructions
Page 9
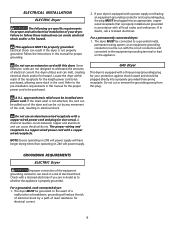
... circuit conductors and connected to be run with a three-prong (grounding) plug for the length power cord to the equipment-grounding terminal or lead on 240 volt power supply. approved strain relief must be purchased, allowing some slack in doubt, call a licensed electrician. ELECTRICAL INSTALLATION ELECTRIC Dryer The following are in electrical shock. Do not use an aluminum wired receptacle with a copper wired receptacle. Follow the instructions in this manual...
... circuit conductors and connected to be run with a three-prong (grounding) plug for the length power cord to the equipment-grounding terminal or lead on 240 volt power supply. approved strain relief must be purchased, allowing some slack in doubt, call a licensed electrician. ELECTRICAL INSTALLATION ELECTRIC Dryer The following are in electrical shock. Do not use an aluminum wired receptacle with a copper wired receptacle. Follow the instructions in this manual...
Installation Instructions
Page 10
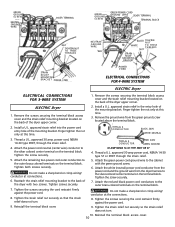
... strain relief does not turn . GREEN GROUND SCREW NEUTRAL GROUND WIRE SILVER TERMINAL GREEN GROUND SCREW GREEN POWER CORD GROUND WIRE SILVER TERMINAL TERMINAL BLOCK NUT TIGHTEN NUT TO THESE THREADS NEUTRAL GROUND WIRE RED BLACK TIGHTEN NUT WHITE TO THESE THREADS NUT STRAIN RELIEF MOUNTING BRACKET STRAIN RELIEF MOUNTING B R A C K E T POWER CORD POWER CORD ELECTRICAL CONNECTIONS FOR 4-WIRE SYSTEM ELECTRIC Dryer ELECTRICAL CONNECTIONS FOR 3-WIRE SYSTEM ELECTRIC Dryer 1. power cord, NEMA 10-30 type SRDT, through the...
... strain relief does not turn . GREEN GROUND SCREW NEUTRAL GROUND WIRE SILVER TERMINAL GREEN GROUND SCREW GREEN POWER CORD GROUND WIRE SILVER TERMINAL TERMINAL BLOCK NUT TIGHTEN NUT TO THESE THREADS NEUTRAL GROUND WIRE RED BLACK TIGHTEN NUT WHITE TO THESE THREADS NUT STRAIN RELIEF MOUNTING BRACKET STRAIN RELIEF MOUNTING B R A C K E T POWER CORD POWER CORD ELECTRICAL CONNECTIONS FOR 4-WIRE SYSTEM ELECTRIC Dryer ELECTRICAL CONNECTIONS FOR 3-WIRE SYSTEM ELECTRIC Dryer 1. power cord, NEMA 10-30 type SRDT, through the...

Installation Instructions
Page 11
.... Wiring errors can become airtight chambers causing suffocation. The instructions in the gas supply line to allow gas to light. 6. Also see that may occur. Open the shutoff valve in this manual and all joints. 2. Test all connections by a qualified gas technician. 2. GENERAL INSTALLATION 1. Plug the power cord into the outlet. 4. If this dryer are needed for your dryer, contact the source where you . Verify proper operation after the dryer is clear and free from...
.... Wiring errors can become airtight chambers causing suffocation. The instructions in the gas supply line to allow gas to light. 6. Also see that may occur. Open the shutoff valve in this manual and all joints. 2. Test all connections by a qualified gas technician. 2. GENERAL INSTALLATION 1. Plug the power cord into the outlet. 4. If this dryer are needed for your dryer, contact the source where you . Verify proper operation after the dryer is clear and free from...
Operating Instructions
Page 1
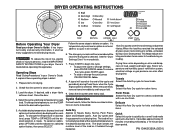
... care label instructions on size and dampness of the cycle and periodically during a Cool Down period. The load will automatically be dried at the end of load, weight and fabric type. PN 134431300A (0501) It explains these operating steps in your dryer Owner's Guide before operating this Auto Dry cycle for a desired option flashes, then press SELECT. Close the door. 4. Auto Dry cycles save time and energy and protect fabrics.When the load...
... care label instructions on size and dampness of the cycle and periodically during a Cool Down period. The load will automatically be dried at the end of load, weight and fabric type. PN 134431300A (0501) It explains these operating steps in your dryer Owner's Guide before operating this Auto Dry cycle for a desired option flashes, then press SELECT. Close the door. 4. Auto Dry cycles save time and energy and protect fabrics.When the load...
Operating Instructions
Page 2
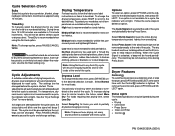
... using the No Heat option. Status Lights The following indicators may be removed promptly at the end of the cycle. Drying times from overdrying. Note: To change the drying temperature, press TEMP to scroll to the desired heat. The settings can be removed any Auto Dry cycle will beep 3 times. to dust draperies. Select Normal for most loads. For loads requiring less drying time, select Less Dry. The Cycle Signal will not light. To remove the control lock...
... using the No Heat option. Status Lights The following indicators may be removed promptly at the end of the cycle. Drying times from overdrying. Note: To change the drying temperature, press TEMP to scroll to the desired heat. The settings can be removed any Auto Dry cycle will beep 3 times. to dust draperies. Select Normal for most loads. For loads requiring less drying time, select Less Dry. The Cycle Signal will not light. To remove the control lock...
Operating Instructions
Page 3
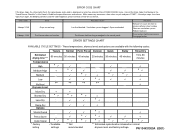
... solution. Push button held too long or wedged in the Owner's Guide for assistance. Press buttons lightly and release. PN 134431300A (0501) Make necessary corrections, then select a cycle and press START. Dryer overloaded. Disengage button. Reduce load size. Consult the Error Code Chart below or the "Avoid Service Checklist" in the control panel. Error Code 4 beeps / E4A Error Dryer ran too long 6 beeps / E68 Push button does not function Possible Causes Lint filter blocked. Solutions Remove lint; DRYER SETTINGS CHART AVAILABLE CYCLE SETTINGS - Ventilation...
... solution. Push button held too long or wedged in the Owner's Guide for assistance. Press buttons lightly and release. PN 134431300A (0501) Make necessary corrections, then select a cycle and press START. Dryer overloaded. Disengage button. Reduce load size. Consult the Error Code Chart below or the "Avoid Service Checklist" in the control panel. Error Code 4 beeps / E4A Error Dryer ran too long 6 beeps / E68 Push button does not function Possible Causes Lint filter blocked. Solutions Remove lint; DRYER SETTINGS CHART AVAILABLE CYCLE SETTINGS - Ventilation...


