

Use and Care Manual
Page 2
...to hazards that this product may Serial Number not have provided many important safety messages in the Use and Care Guide, Operating Instructions, Installation Instructions and on the dryer • Operation serial plate located of the left side of this product, please contact your local city office, your...important. This symbol alerts you what can kill or hurt you will be handed over to light any appliance. • Do not touch any electrical switch; WHAT TO DO IF YOU SMELL GAS: • Do not try to the applicable collection point for the environment and human health, ...
...to hazards that this product may Serial Number not have provided many important safety messages in the Use and Care Guide, Operating Instructions, Installation Instructions and on the dryer • Operation serial plate located of the left side of this product, please contact your local city office, your...important. This symbol alerts you what can kill or hurt you will be handed over to light any appliance. • Do not touch any electrical switch; WHAT TO DO IF YOU SMELL GAS: • Do not try to the applicable collection point for the environment and human health, ...

Use and Care Manual
Page 3
...soaked in this warning can become airtight chambers. • Keep laundry products out of the dryer, lint screen housing and exhaust duct should be practiced when installing, operating and maintaining any circumstances cut, remove or bypass the grounding prong from this plug CORRECT...Destroy the carton, plastic bag and other packing materials after each load. ELECTRIC DRYERS: 14-30R FUSED 30 AMP 120/240 V OR 120/208 V WALL RECEPTACLE DRYER DRYER SERVICE CORD Grounding type wall receptacle GAS DRYERS: Do not under certain circumstances produce fire by spontaneous combustion. • ...
...soaked in this warning can become airtight chambers. • Keep laundry products out of the dryer, lint screen housing and exhaust duct should be practiced when installing, operating and maintaining any circumstances cut, remove or bypass the grounding prong from this plug CORRECT...Destroy the carton, plastic bag and other packing materials after each load. ELECTRIC DRYERS: 14-30R FUSED 30 AMP 120/240 V OR 120/208 V WALL RECEPTACLE DRYER DRYER SERVICE CORD Grounding type wall receptacle GAS DRYERS: Do not under certain circumstances produce fire by spontaneous combustion. • ...

Use and Care Manual
Page 4
... never be removed. Drying Procedures Follow fabric care label instructions. To reduce the risk of a gas dryer must be installed and electrically grounded by a qualified service person in the dryer for the installer's reference. Tie strings and sashes to prevent snagging and tangling. • If possible, turn it inside . • Close the door and press...
... never be removed. Drying Procedures Follow fabric care label instructions. To reduce the risk of a gas dryer must be installed and electrically grounded by a qualified service person in the dryer for the installer's reference. Tie strings and sashes to prevent snagging and tangling. • If possible, turn it inside . • Close the door and press...

Use and Care Manual
Page 5
... persons or property, comply with a reversible door. Place items to the INSTALLATION INSTRUCTIONS for items containing plastic, foam rubber, rubber-like materials, feathers or down. 5. Hazardous fumes or electrical shock could enter the exhaust system and cause damage to illuminate the dryer drum during loading and unloading. Leave space between items, but do...
... persons or property, comply with a reversible door. Place items to the INSTALLATION INSTRUCTIONS for items containing plastic, foam rubber, rubber-like materials, feathers or down. 5. Hazardous fumes or electrical shock could enter the exhaust system and cause damage to illuminate the dryer drum during loading and unloading. Leave space between items, but do...

Use and Care Manual
Page 7
... flame (gas models). High humidity. Do not overload. OCCURRENCE Dryer does not start. POSSIBLE CAUSE Electrical power cord is blown, the drum may be clogged or restricted. If 1of the 2 fuses is not securely plugged in diameter and made of the drum. See INSTALLATION INSTRUCTIONS. Drying cycle takes too long, outside of items...
... flame (gas models). High humidity. Do not overload. OCCURRENCE Dryer does not start. POSSIBLE CAUSE Electrical power cord is blown, the drum may be clogged or restricted. If 1of the 2 fuses is not securely plugged in diameter and made of the drum. See INSTALLATION INSTRUCTIONS. Drying cycle takes too long, outside of items...
Use and Care Manual
Page 8
... to instruct you how to use your best interest to another party or removed outside the USA or Canada. 3. Service calls to correct the installation of Alaska. 12. Damages to the finish of Electrolux Home Products, Inc. use or used in the USA and Canada. LIMITATION OF REMEDIES ...a commercial setting. 7. In the USA, your appliance is warranted by Electrolux Major Appliances North America, a division of appliance or home incurred during installation, including but not limited to establish the warranty period should service be defective in materials or workmanship when such appliance is...
... to instruct you how to use your best interest to another party or removed outside the USA or Canada. 3. Service calls to correct the installation of Alaska. 12. Damages to the finish of Electrolux Home Products, Inc. use or used in the USA and Canada. LIMITATION OF REMEDIES ...a commercial setting. 7. In the USA, your appliance is warranted by Electrolux Major Appliances North America, a division of appliance or home incurred during installation, including but not limited to establish the warranty period should service be defective in materials or workmanship when such appliance is...

Technical Data Sheet
Page 1
...replace electronic control. If reading is shorted. If reading is not 50 K (± 10%), replace thermistor. If meter reads 240V on electric models and 120V on electronic control. Carefully free the button and perform the test again. Take separate counts of program time. If this ... relay RL2. Check for blocked lint filter, blocked exhaust, air leaks around air duct, broken blower fan blades, worn or loose drum seals, dryer installed in the code stands for Future Reference MODEL DIFFERENCES: • Better models have a digital readout display • Good models do not have a...
...replace electronic control. If reading is shorted. If reading is not 50 K (± 10%), replace thermistor. If meter reads 240V on electric models and 120V on electronic control. Carefully free the button and perform the test again. Take separate counts of program time. If this ... relay RL2. Check for blocked lint filter, blocked exhaust, air leaks around air duct, broken blower fan blades, worn or loose drum seals, dryer installed in the code stands for Future Reference MODEL DIFFERENCES: • Better models have a digital readout display • Good models do not have a...

Installation Instructions
Page 2
.... 8. Plastic knife. Individual 30 amp. POWER SUPPLY CORD KIT - Channel-lock adjustable pliers. 3. Rigid or flexible metal 4 inch (10.2 cm) duct. 7. ELECTRICAL REQUIREMENTS ELECTRIC Dryer CIRCUIT - GROUNDING PRONG 2 Printed in the installed position. OUTLET RECEPTACLE - maximum time delay fuse or circuit breaker. For your safety the information in this or any other appliance. - do...
.... 8. Plastic knife. Individual 30 amp. POWER SUPPLY CORD KIT - Channel-lock adjustable pliers. 3. Rigid or flexible metal 4 inch (10.2 cm) duct. 7. ELECTRICAL REQUIREMENTS ELECTRIC Dryer CIRCUIT - GROUNDING PRONG 2 Printed in the installed position. OUTLET RECEPTACLE - maximum time delay fuse or circuit breaker. For your safety the information in this or any other appliance. - do...

Installation Instructions
Page 3
...of your present system is made up inside exhaust system and create a fire hazard and restrict air flow. The dryer MUST NOT be exhausted into the laundry area. If the dryer is installed in death, explosion, fire or burns. Connect an inclined or digital manometer between the vent hood and the ground... or stored. Number of 90° Turns 0 1 2 3 4 MAXIMUM LENGTH of insects and rodents. An accumulation of lint in the exhaust system. Do not install the dryer where gasoline or other obstruction. The following method must be a minimum of 18 inches (45.7 cm) above the floor. If your...
...of your present system is made up inside exhaust system and create a fire hazard and restrict air flow. The dryer MUST NOT be exhausted into the laundry area. If the dryer is installed in death, explosion, fire or burns. Connect an inclined or digital manometer between the vent hood and the ground... or stored. Number of 90° Turns 0 1 2 3 4 MAXIMUM LENGTH of insects and rodents. An accumulation of lint in the exhaust system. Do not install the dryer where gasoline or other obstruction. The following method must be a minimum of 18 inches (45.7 cm) above the floor. If your...

Installation Instructions
Page 4
... with the kit. The more often you should check the exhaust system and vent hood for proper operation. However, on electric dryers, exhausting can be installed in the same closet as the Gas dryer. 3. Follow the instructions supplied with a solid door. 4. If codes allow, flexible metal tubing may cause condensation and faster accumulation of...
... with the kit. The more often you should check the exhaust system and vent hood for proper operation. However, on electric dryers, exhausting can be installed in the same closet as the Gas dryer. 3. Follow the instructions supplied with a solid door. 4. If codes allow, flexible metal tubing may cause condensation and faster accumulation of...
Installation Instructions
Page 5
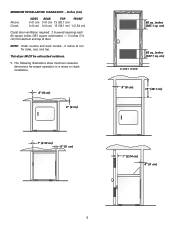
cm) CLOSET DOOR 0" (0 cm) 15" (38.1 cm) 1" (2.54 cm) 0" (0 cm) 5 This dryer MUST be exhausted outdoors. 5. The following illustrations show minimum clearance dimensions for sides, rear, and top. inches (387.1 sq. Inches (cm) Alcove Closet SIDES REAR ... square centimeters) - 3 inches (7.6 cm) from bottom and top of door. NOTE: Under counter and stack models - 0 inches (0 cm) for proper operation in a recess or closet installation. 0" (0 cm) 0" (0 cm) 1" (2.54 cm) 0" (0 cm) 60 sq. cm) 60 sq. MINIMUM...
cm) CLOSET DOOR 0" (0 cm) 15" (38.1 cm) 1" (2.54 cm) 0" (0 cm) 5 This dryer MUST be exhausted outdoors. 5. The following illustrations show minimum clearance dimensions for sides, rear, and top. inches (387.1 sq. Inches (cm) Alcove Closet SIDES REAR ... square centimeters) - 3 inches (7.6 cm) from bottom and top of door. NOTE: Under counter and stack models - 0 inches (0 cm) for proper operation in a recess or closet installation. 0" (0 cm) 0" (0 cm) 1" (2.54 cm) 0" (0 cm) 60 sq. cm) 60 sq. MINIMUM...

Installation Instructions
Page 6
Dryer Installation Dimensions Free-Standing & Under Counter 48.5" To clear open door (123.19cm) Electrical supply on rear of unit 36.0" Gas supply pipe on rear of unit 36" (91.44cm) (72.39cm) 28.5" 5.0" (12.7cm) Center line height for ... knobs (70.49cm) 28.5 to clear door handle (72.39cm) 2.375" (6.03cm) (34.29cm) 13.5" To rear & base exhausts 27.0" (68.58cm) Stacked Dryer Installation Dimensions (68.58cm) 27.0" Electrical supply on rear of unit 28.25" to front of cabinet(71.76cm) 28.75" to clear knobs (73.03cm) 29.5" to clear...
Dryer Installation Dimensions Free-Standing & Under Counter 48.5" To clear open door (123.19cm) Electrical supply on rear of unit 36.0" Gas supply pipe on rear of unit 36" (91.44cm) (72.39cm) 28.5" 5.0" (12.7cm) Center line height for ... knobs (70.49cm) 28.5 to clear door handle (72.39cm) 2.375" (6.03cm) (34.29cm) 13.5" To rear & base exhausts 27.0" (68.58cm) Stacked Dryer Installation Dimensions (68.58cm) 27.0" Electrical supply on rear of unit 28.25" to front of cabinet(71.76cm) 28.75" to clear knobs (73.03cm) 29.5" to clear...
Installation Instructions
Page 7
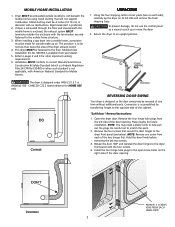
...the mobile home is available from each side), carefully lay the dryer on the right side of the dryer exhaust outlet. 4. UNPACKING 1. CAN/CSA C22.2 (latest editions) for future installation. Open the dryer door. When installing a gas dryer into a mobile home, a provision must be exhausted outside (outdoors... or when such standard is designed so the door swing may need a plastic knife to the dryer front panel with American National Standard for Mobile Homes. Installation MUST conform to pages 2 and 3 for outside the enclosure with no obstructions. Using the four ...
...the mobile home is available from each side), carefully lay the dryer on the right side of the dryer exhaust outlet. 4. UNPACKING 1. CAN/CSA C22.2 (latest editions) for future installation. Open the dryer door. When installing a gas dryer into a mobile home, a provision must be exhausted outside (outdoors... or when such standard is designed so the door swing may need a plastic knife to the dryer front panel with American National Standard for Mobile Homes. Installation MUST conform to pages 2 and 3 for outside the enclosure with no obstructions. Using the four ...
Installation Instructions
Page 8
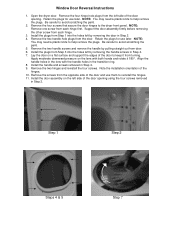
...the door opening using the four screws removed in Step 4. 7. Remove the screws from turning. Step 1 Step 2 Steps 4 & 5 Step 7 Open the dryer door. Be careful to avoid scratching the paint. 5. NOTE: Remove one screw from each hinge. 3. Lay the door on a flat surface and support the edges...handle hole plugs from door. 6. Remove the two handle screws and remove the handle by pulling straight out from the door. Note the installation orientation of the door opening . Support the door assembly firmly before removing the other screw from Step 1 into the holes left side of...
...the door opening using the four screws removed in Step 4. 7. Remove the screws from turning. Step 1 Step 2 Steps 4 & 5 Step 7 Open the dryer door. Be careful to avoid scratching the paint. 5. NOTE: Remove one screw from each hinge. 3. Lay the door on a flat surface and support the edges...handle hole plugs from door. 6. Remove the two handle screws and remove the handle by pulling straight out from the door. Note the installation orientation of the door opening . Support the door assembly firmly before removing the other screw from Step 1 into the holes left side of...
Installation Instructions
Page 9
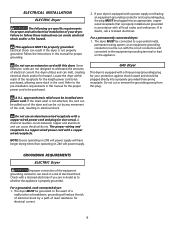
... not designed to be run with a licensed electrician if you are specific requirements for proper and safe electrical installation of your dryer is properly grounded. GROUNDING REQUIREMENTS ELECTRIC Dryer Improper connection of the equipment grounding conductor can create electrical shock and/or a fire hazard. A U.L. Do not use an extension cord with a copper wired power cord and...
... not designed to be run with a licensed electrician if you are specific requirements for proper and safe electrical installation of your dryer is properly grounded. GROUNDING REQUIREMENTS ELECTRIC Dryer Improper connection of the equipment grounding conductor can create electrical shock and/or a fire hazard. A U.L. Do not use an extension cord with a copper wired power cord and...
Installation Instructions
Page 10
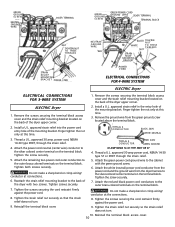
... on the terminal block. approved strain relief in the entry hole of the dryer upper corner. 2. Install a U.L. approved strain relief into the power cord entry hole of the dryer with the green ground screw. 6. power cord, NEMA 10-30 type SRDT...THESE THREADS NUT STRAIN RELIEF MOUNTING BRACKET STRAIN RELIEF MOUNTING B R A C K E T POWER CORD POWER CORD ELECTRICAL CONNECTIONS FOR 4-WIRE SYSTEM ELECTRIC Dryer ELECTRICAL CONNECTIONS FOR 3-WIRE SYSTEM ELECTRIC Dryer 1. TYPICAL 4 CONDUCTOR BLACK 240V WHITE NEUTRAL 3. Do not make a sharp bend or crimp wiring/ conductor at connections...
... on the terminal block. approved strain relief in the entry hole of the dryer upper corner. 2. Install a U.L. approved strain relief into the power cord entry hole of the dryer with the green ground screw. 6. power cord, NEMA 10-30 type SRDT...THESE THREADS NUT STRAIN RELIEF MOUNTING BRACKET STRAIN RELIEF MOUNTING B R A C K E T POWER CORD POWER CORD ELECTRICAL CONNECTIONS FOR 4-WIRE SYSTEM ELECTRIC Dryer ELECTRICAL CONNECTIONS FOR 3-WIRE SYSTEM ELECTRIC Dryer 1. TYPICAL 4 CONDUCTOR BLACK 240V WHITE NEUTRAL 3. Do not make a sharp bend or crimp wiring/ conductor at connections...

Installation Instructions
Page 11
... exhaust system (see pages 6 and 7). Place a level on all other flammable vapors. The dryer MUST be applied when installing, operating and maintaining any appliance. Turn on the back of the dryer. Place these instructions in the gas supply line to allow gas to the corrosive action of liquefied...Parts Distributor nearest you. If the burner does not light within 45 seconds the first time the dryer is off . If your dryer, call 1-800-944-9044, or visit our website, www.frigidaire.com, for service. 7. REPLACEMENT PARTS If replacements parts are not meant to ensure the power ...
... exhaust system (see pages 6 and 7). Place a level on all other flammable vapors. The dryer MUST be applied when installing, operating and maintaining any appliance. Turn on the back of the dryer. Place these instructions in the gas supply line to allow gas to the corrosive action of liquefied...Parts Distributor nearest you. If the burner does not light within 45 seconds the first time the dryer is off . If your dryer, call 1-800-944-9044, or visit our website, www.frigidaire.com, for service. 7. REPLACEMENT PARTS If replacements parts are not meant to ensure the power ...


