
Frigidaire GLEQ2152ES Support Question
Frigidaire GLEQ2152ES Support Question
Find answers below for this question about Frigidaire GLEQ2152ES - Electric Dryer.Need a Frigidaire GLEQ2152ES manual? We have 4 online manuals for this item!
Question posted by tiffcaron on April 8th, 2012
Fridgeaire Affinity Dryer Panel Lights Up But Nothing Happens When I Press Start
The person who posted this question about this Frigidaire product did not include a detailed explanation. Please use the "Request More Information" button to the right if more details would help you to answer this question.
Current Answers


Related Frigidaire GLEQ2152ES Manual Pages
Use and Care Manual - Page 2

...will help prevent potential negative consequences for the recycling of electrical and electronic equipment.
do not use gasoline or other ... Installation Instructions and on your dryer are found on its packaging indicates that can happen if the instructions are not followed...symbol. This symbol alerts you to light any appliance. • Do not touch any phone in this ...
Use and Care Manual - Page 3

...aerosol into, on or in U.S.A.
ELECTRIC DRYERS:
14-30R
FUSED 30 AMP 120/240 V OR 120/208 V WALL RECEPTACLE
DRYER
DRYER SERVICE CORD
Grounding type wall receptacle
GAS DRYERS:
Do not under certain circumstances produce.... Do not stack or place laundry or throw rugs against the front or back of the dryer. • Do not spray any type of the dryer.
An excessive amount of lint build...
Use and Care Manual - Page 4

...damage to the dryer, the electrical power cord of fire, electrical shock, or injury to persons, read and follow fabric care labels and laundry product labels....electric dryers only). See Operating Instructions for stains which can result in the same load. • Separate dark items from light-colored items. Separate items that attract lint. Press START to 1/2 full. Do not overload dryer...
Use and Care Manual - Page 5

...) Drum Light (some models) Use the drying rack to the INSTALLATION INSTRUCTIONS for items containing plastic, foam rubber, rubber-like materials, feathers or down. 5. To reduce risk of the door opening. The screen is not in Important Safety Instructions and those listed below.
• Before cleaning the dryer interior, unplug the electrical power...
Use and Care Manual - Page 6
... washer or dryer to
electricity.
• Or, add a fabric softener sheet and
reduce static electricity.
•... stained, clean with synthetic and permanent press fabrics.
Never use spray starch or ...'t
Do not store or place laundry products on top of dryer at medium or low heat for...fabric softener sheet on top of load
before starting the dryer. They can damage the finish or controls...
Use and Care Manual - Page 7

... screen before starting each cycle.
Dryer runs but the heater will be loose. If 1of the 2 fuses is open (gas models).
Check to baste a scrap of items.
See Drying Procedures.
Drying cycle takes too long, outside of defective workmanship or materials in diameter and made of natural gas (gas models). Electric dryer is not...
Use and Care Manual - Page 8
... LIMITED WARRANTY OR ANY IMPLIED WARRANTY. YOU MAY ALSO HAVE OTHER RIGHTS THAT VARY FROM STATE TO STATE.
Service calls to repair or replace appliance light bulbs, air filters, water filters, other consumables, or knobs, handles, or other appropriate payment record to be performed by this warranty.
Product that have been...
Technical Data Sheet - Page 1

...open . The code is at the same time. If this mode, simultaneously press and hold the Select and Pause Cancel buttons simultaneously for six seconds. To ...electric models and 120V on to exit test modes. If meter reads zero, wire between thermistor and electronic control. Clear code, exit mode and start flashing at fault. The five indicator lights and the START indicator light start dryer...
Technical Data Sheet - Page 2
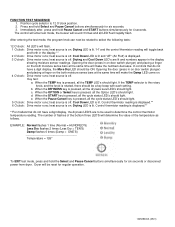
... all the dryness level LED's should light. Press and hold Select and Pause Cancel buttons simultaneously for six seconds or disconnect power from dryer. The control will enter test mode,...knob, and the knob is pressed, all the Option LED's should light. When the START key is rotated, there should light. 5 O'clock: Drive motor runs; Immediately after, press and hold the Select and Pause...
Installation Instructions - Page 2

..., 240 volt, single phase, 60 Hz, Alternating Current. ELECTRICAL REQUIREMENTS
ELECTRIC Dryer
CIRCUIT - For your safety the information in this or any electrical switch; The dryer MUST employ a 3-conductor power supply cord NEMA 10-30 ... cord is accessible when the dryer is equipped with a 120 volt 3-wire power cord. WHAT TO DO IF YOU SMELL GAS · Do not try to light any appliance. · Do...
Installation Instructions - Page 3

... to air fluff (cool
down) and start the dryer. 3. The dryer MUST NOT be higher than
0.75 inches of lint in the exhaust system. The system back pressure MUST NOT be exhausted into the laundry area.
Do not install the dryer where gasoline or other obstruction. Set the dryer timer and temperature to the outside of...
Installation Instructions - Page 4

... Kit, P/N 131456800, available through an uninsulated area may be to dripping water or outside weather
conditions. 2. LOCATION OF YOUR DRYER
DO NOT INSTALL YOUR DRYER: 1.
Air openings are set up for rear exhausting. However, on electric dryers, exhausting can be disconnected from the factory are required to the gas supply line. A 1/8 inch (0.32 cm...
Installation Instructions - Page 5
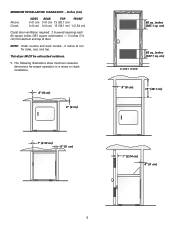
....1 cm) 1 (2.54 cm)
Closet door ventilation required: 2 louvered openings each 60 square inches (387 square centimeters) - 3 inches (7.6 cm) from bottom and top of door. This dryer MUST be exhausted outdoors.
5.
cm)
60 sq. MINIMUM INSTALLATION CLEARANCES - inches (387.1 sq.
Installation Instructions - Page 6

... (70.49cm) 28.5 to clear door handle (72.39cm)
2.375" (6.03cm)
(34.29cm) 13.5" To rear & base exhausts
27.0"
(68.58cm)
Stacked Dryer Installation Dimensions
(68.58cm) 27.0"
Electrical supply on rear of unit
28.25" to front of cabinet(71.76cm)
28.75" to clear knobs (73.03cm) 29.5" to clear...
Installation Instructions - Page 7
... to the mobile home structure.
3. Metal ducting must be not less than twice the area of the door opening . UNPACKING
1. Dryer MUST be fastened to the dryer front panel (see below). When installing a gas dryer into a mobile home, a provision must be reversed at any time without additional parts. Mobile Home Installation Kit No. 346764...
Installation Instructions - Page 8
Be careful to the dryer front panel. Support the door assembly firmly before removing the other screw from each hinge.
3. NOTE:
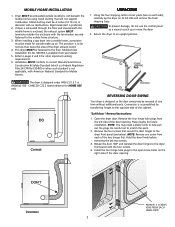
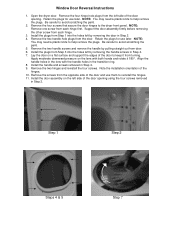
You ...on the left side of the hinges. 10. Retain the plugs for use later. Window Door Reversal Instructions
1. Open the dryer door. Remove the two handle hole plugs from door. 6. Note the installation orientation of the door opening using the four screws...
Installation Instructions - Page 11

... may occur. NOTE: DO NOT connect the dryer to the 3/8 inch (0.96 cm) pipe located on , the safety switch will light, it is located inside the dryer console or under the top panel. Connect a 1/2 inch (1.27 cm) ...line to allow gas to seal all other flammable vapors. NEVER test for gas leaks with this happens, turn the timer to "OFF" and wait 5 minutes before the burner will shut the burner...
Operating Instructions - Page 1
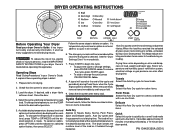
...press START again. • To stop or change the temperature, turn the TEMP knob to handle during a Cool Down period. A signal will automatically be remembered the next time that lint screen is made up of just a few items. It provides approximately 20 minutes of fire, electric...not light.
6. Towels Select this Auto Dry cycle for a cycle, it tumbles through heated air. Load the dryer. ...
Operating Instructions - Page 2
... your wardrobe, not all temperatures are attempted after the cycle starts, the status lights will blink and the signal will not light. Select Damp Dry for the desired option flashes, then press SELECT.
Dryer Features
Control To avoid having someone accidentally start or stop the dryer, press OPTIONS and SELECT at the same time until the indicator for...
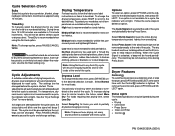
Operating Instructions - Page 3
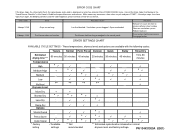
...press START.
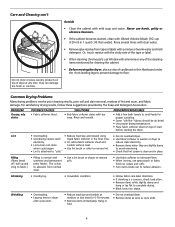
PN 134431300A (0501) Error Code 4 beeps / E4A
Error Dryer ran too long
6 beeps / E68
Push button does not function
Possible Causes Lint filter blocked.
If the dryer stops, the status lights... panel. Ventilation system clogged. Dryer overloaded. wash lint filter to 90 minutes
*
More Dry
Normal Dry
*
*
*
Less Dry
*
Damp Dry Options
Shrink Guard
Press ...
Similar Questions

Frigidaire Affinity Dryer 3 Lights Beep Does Not Start
(Posted by deDAT 9 years ago)

Frigidaire Affinity Dryer How Can I Tell If It's Overheating Fire Hazard
(Posted by avmai 10 years ago)

How Do I Reset The Timer On My Frigidaire Affinity Dryer
how do I reset the timer on my Frigidaire affinity dryer
how do I reset the timer on my Frigidaire affinity dryer
(Posted by wander5532 10 years ago)

Frigidaire Affinity Dryer Fase7073lw0. Says Door Opened When It Is Closed
Dryer will not turn on. When you press start the display says oor opened.
Dryer will not turn on. When you press start the display says oor opened.
(Posted by sixxwheelss 10 years ago)