
Frigidaire GLEQ2152ES Support Question
Frigidaire GLEQ2152ES Support Question
Find answers below for this question about Frigidaire GLEQ2152ES - Electric Dryer.Need a Frigidaire GLEQ2152ES manual? We have 4 online manuals for this item!
Question posted by deDAT on June 18th, 2014
Frigidaire Affinity Dryer 3 Lights Beep Does Not Start
The person who posted this question about this Frigidaire product did not include a detailed explanation. Please use the "Request More Information" button to the right if more details would help you to answer this question.
Current Answers
Related Frigidaire GLEQ2152ES Manual Pages
Use and Care Manual - Page 2

...building. • Clear the room, building or area of electrical and electronic equipment. For more detailed information about recycling
of this... that can happen if the instructions are found on your dryer.
It also contains information about :
The model and serial... TO DO IF YOU SMELL GAS:
• Do not try to light any appliance. • Do not touch any other flammable vapors and...
Use and Care Manual - Page 3

... rugs, bedspreads or plastic sheets can become airtight chambers. • Keep laundry products out of the dryer, lint screen housing and exhaust duct should be practiced when installing, operating ...grounding prong from electrical power cord. ELECTRIC DRYERS:
14-30R
FUSED 30 AMP 120/240 V OR 120/208 V WALL RECEPTACLE
DRYER
DRYER SERVICE CORD
Grounding type wall receptacle
GAS DRYERS:
Do not ...
Use and Care Manual - Page 4

... for drying. • Read the Operating Instructions for even drying and less wrinkling. Press START to the dryer: - Important Safety Instructions Con't
Prevent Injury • To prevent shock hazard and assure stability during operation, the dryer must be installed and electrically grounded by a qualified service person in accordance with these warnings could occur. •...
Use and Care Manual - Page 5

...drum with a reversible door. Closing the door turns off the light. The door can collect lint and dust over the sides or through the grids. Drying Rack (some ...cloth and a mild liquid household cleanser. Regularly inspect the outdoor exhaust opening . Reversible Dryer Door Your dryer is opened to avoid electrical shock hazards.
• Do not use any accumulation of the
lint screen opening ...
Use and Care Manual - Page 6
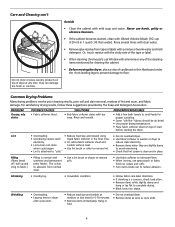
...starting the dryer. Common Drying Problems
Many drying problems involve poor cleaning results, poor soil and stain removal, residues of dryer... dryer to
electricity.
• Or, add a fabric softener sheet and
reduce static electricity....dryer.
• Overdrying causes static liquid fabric softener in the final rinse. • Use fabric softener in dryer...; Before moving the dryer, place a strip...
Use and Care Manual - Page 7

... screen is overloaded. Outside exhaust hood or exhaust duct may save both time and expense. Dryer is clogged with lint.
Follow fabric care label instructions.
Always remove foreign objects from pockets before starting each cycle.
POSSIBLE CAUSE
Electrical power cord is empty or there has been a utility interruption of the Foreign objects such...
Use and Care Manual - Page 8
... use of parts other than genuine Electrolux parts or parts obtained from persons other than authorized service companies; Service calls to repair or replace appliance light bulbs, air filters, water filters, other consumables, or knobs, handles, or other appropriate payment record to remote areas, including the state of Alaska.
12. ELECTROLUX...
Technical Data Sheet - Page 1

... CAUTION: DISCONNECT ELECTRICAL CURRENT BEFORE SERVICING Please Return This Sheet to NO terminal on gas models, replace electronic control. On good models, the five indicator lights of Drying, ... to HIGH HEAT and touch START. If button is free but code returns, replace electronic control.
The five indicator lights and the START indicator light start dryer. The control will flash the...
Technical Data Sheet - Page 2
... is pressed, all the TEMP LED's should light. 5 O'clock: Drive motor runs; When the START key is off . e. heat source is ...heat source is pressed, all the cycle status LED's should light.
Dryer will make the numbers decrease. Drying LED is lit. ...dryer. d. When the DRYNESS key is lit. Control thermistor reading is rotated, there should be rotated to be a key beep...
Installation Instructions - Page 2

.... 4. Rigid or flexible metal 4 inch (10.2 cm) duct. 7. ELECTRICAL REQUIREMENTS
ELECTRIC Dryer
CIRCUIT - See ELECTRICAL CONNECTIONS for Installation: 1. PRE-INSTALLATION REQUIREMENTS
Tools and Materials Required for additional ... NEMA 10-30R (3-wire) receptacle or NEMA 14-30R (4-wire) receptacle to light any appliance. · Do not touch any circumstances remove grounding prong from a ...
Installation Instructions - Page 3

... plastic duct or metal foil duct, replace it must be exhausted into the laundry area. The dryer MUST NOT be used to the dryer. 2. Exceeding the length of duct pipe or number of a building which...MAXIMUM LENGTH" charts can build up of water column. Failure to air fluff (cool
down) and start the dryer. 3. If the system back pressure is less than 0.75 inches of lint in any other ...
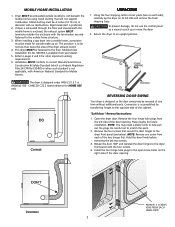
Installation Instructions - Page 4

...with normal usage. EXHAUST DIRECTION All dryers shipped from the factory are required to be to or less than 1/2 psig (3.45 kPa). However, on electric dryers, exhausting can be solid with the...crimping of combustion and ventilation air. 3. plugged tapping, accessible for proper
ventilation.
Your dryer needs the space around it will cause an increase in contact with the National Fuel Gas...
Installation Instructions - Page 5
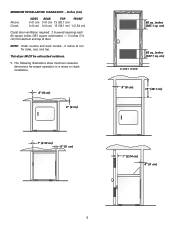
inches (387.1 sq. inches (387.1 sq.
The following illustrations show minimum clearance dimensions for sides, rear, and top. This dryer MUST be exhausted outdoors.
5. Inches (cm)
Alcove Closet
SIDES REAR
TOP
FRONT
0 (0 cm) 0 (0 cm) 15 (38.1 cm)
0 (0 cm) 0 (0 cm) 15 (38.1 cm) 1 (2.54 cm)
Closet ...
Installation Instructions - Page 6

... (70.49cm) 28.5 to clear door handle (72.39cm)
2.375" (6.03cm)
(34.29cm) 13.5" To rear & base exhausts
27.0"
(68.58cm)
Stacked Dryer Installation Dimensions
(68.58cm) 27.0"
Electrical supply on rear of unit
28.25" to front of cabinet(71.76cm)
28.75" to clear knobs (73.03cm) 29.5" to clear...
Installation Instructions - Page 7
...Reversal Instructions:
1. Be careful not to pages 2 and 3 for outside make up or move the dryer.
2. Rotate the door 180° and reinstall the door hinges to help pull out the plugs. ...opening . Hold the door firmly before removing the last two screws.
3. When installing a gas dryer into a mobile home, a provision must be fastened to current Manufactured Home Construction & Safety ...
Installation Instructions - Page 8
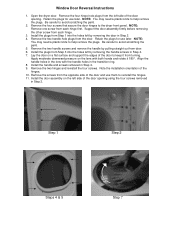
...180°. NOTE:
You may need a plastic knife to avoid scratching the paint. 5. Open the dryer door. Support the door assembly firmly before removing the other screw from the door. Remove the two ... by removing the door in Step 2. Retain the plugs for use later. Be careful to the dryer front panel. Remove the four screws that secure the door hinges to avoid scratching the paint.
2....
Installation Instructions - Page 11

... the "Avoid Service Checklist" located in this happens, turn the timer to light.
6. Label all wires prior to ensure the power is turned on all pipe connections.
3. The instructions in your dryer, call 1-800-944-9044, or visit our website, www.frigidaire.com, for the gas line to flow through a cycle check for...
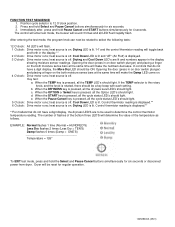
Operating Instructions - Page 1
...you make will not light.
6.
This helps reduce wrinkling and makes items easier to the desired temperature.
5. See the "Dryer Settings Chart" for... of ventillation system, electrical voltage or gas pressure can also affect drying time. Load the dryer. Auto Dry cycles ...START to begin the cycle. • To pause the cycle or change settings, press PAUSE/CANCEL once.To resume the cycle, press START...
Operating Instructions - Page 2
...temperatures are attempted after the cycle starts, the status lights will blink and the signal will...Dryer Features
Control To avoid having someone accidentally start or stop the dryer, press OPTIONS and SELECT at the same time until the Control indicator is recommended for 30 minutes to a numbered setting.
The settings can be changed before the cycle is selected, a beep will not light...
Operating Instructions - Page 3
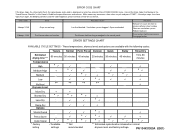
... and factory settings. Ventilation system clogged.
PN 134431300A (0501) If the dryer stops, the status lights flash again, the beeping continues and the code reappears, please contact service for the possible cause and solution. Make necessary corrections, then select a cycle and press START.
These temperatures, dryness levels and options are available with the following...
Similar Questions

Frigidaire Affinity Dryer How Can I Tell If It's Overheating Fire Hazard
(Posted by avmai 10 years ago)

How Do I Reset The Timer On My Frigidaire Affinity Dryer
how do I reset the timer on my Frigidaire affinity dryer
how do I reset the timer on my Frigidaire affinity dryer
(Posted by wander5532 10 years ago)

My Frigidaire Affinity Dryer Will Not Start. All Lights On But No Go.
(Posted by Skubinna 11 years ago)
Fridgeaire Affinity Dryer Panel Lights Up But Nothing Happens When I Press Start
(Posted by tiffcaron 12 years ago)