Dynex DX-L26-10A Support Question
Dynex DX-L26-10A Support Question
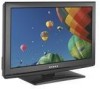
Find answers below for this question about Dynex DX-L26-10A - 26" LCD TV.Need a Dynex DX-L26-10A manual? We have 5 online manuals for this item!
Question posted by gpapaspyros on August 7th, 2021
What Size Screws Are Needed For The Back Of The Tv For The Wall Mount Feature
The person who posted this question about this Dynex product did not include a detailed explanation. Please use the "Request More Information" button to the right if more details would help you to answer this question.
Current Answers
Answer #1: Posted by Odin on August 7th, 2021 11:10 AM
Odin

Member since:
April 10th, 2010 Points: 41,236,690

Member since:
April 10th, 2010 Points: 41,236,690
If you have them, use the screws included with the product. (See https://www.manualslib.com/manual/41500/Dynex-Dx-L26-10a.html?page=9#manual.) If not, your first step should be to call the manufacturer. Dynex may just send you gratis what you need, or, if not, will provide the information for getting it yourself. Use the contact information at https://www.contacthelp.com/dynex.
(The most common screw for securing the TV to the wall bracket is an M8 screw. The other screw sizes for some TVs are M4, M5, and M6. The length will be determined by the type of TV you have.)
(The most common screw for securing the TV to the wall bracket is an M8 screw. The other screw sizes for some TVs are M4, M5, and M6. The length will be determined by the type of TV you have.)
Hope this is useful. Please don't forget to click the Accept This Answer button if you do accept it. My aim is to provide reliable helpful answers, not just a lot of them. See https://www.helpowl.com/profile/Odin.
Answer #2: Posted by SonuKumar on August 7th, 2021 11:53 AM
SonuKumar

Member since:
May 9th, 2021 Points: 16,617,810
Member since:
May 9th, 2021 Points: 16,617,810
https://www.manualsdir.com/manuals/78246/dynex-dx-l26-10a-dx-l15-10a.html?page=9
https://www.amazon.com/Full-Motion-Swivel-Bracket-DX-L26-10A-Television/dp/B00CF9Y7XK
Best answer !
https://www.manualslib.com/manual/41500/Dynex-Dx-L26-10a.html?page=9
(The most common screw for securing the TV to the wall bracket is an M8 screw. The other screw sizes for some TVs are M4, M5, and M6. The length will be determined by the type of TV you have.)
Please respond to my effort to provide you with the best possible solution by using the "Acceptable Solution" and/or the "Helpful" buttons when the answer has proven to be helpful.
Regards,
Sonu
Your search handyman for all e-support needs!!
Related Dynex DX-L26-10A Manual Pages
User Manual (English) - Page 2
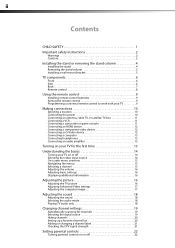
...CHILD SAFETY 1
Important safety instructions 2
Warnings 2 Cautions 2
Installing the stand or removing the stand column 4
Installing the stand 4 Removing the stand column 5 Installing a wall-mount bracket 5
TV components 6
Front 6 Side 6 Back 7 Remote control 8
Using the remote control 9
Installing remote control batteries 9 Aiming the remote control 9 Programming a universal remote...
User Manual (English) - Page 5
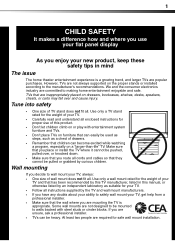
... placed on a "larger-than-life" TV. However, TVs are committed to wall mount your ability to walls backed with entertainment system furniture and TVs.
• Don't place TVs on furniture that the wall where you are mounting the TV is a growing trend, and larger TVs are popular purchases. TVs that are required for proper use your flat panel display
As you enjoy your new...
User Manual (English) - Page 6
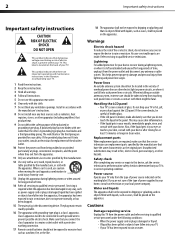
... not be exposed to dripping or splashing and that your local power company. Class I apparatus need to be exposed to dripping or splashing, and no objects filled with liquids, such as contact...prevent property damage and personal injury from the type of glass. Handling the LCD panel • Your TV's screen is a class I apparatus to a mains socket outlet with your doctor after rinsing ...
User Manual (English) - Page 7
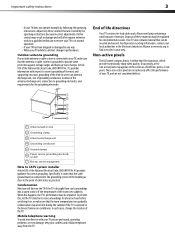
...org to find a recycler in wire to an antenna discharge unit, size of grounding conductors, location of the TV. Condensation may appear on the screen as close to the point of...may also form during the summer if the TV is grounded to provide some protection against voltage surges and built-up static charges.
Non-active pixels
The LCD panel contains almost 3 million thin film transistors,...
User Manual (English) - Page 8
... grooves
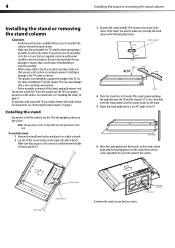
Four screws If you need to install the TV into the column socket on the stand.
5 Adjust the stand angle until the locators on the stand column align with the locating grooves on the stand, then use four screws (provided) to secure the stand to the column.
If you plan to wall-mount the TV, you...
User Manual (English) - Page 9
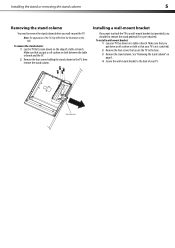
... need to remove the stand column before you should first remove the stand pedestal if it is not scratched).
2 Remove the four screws that you put down a soft cushion or cloth so that your TV is pre-attached. To remove the stand column: 1 Lay the TV flat (screen down) on a table or bench. To install a wall-mount...
User Manual (English) - Page 10
...
2 1
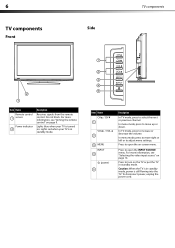
Item Name Remote control
1 sensor
Power indicator 2
Description
Receives signals from the remote control. Do not block.
Lights red when your TV is still flowing into the TV. In menu mode, press to move right or left or to open the INPUT SOURCE menu. Press to adjust menu settings. Press to turn...
User Manual (English) - Page 11
...page 10.
For more information, see "Connecting the power" on page 13. Connect an HDMI device to this jack.
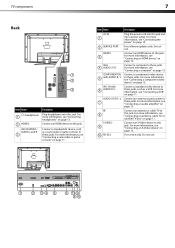
TV components
7
Back
1 2
3
Item Name
(headphone) 1
2 HDMI 2 AV2 IN VIDEO / AUDIO L and .... For more information, see "Connecting an S-Video device" on page 13.
Connect an antenna or cable TV to these jacks. Do not use .
1
2 34 5
6 79
8 10
For service only. ...
User Manual (English) - Page 12
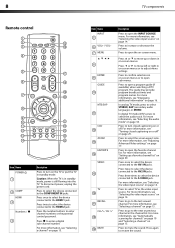
...For more information, see "Setting up or down in standby mode, power is still flowing into the TV.
For more information, see "Automatically scanning for channels" on page 19 and "Selecting a channel"...the sound. Press to select STEREO, SAP (secondary audio language), or MONO.
In analog TV mode, press to enter a digital sub-channel number.
Press once to select the device connected...
User Manual (English) - Page 13

... Do not mix batteries of new batteries and can cause old batteries to work with your TV with a new or existing universal remote control. Press to display the information banner. Press to... not used for channels" on the charts below it.
Mixing old and new batteries can operate your TV. Press to select the audio mode. Programming a universal remote control to set -top box's remote ...
User Manual (English) - Page 14
... one at 1-800-305-2204. You may need to try codes for a long
period of time. See your universal remote control's instructions for the TV: • Where direct light does not reflect...using your universal remote control has a code search feature, run a code search to identify a code that the power cords are securely inserting into jacks on the TV. • Make sure that you can result ...
User Manual (English) - Page 15
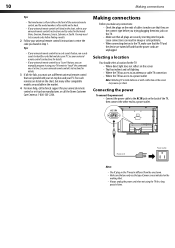
... of a standard AV cable into the AV1 IN jacks on the back of the TV, then connect the other end of TV
Wall jack
Notes:
• We recommend using an antenna and reception is not good, ...of the cable to the antenna or cable TV wall jack. Making connections
11
Connecting an antenna, cable TV, or satellite TV box
To connect an antenna, cable TV, or satellite TV box: • Connect one end of ...
User Manual (English) - Page 16
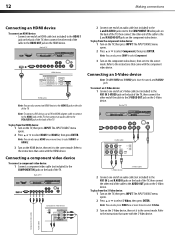
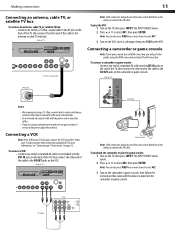
... set it to the correct mode. To play from the component video device: 1 Turn on the TV, then press INPUT.
Refer to the instructions that came with the HDMI device.
The INPUT SOURCE menu... opens. 2 Press or to select Component, then press ENTER. Back of TV
Audio cable
S-Video device
S-Video cable
2 Connect one end of an audio cable (not included) ...
User Manual (English) - Page 17
...
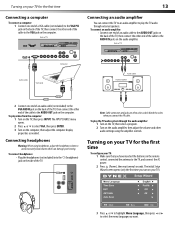
To connect headphones: • Plug the headphones (not included) into the (headphone) jack on your TV for the first time
13
Connecting a computer
To connect a computer: 1 Connect one end of an ..., then adjust the computer display properties as needed. Turning on your TV for the first time
To configure your TV: 1 Make sure that you turn on the TV, then press INPUT. To connect an audio...
User Manual (English) - Page 18
... power cord into standby mode.
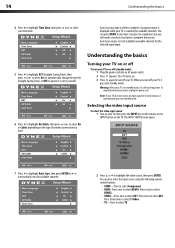
Selecting the video input source
To select the video input source: 1 Turn on your TV, then press the INPUT key on the remote, or the INPUT button on the type of available/receivable channels for the... select Component. • HDMI-Press once to complete the process. Warning: When your TV. When you will need to run Auto Scan later to select HDMI1.
User Manual (English) - Page 19
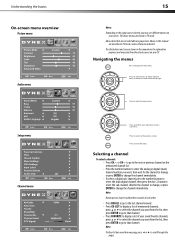
...sub-channel. Press to select menus, to display the main menu.
The above menus are described in TV mode. The illustrations and screens shown in the manual are grayed out.
Selecting a channel
To select...screen cursor left or right. Press to select the menu items.
Press to confirm your TV. Press to return to scroll through the pages.
Menu items that channel.
Understanding the ...
User Manual (English) - Page 20
...information provided by a dot, then the sub-channel number.
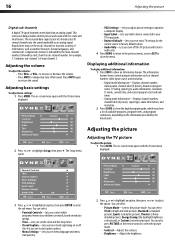
Adjusting the picture
Adjusting the TV picture
To adjust the picture: 1 Press MENU. The on -screen menu opens with ...Digital mode information-Displays channel number, station name, channel label (if preset), broadcast program name, TV rating, signal type, audio information, resolution, CC mode, current time, and current program start...
User Manual (English) - Page 22

...: • MONO-Select this option to listen to only the program audio. The on your TV and listen to a secondary audio program, if available. Adjusting the sound
Adjusting the sound
To...or left and right
audio channels.
2 Press or to highlight Audio, then press . To play only the TV audio:
1 Press MENU.
You can turn off . • AVC-(Auto volume control) Equalizes the overall...
User Manual (English) - Page 32
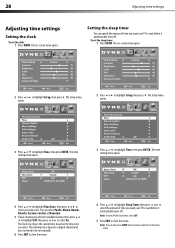
.... Note: You can select Pacific, Alaska, Hawaii, Atlantic, Eastern, Central, or Mountain.
5 If your TV to highlight Time, then press ENTER. The Setup menu opens.
You can also press SLEEP on the remote ...control to highlight Time, then press ENTER.
The on a digital channel and does not need to be set the sleep timer. The Setup menu opens.
The on the time zone you ...
User Manual (English) - Page 35
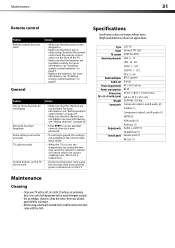
... Panel TV system Receiving channels
Audio multiples Audio out
Power requirement Power consumption
Dimensions (W × H × D with stand)
Weight Input ports
Output ports Control ports
LCD TV 26-inch TFT LCD ... and R (1) Headphone (1) Service port (1) RS-232 (1)
Maintenance
Cleaning
• Clean your TV with the cloth. For more information, see "Setting parental control levels" on page 23.
...
Similar Questions

What Size Screws Mount The Tv To A Wall Mount
what size screws mkunt to the back of the tv
what size screws mkunt to the back of the tv
(Posted by Anonymous-162382 7 years ago)

My Mon Moved From Florida With This Tv And Lost All The Connections And Wiring T
make this tv function ...went to best buy they havent a clue..help what is needed
make this tv function ...went to best buy they havent a clue..help what is needed
(Posted by mmaruzzo 12 years ago)

What Is The Code For The Volume For A 26 Inch Dynex Tv
(Posted by rrluis2004 12 years ago)

Want The Remote Code For This Dynex Tv 26 Inch Dx L26 10c
Want remote code for a universal remote from my TV cabe company TElus
Want remote code for a universal remote from my TV cabe company TElus
(Posted by gbetten 12 years ago)

What Size Screw Fits The Wall Mount Holes On The Back
(Posted by mikewheaton 14 years ago)