Dell Precision T5500 Support Question
Dell Precision T5500 Support Question
Find answers below for this question about Dell Precision T5500.Need a Dell Precision T5500 manual? We have 3 online manuals for this item!
Question posted by nikallove on June 8th, 2014
Precision T5500 Tower How Much Hard Drive Slots Can Support
The person who posted this question about this Dell product did not include a detailed explanation. Please use the "Request More Information" button to the right if more details would help you to answer this question.
Current Answers
Related Dell Precision T5500 Manual Pages
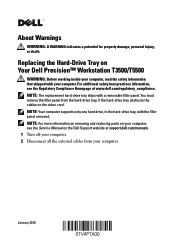
Replacing the Hard-Drive Tray - Page 1
...remove the filler panel from your computer. NOTE: Your computer supports only one hard drive, in the hard-drive tray, with a removable filler panel. About Warnings
WARNING: A WARNING indicates a potential for property damage, personal injury, or death. Replacing the Hard-Drive Tray on Your Dell Precision™ Workstation T3500/T5500
WARNING: Before working inside your computer, read the safety...
Replacing the Hard-Drive Tray - Page 4
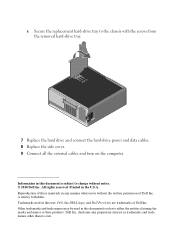
...Reproduction of these materials in this text: Dell, the DELL logo, and Dell Precision are trademarks of Dell Inc. Printed in trademarks and trade names other than its...used in this document to refer to the chassis with the screws from the removed hard-drive tray.
7 Replace the hard drive and connect the hard-drive power and data cables. 8 Replace the side cover. 9 Connect all the external...
Setup and Features Information Tech Sheet - Page 7
... devices
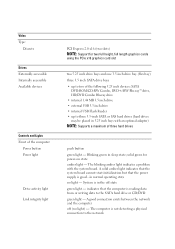
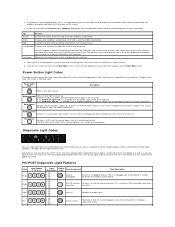
Controls and Lights Front of the computer:
Power button Power light
Drive activity light Link integrity light
PCI Express 2.0 x16 (two slots)
NOTE: Support for power-on state amber light - System is reading data from or writing data to the SATA hard drive or CD/DVD green light - The computer is good - The blinking...
Service Manual - Page 2
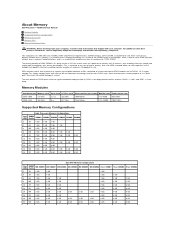
... 8 bit deep prefetch buffer, whereas DDR2's is 4 bits, and DDR's is achieved at www.dell.com/regulatory_compliance. About Memory
Dell Precision™ T5500 Service Manual
Memory Modules Supported Memory Configurations Memory Subsystem Memory Slots Memory Population Rules
WARNING: Before working inside your computer.
DDR3 memory comes with a promise of a power consumption reduction of 30...
Service Manual - Page 5
.... About Your System Board
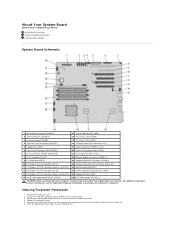
Dell Precision™ T5500 Service Manual System Board Schematic Clearing Forgotten Passwords Clearing CMOS Settings
System Board Schematic
1 Main Power Connector (POWER1)
15 Type A USB Port (INT_USB2)
2 SATA Connectors (SATA0-4)
16 CPU Riser 2 (CPU2_RSR2)
3 Password Jumper (PSWD)
17 CPU Riser 1 (CPU_RSR1)
4 Hard Drive Fan Connector (FAN_HDD)
18 >Primary...
Service Manual - Page 7
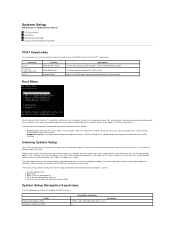
System Setup
Dell Precision™ T5500 Service Manual
POST Keystrokes Boot Menu Entering System Setup System Setup Navigation... still exists and can be used to call up ) configuration l Basic device configuration settings l System security and hard drive password settings
System Setup Navigation Keystrokes
Use the following keystrokes to the network
Boot Menu
As with which to bypass the...
Service Manual - Page 9
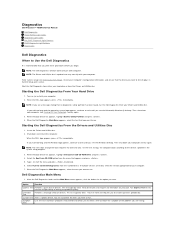
...desktop. Select Run the 32 Bit Dell Diagnostics from your Drivers and Utilities disc.
Start the Dell Diagnostics from either your computer (see Entering System Setup), review your computer. If multiple versions are having. Starting the Dell Diagnostics From Your Hard Drive... and Utilities disc. Diagnostics
Dell Precision™ T5500 Service Manual
Dell Diagnostics Power Button...
Service Manual - Page 10
...stack.
Description
Blinking Amber Initial state of a functioning machine. If the Hard Drive light is off , light is
Operation
also S0e. If the Hard Drive light on the screen.
3. Solid Green System is probable that the ...the POWER_GOOD signal is labeled with the number 1, and the other three are also supported in S0 state, the normal power state of light at power up . 2. Help...
Service Manual - Page 14
Adding and Replacing Parts
Dell Precision™ T5500 Service Manual
Cover Battery Drives Bezel Hard Drive Tray Front Fan Assembly Memory Card Reader Memory Dual Processor Riser (Optional) System Board
I/O Data Cable Chassis Intrusion Switch Front Bezel Hard Drive Floppy Drive Optical Drive Expansion Cards Heat Sink and Processor Power Supply
Service Manual - Page 15

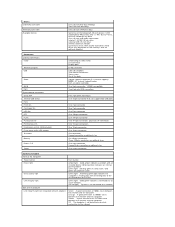
... GB 72 GB with optional riser
PCI Express 2.0 x16 (two slots) NOTE: Support for two full height, full length graphics cards using the PCIe x16 graphics card slot. Specifications
Dell Precision™ T5500/T5500n Service Manual Processors System Information Memory Video Audio Expansion Bus
Drives Connectors Controls and Lights Power Physical Environmental
NOTE: Offerings may vary...
Service Manual - Page 16
... green light indicates the computer is reading data from or writing data to the SATA hard drive or CD/DVD
Green light Solid green indicates a connection to an active network Off ...hard drives (hard drives may be placed in 5.25 inch bays with an installed device; One 9-pin connector; 16550C-compatible Two 6-pin mini-DIN connectors
Five 7-pin SATA connectors One 10-pin connector that can support...
Service Manual - Page 22
Hard-drive Bezel
Dell Precision™ T5500 Service Manual WARNING: Before working inside your computer, read the safety information that shipped with your computer. Remove the computer cover.
3. Press and hold the sliding-plate lever toward the base of the computer to release the drives bezel. For additional safety best practices information, see the Regulatory Compliance...
Service Manual - Page 28
...
1. Remove the memory shroud.
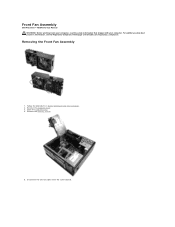
5. Disconnect the two fan cables from the system board. Open the hard drive tray. 4. Remove the computer cover. 3. Follow the procedures in Before Working Inside Your Computer. 2. Front Fan Assembly
Dell Precision™ T5500 Service Manual WARNING: Before working inside your computer, read the safety information that shipped with your...
Service Manual - Page 31

... the sliding plate lever down . 7. Remove the computer cover. 3. Remove the front bezel. 4. Push the sliding plate lever down to the back of the floppy drive. 6. Floppy Drive
Dell Precision™ T5500 Service Manual
WARNING: Before working inside your computer, read the safety information that shipped with your computer. Remove the floppy...
Service Manual - Page 32

... computer cover.
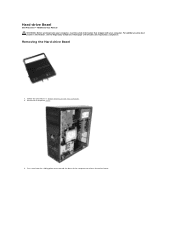
3. For additional safety best practices information, see the Regulatory Compliance Homepage at www.dell.com/regulatory_compliance. Removing the Hard Drives
1. Disconnect the power cable from the first hard drive. Hard Drives
Dell Precision™ T5500 Service Manual WARNING: Before working inside your computer, read the safety information that shipped with your computer.
Service Manual - Page 36
...dell.com/regulatory_compliance. Remove the computer cover.
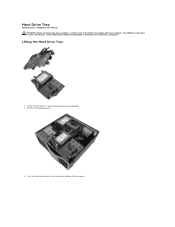
. 3. Follow the procedures in Before Working Inside Your Computer. 2. Lifting the Hard Drive Tray
1. Press the hard drive release lever toward the bottom of the computer. Hard Drive Tray
Dell Precision™ T5500 Service Manual WARNING: Before working inside your computer, read the safety information that shipped with your computer...
Service Manual - Page 43
.../O Data Cable
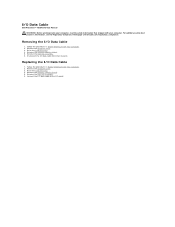
1. Raise the hard drive tray. 4. Remove the front fan assembly. 6. For additional safety best practices information, see the Regulatory Compliance Homepage at www.dell.com/regulatory_compliance. Remove the memory module shroud. 5.
Follow the procedures in Before Working Inside Your Computer. 2. I/O Data Cable
Dell Precision™ T5500 Service Manual
WARNING: Before working...
Service Manual - Page 44
...hard drive tray.
4.
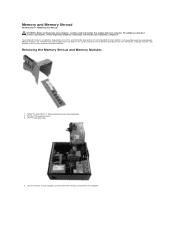
Removing the Memory Shroud and Memory Modules
1. Lift the memory shroud straight up and remove the memory shroud from and installed into slots both on the system board or on the optional dual-processor riser identically, although only the slots...and Memory Shroud
Dell Precision™ T5500 Service Manual WARNING: Before working inside your computer, read the safety ...
Service Manual - Page 52

... Homepage at www.dell.com/regulatory_compliance. Open the hard drive tray.
4. Follow the procedures in Before Working Inside Your Computer. 2.
Remove the computer cover. 3. Loosen the four captive screws on the heat sink. Removing the Heat Sink and Processor
1. Heat Sink and Processor
Dell Precision™ T5500 Service Manual WARNING: Before working inside your...
Service Manual - Page 69
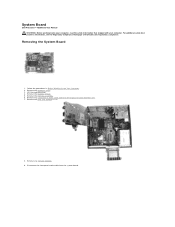
... cable from the system board. Removing the System Board
1. Lift the hard drive tray. 4. Remove the memory shroud. 5. Remove any memory modules. 9. Follow the procedures in Before Working Inside Your Computer. 2. Remove the heat sink and processor.
8.
System Board
Dell Precision™ T5500 Service Manual WARNING: Before working inside your computer, read the safety...
Similar Questions

Detecting New Hard Drive In Bios On Vostro 320. The Computer Detect,s The Dvd Wr
But not the hard drive
But not the hard drive
(Posted by grabojo82 2 years ago)

Dell Precision T5500 'hard Drive Fan Failure'
Dear Problem Solvers,My Dell Precision T5500 started giving the following message on boot-up:"Alert!...
Dear Problem Solvers,My Dell Precision T5500 started giving the following message on boot-up:"Alert!...
(Posted by nidllc 6 years ago)

How To Remove Main Hard Drive In Dell Precision T5500
(Posted by mattara 10 years ago)

