
Dell OptiPlex 755 Support Question
Dell OptiPlex 755 Support Question
Find answers below for this question about Dell OptiPlex 755.Need a Dell OptiPlex 755 manual? We have 3 online manuals for this item!
Question posted by akin1Un on November 11th, 2013
How To Reset Power On Optiplex 755 Small Form Factor
The person who posted this question about this Dell product did not include a detailed explanation. Please use the "Request More Information" button to the right if more details would help you to answer this question.
Current Answers
Related Dell OptiPlex 755 Manual Pages
Quick Reference
Guide - Page 3
...Computer 10 Set Up Your Keyboard and Mouse 11 Set Up Your Monitor 12 Power Connections 12
Before You Begin 13 Recommended Tools 13 Turning Off Your Computer ...Board Components 25 Jumper Settings 26
Desktop Computer 27 System Views 27 Removing the Computer Cover 32 Inside Your Computer 33 System Board Components 35 Jumper Settings 36
Small Form Factor Computer 37 System Views 37 ...
Quick Reference
Guide - Page 15
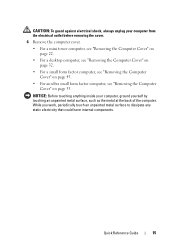
... a mini tower computer, see "Removing the Computer Cover" on page 22.
• For a desktop computer, see "Removing the Computer Cover" on page 32.
• For a small form factor computer, see "Removing the Computer Cover" on page 43.
• For an ultra small form factor computer, see "Removing the Computer Cover" on page 55. Quick Reference Guide
15...
Quick Reference
Guide - Page 37

Jumper RTCRST
Setting
jumpered
Description
The real-time clock has not been reset. unjumpered
Small Form Factor Computer
System Views
Front View
1
2
3
4
5
6
11 10
1 USB 2.0 connectors (2)
98
7
Use the front USB connectors for more information about booting to a USB device).
It is being reset (jumpered temporarily). Quick Reference Guide
37
The real-time clock is ...
Quick Reference
Guide - Page 48

.... NOTE: If you want to prevent the cables from being reset (jumpered temporarily).
Front View
1 23 4 5
9
8
7
6
48
Quick Reference Guide
The real-time clock is being pulled, tangled, or stepped on a wall surface, use the optional wall-mount bracket. unjumpered
Ultra Small Form Factor Computer
System Views
NOTICE: Do not place your computer under...
User's Guide - Page 7
... 170 Replacing the Chassis Intrusion Switch 171 Resetting the Chassis Intrusion Detector 171
System Board Components 172
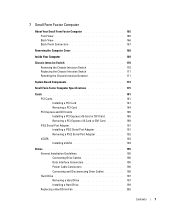
Small Form Factor Computer Specifications 175
Cards 181 PCI Cards ...195 General Installation Guidelines 195 Connecting Drive Cables 196 Data Interface Connectors 196 Power Cable Connectors 196 Connecting and Disconnecting Drive Cables 196 Hard Drive 197 Removing ...
User's Guide - Page 9
... Intrusion Switch 234 Replacing the Chassis Intrusion Switch 234 Resetting the Chassis Intrusion Detector 235
System Board Components 236 Cable Cover (Optional 237 Attaching the Cable Cover 237 Removing the Cable Cover 237
Connecting the AC Power Adapter 238
Dell Badge 239
Ultra Small Form Factor Computer Specifications 241
Drives 247 General Installation Guidelines 247...
User's Guide - Page 12
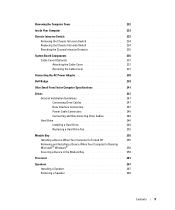
... the System Board: Mini Tower, Desktop, Small Form Factor, and Ultra Small Form Factor Computers 307
Mini Tower System Board Screws 308 Desktop System Board Screws 309 Small Form Factor System Board Screws 310 Ultra Small Form Factor System Board Screws 311 Replacing the System Board: Mini Tower, Desktop, Small Form Factor, and Ultra Small Form Factor Computers 311
12 Memory
DDR2 Memory...
User's Guide - Page 22
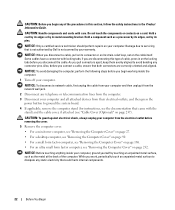
...shock, always unplug your computer from their electrical outlets, and then press the power button to avoid bending any telephone or telecommunication lines from the computer.
3 ...8226; For a desktop computer, see "Removing the Computer Cover" on page 90.
• For a small form factor computer, see "Removing the Computer Cover" on page 168.
• For an ultra small form factor computer, see "...
User's Guide - Page 29
... not be present on mini tower, desktop and small form factor computers;
NOTICE: Be careful when opening the computer cover to ensure that you do not accidentally disconnect cables from the electrical outlet before removing the computer cover. NOTE: The chassis intrusion switch is standard on the ultra small form factor computer but is optional on your...
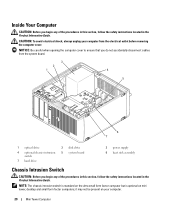
User's Guide - Page 92
... not be present on mini tower, desktop, and small form factor computers; NOTICE: Be careful when opening the computer cover to ensure that you do not accidentally disconnect cables from the system board.
2
1
3
4
5
7
6
1 drive bays (media card
5 card slots
reader or floppy drive,
optical drive and hard drive)
2 power supply
6 heat sink assembly
3 optional chassis...
User's Guide - Page 166
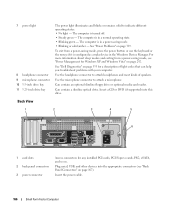
... codes that can help you troubleshoot problems with your computer. Back View
1
2
3
4
5
6
1 card slots 2 back panel connectors 3 power connector
Access connectors for a description of speakers.
Insert the power cable.
166
Small Form Factor Computer The computer is in a power-saving mode. • Blinking or solid amber - The computer is in the Windows Device Manager.
Can contain...
User's Guide - Page 170
... fingers to disconnect the cable connector.
170
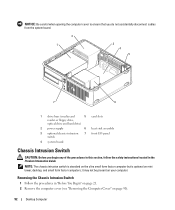
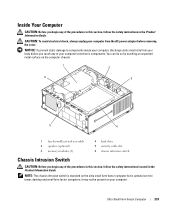
Small Form Factor Computer it may not be present on mini tower, desktop, and small form factor computers; Removing the Chassis Intrusion Switch
1 ...cable from the system board.
3
4
2
1
5 6
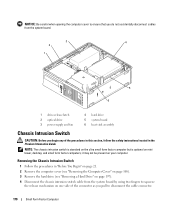
1 drive-release latch 2 optical drive 3 power supply and fan
4 hard drive 5 system board 6 heat sink assembly
Chassis Intrusion Switch
CAUTION: Before ...
User's Guide - Page 171
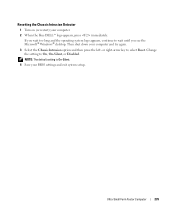
... operating system logo appears, continue to wait until it to the computer. Small Form Factor Computer
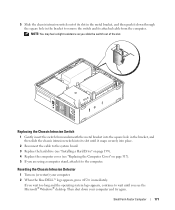
171 5 Slide the chassis intrusion switch out of the slot. Resetting the Chassis Intrusion Detector
1 Turn on page 317). 5 If you see the Microsoft® Windows® desktop. Replacing the Chassis Intrusion Switch
1 Gently insert the switch from the...
User's Guide - Page 173
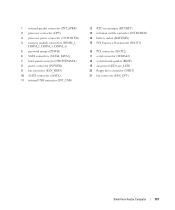
... USB connector (INT_USB)
12 RTC reset jumper (RTCRST) 13 intrusion switch connector (INTRUDER) 14 battery socket (BATTERY) 15 PCI Express x16 connector (SLOT1)
16 PCI connector (SLOT2) 17 serial connector (SERIAL2) 18 system board speaker (BEEP) 19 aux power LED (aux_LED) 20 floppy drive connector (DSKT) 21 fan connector (FAN_CPU)
Small Form Factor Computer
173
User's Guide - Page 233
NOTE: The chassis intrusion switch is standard on the ultra small form factor computer but is optional on the computer chassis.
1
2
6
3
5
4
1 fan shroud/...unpainted metal surface on mini tower, desktop and small form factor computers; NOTICE: To prevent static damage to components inside your computer, discharge static electricity from the AC power adapter before you touch any of your...
User's Guide - Page 235
Change the setting to select Reset.
Ultra Small Form Factor Computer
235 Resetting the Chassis Intrusion Detector
1 Turn on (or restart) your BIOS settings and exit system setup. NOTE: The default setting is On-Silent.
4 Save your computer. ..., or Disabled. If you wait too long and the operating system logo appears, continue to wait until you see the Microsoft® Windows® desktop.
User's Guide - Page 239
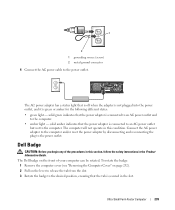
... in the slot. 1
2 1 grounding source (screw) 2 metal ground connector 4 Connect the AC power cable to the power outlet.
Ultra Small Form Factor Computer
239
Connect the AC power adapter to the computer and/or reset the power adapter by disconnecting and reconnecting the plug to the power outlet. Dell Badge
CAUTION: Before you begin any of your computer can...
User's Guide - Page 317

...Reset the chassis intrusion detector in "System Setup" on page 280 by touching an unpainted metal surface on resetting the chassis intrusion detector.
Ultra Small Form Factor...
Replacing the Computer Cover
317 Gently pull the power cables toward you so that they do so ... the Computer Cover
Mini-Tower, Desktop, and Small Form Factor Computers
CAUTION: Before you begin any of the ...
User's Guide - Page 340
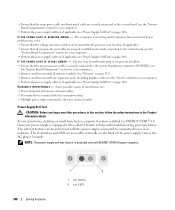
... ENERGY STAR® 4.0, then your computer).
• Perform the power supply self-test, if applicable (see "Memory" on page 340).
If your mini tower, desktop, or small form factor computer has been certified for your power supply is equipped with a self-test feature to help with troubleshooting power problems. The self-test feature can be malfunctioning or...
User's Guide - Page 341
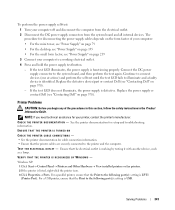
...-click the printer icon. 3 Click Properties→ Ports. To perform the power supply self-test:
1 Turn your computer:
• For the mini tower, see "Power Supply" on page 79
• For the desktop, see "Power Supply" on page 155 • For the small form factor, see "Contacting Dell" on page 370). NOTE: If you begin any of...
Similar Questions

Optiplex 760 Small Form Factor Flashing 3 When Power Button Is Pushed
(Posted by bobbrnado 10 years ago)
Where Is The Temperature Sensor In A Dell Optiplex 755
(Posted by wedan 10 years ago)

Where Is The Connector On Motherboard Dell Optiplex 960 Small Form Factor Power
button cable
button cable
(Posted by STje 10 years ago)

How To Remove Hard Drive From Optiplex 755 Small Form Factor
(Posted by ladybqatmus 10 years ago)

Dell Optiplexx 755 Small Form Factor Wont Recognize Keyboarrd
(Posted by starBagg98 10 years ago)