Dell OptiPlex 745 Support Question
Dell OptiPlex 745 Support Question
Find answers below for this question about Dell OptiPlex 745.Need a Dell OptiPlex 745 manual? We have 1 online manual for this item!
Question posted by myed on July 21st, 2014
How Do You Remove & Install The Assembly Fan In A Optiplex 745
The person who posted this question about this Dell product did not include a detailed explanation. Please use the "Request More Information" button to the right if more details would help you to answer this question.
Current Answers
Related Dell OptiPlex 745 Manual Pages
Quick Reference
Guide - Page 2

... trade names may be used in this document is strictly forbidden. Dell Inc. Information in this text: Dell, the DELL logo, Inspiron, Dell Precision, Dimension, OptiPlex, Latitude, PowerEdge, PowerVault, PowerApp, and Dell OpenManage are not applicable. Trademarks used in this document to Microsoft® Windows® operating systems are trademarks of...
Quick Reference
Guide - Page 3
... Form Factor Computer - Back-Panel Connectors 23
Removing the Computer Cover 24 Before You Begin 25 Mini Tower Computer 26 Desktop Computer 27 Small Form Factor Computer 28 Ultra-...Power Connections 46
Solving Problems 46 Dell Diagnostics 46 System Lights 49
Contents
3 Front View 13 Desktop Computer - Front View 17 Small Form Factor Computer - book.book Page 3 Wednesday, August 16...
Quick Reference
Guide - Page 5

... drivers are already installed on page 46...• My computer documentation • My device documentation • Desktop System Software (DSS)
• How to remove and replace parts • Specifications • How to configure system ...Additional information may not be found at support.dell.com.
Dell™ OptiPlex™ User's Guide
Microsoft Windows XP Help and Support Center 1 Click...
Quick Reference
Guide - Page 6
...174; Windows® Product Key" on page 7).
Your operating system product key label is already installed on the screen. Windows Help and Support Center 1 Click Start→ Help and Support. 2...• How to use the optional Drivers and Utilities CD (ResourceCD) to personalize my desktop
6
Quick Reference Guide
Find It Here Dell™ Product Information Guide
Operating System CD ...
Quick Reference
Guide - Page 7
.... Certified drivers, patches, and software updates
• Desktop System Software (DSS)- NOTE: The support.dell.com user...dell.co m or contact support.
• Enter the Express Service Code to direct your To download Desktop System Software:
computer and operating system and installs the updates 1 Go to view the appropriate support site.
• Community - Quick Reference Guide
7...
Quick Reference
Guide - Page 16
...monitor to the connector on the card. NOTE: The integrated parallel connector is automatically disabled if the computer detects an installed card containing a parallel connector configured to ensure reliable operation.
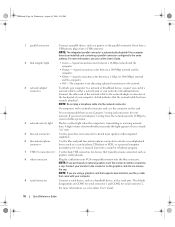
4 network activity light
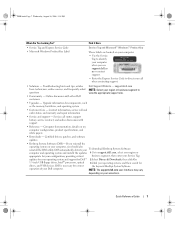
Flashes a yellow light when the ...8226; Off - On computers with your online User's Guide.
16
Quick Reference Guide Do not remove the cap.
Quick Reference
Guide - Page 26
... normal operation. book.book Page 26 Wednesday, August 16, 2006 3:18 PM
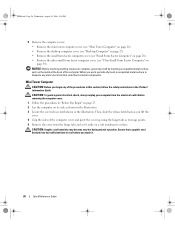
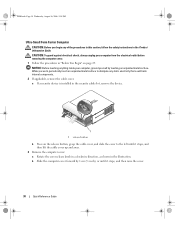
5 Remove the computer cover: • Remove the mini tower computer cover (see "Mini Tower Computer" on page 26). • Remove the desktop computer cover (see "Desktop Computer" on page 27). • Remove the small form factor computer cover (see "Small Form Factor Computer" on...
Quick Reference
Guide - Page 27
...18 PM
1 2 3
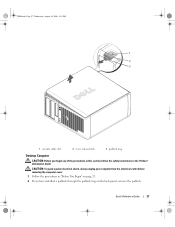
1 security cable slot
2 cover release latch
3 padlock ring
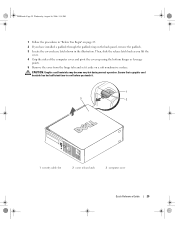
Desktop Computer
CAUTION: Before you have installed a padlock through the padlock ring on page 25. 2 If you begin any of ...You Begin" on the back panel, remove the padlock. CAUTION: To guard against electrical shock, always unplug your computer from the electrical outlet before removing the computer cover. 1 Follow the ...
Quick Reference
Guide - Page 29
...cover
Quick Reference Guide
29
Then, slide the release latch back as you touch it aside on the back panel, remove the padlock.
3 Locate the cover release latch shown in the illustration. CAUTION: Graphic card heatsinks may become very hot...
1 Follow the procedures in "Before You Begin" on page 25.
2 If you have installed a padlock through the padlock ring on a soft nonabrasive surface.
Quick Reference
Guide - Page 30
a If a security device is installed in the security cable slot, remove the device.
1
1 release button
b Press on page 25. b Slide the ...clockwise direction, as shown in the illustration. NOTICE: Before touching anything inside your computer from the electrical outlet before removing the computer cover. 1 Follow the procedures in "Before You Begin" on the release button, grasp the cable ...
Quick Reference
Guide - Page 35
RTCRST
jumpered
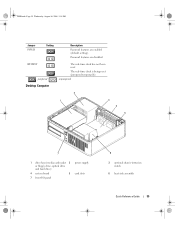
Desktop Computer
The real-time clock has not been reset. book.book Page 35 Wednesday, August 16, ... drive and hard drive)
4 system board
5
7 front I/O panel
power supply card slots
6
3 optional chassis-intrusion switch
6 heat sink assembly
Quick Reference Guide
35 Password features are enabled (default setting). The real-time clock is being reset (jumpered temporarily).
Quick Reference
Guide - Page 38

book.book Page 38 Wednesday, August 16, 2006 3:18 PM
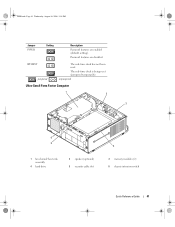
Small Form Factor Computer
3 2 1
4 5
1 drive-release latch
4 optional chassis-intrusion switch
7 heat sink and blower assembly
2 optical drive 5 hard drive
6 7
3 power supply and fan 6 system board
38
Quick Reference Guide
Quick Reference
Guide - Page 41
Password features are enabled (default setting).
unjumpered
Ultra-Small Form Factor Computer
1 2
3
6 5
1 fan shroud/ heat sink assembly
4 hard drive
2 speaker (optional) 5 security cable slot
4
3 memory modules (2) 6 chassis intrusion switch
Quick Reference Guide
41 The real-time clock is being reset (jumpered temporarily).
...
Quick Reference
Guide - Page 49
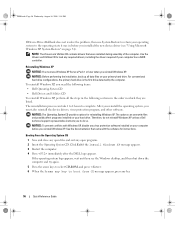
...tests are completed, if you are running the Dell Diagnostics from the Drivers and Utilities CD (optional), remove the CD.
5 Close the test screen to return to wake the computer.
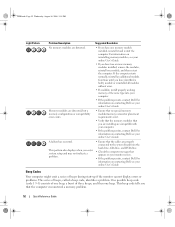
No corrective action is ...
Power is on, and the computer is identified (see if the specific
faulty or incorrectly installed or the problem is required.
times and then turns off
Check Diagnostic Lights to see if...
Quick Reference
Guide - Page 51

... floppy or hard drive failure has Reseat all modules without error.
• If available, install properly working memory of the same type into your online User's Guide.
• If ... two or more memory modules installed, remove the modules, reinstall one memory module installed, reinstall it , and then restart the computer.
• If the problem still exists, install a graphics card that you ...
Quick Reference
Guide - Page 52
...Dell, see your online User's Guide.
Continue until you have two or more memory modules installed, remove the modules, reinstall one module, and then restart the computer. One possible beep code (code...1 3-1) consists of one beep, a burst of three beeps, and then one memory module installed, reinstall it and restart the computer. Memory modules are detected, but a memory configuration or ...
Quick Reference
Guide - Page 56
... you reinstall Windows XP. After you reinstall the operating system, you installed the new device driver (see the Windows desktop, and then shut down the computer and try again.
5 Press ...the arrow keys to select CD-ROM, and press . 6 When the Press any key to complete.
See the documentation that were installed during assembly...
Quick Reference
Guide - Page 57

..., and press to
accept the license agreement. 3 If your computer already has Windows XP installed and you want to install a new copy of Windows XP, press to select that option. 5 Press to select...type r to select the repair option, and remove the CD. 4 If you are unsure of your computer.
NOTE: The time required to copy files and install the devices.
screen appears, you are prompted ...
Quick Reference
Guide - Page 58
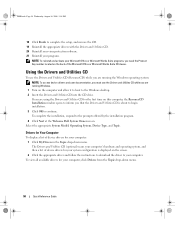
To complete the installation, respond to complete the setup, and remove the CD. 19 Reinstall the appropriate drivers with the Drivers and Utilities CD. ... CD sleeve. The Drivers and Utilities CD (optional) scans your system configuration is about to begin installation. 3 Click OK to the Windows desktop. 2 Insert the Drivers and Utilities CD into the CD drive. NOTE: To access device drivers and...
Quick Reference
Guide - Page 59
...Index
B
beep codes, 52
C
CDs operating system, 6
conflicts software and hardware incompatibilities, 53
cover removing, 24
D
Dell Diagnostics, 46 Dell support site, 7 diagnostics
beep codes, 52 Dell Diagnostics, 46...Help and Support Center, 6 help file
Windows Help and Support Center, 6
I
installing parts before you begin, 25
IRQ conflicts, 53
L
labels Microsoft Windows, 7 Service Tag, 7
lights...
Similar Questions


