
Dell OptiPlex 740 Support Question
Dell OptiPlex 740 Support Question
Find answers below for this question about Dell OptiPlex 740.Need a Dell OptiPlex 740 manual? We have 2 online manuals for this item!
Question posted by ohangra on June 17th, 2014
How To Select Mic Rear Panel Optiplex 960
The person who posted this question about this Dell product did not include a detailed explanation. Please use the "Request More Information" button to the right if more details would help you to answer this question.
Current Answers
Related Dell OptiPlex 740 Manual Pages
Quick Reference
Guide - Page 3
... 36 Small Form Factor Computer 38
Inside Your Computer 39 Mini Tower Computer 39 Desktop Computer 43 Small Form Factor Computer 47
Contents
3 Back View 17 Mini Tower Computer - Front View 14 Mini Tower Computer - Back-Panel Connectors . . 24 Small Form Factor Computer - Contents
Finding Information 5
Setting Up Your Computer 10
System...
Quick Reference
Guide - Page 24

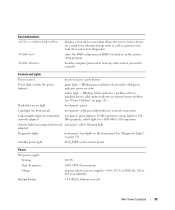
Desktop Computer - Back-Panel Connectors
1
2
34 5
9
8
24
Quick Reference Guide
7
6 Also, ensure that most closely matches the AC power available in your location.
Allows you to lock the computer cover.
To help avoid damaging a computer with a manual voltage selection switch, set to the 115-V position even though the AC power available in Japan is...
User's Guide - Page 35
...)
rear panel - amber light - yellow blinking light adapter)
Diagnostic lights
front panel - Standby power light
AUX_PWR on the front panel. ...green light for 100Mb operation; four lights on the system board
Power DC power supply:
Wattage Heat dissipation Voltage
Backup battery
305 W 1040.7 BTU/hr maximum manual selection...
User's Guide - Page 71

2 1
3
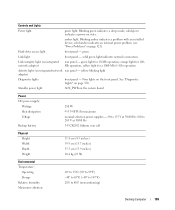
1 drive panel
2 release tab
3 drive-panel insert
3 Select the drive-panel insert in front of the drive bay that you want to use. 4 Gently press the release tab of the insert to remove it from the drive panel. Mini Tower Computer
71
User's Guide - Page 99

...Japan is 100 V. Back-Panel Connectors
1
2
3
4
5
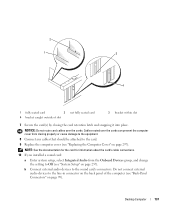
9 1 parallel connector
2 link integrity light
6
8
7
Connect a parallel device, such as a printer, to operate with a manual voltage-selection switch. A good connection exists...a physical connection to the same address. Desktop Computer
99 To help avoid damaging a computer with a manual voltage selection switch, set to the 115-V position ...
User's Guide - Page 109
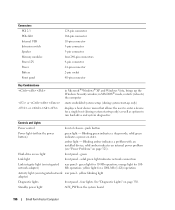
... power supply:
Wattage Heat dissipation Voltage
Backup battery
280 W 955.39 BTU/hr maximum manual selection power supplies - 90 to 135 V at 50/60 Hz; 180 to 265 V at 50...(-40° to 149°F) 20% to 80% (noncondensing)
Desktop Computer
109 orange light for a 1000-Mb (1-Gb) operation
Activity light (on integrated network rear panel - green light for 10-Mb operation; Four lights on state....
User's Guide - Page 111

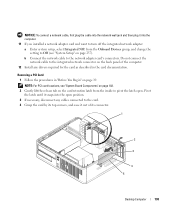
... of the procedures in this section, follow the safety instructions located in damage to the desktop computer. Desktop Computer
111 NOTICE: When sliding the I /O panel to the cable connectors and the cable routing clips. 4 Gently rotate and slide the I/O panel away from the electrical outlet before disconnecting them, so that you begin any of...
User's Guide - Page 137
...over the cards. Desktop Computer
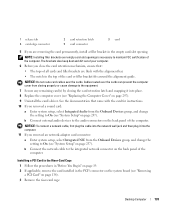
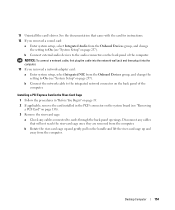
137 NOTE: See the documentation for the card for information about the card's cable connections. 10 If you installed a sound card:
a Enter system setup, select Integrated Audio from... the setting to Off (see "Back-Panel Connectors" on page 99).
Do not connect external audio devices to the line-in connector on the back panel of slot
not fully seated card
3 ...
User's Guide - Page 138
..."System Board Components" on page 102. 2 Gently lift the release tab on the back panel of its top corners, and ease it into the open . NOTE: For PCI card ...adapter card and want to turn off the integrated network adapter: a Enter system setup, select Integrated NIC from the inside to pivot the latch open position. 3 If necessary, disconnect... its connector.
1
2 3
4 5
Desktop Computer
138
User's Guide - Page 139
... it into place. 8 Replace the computer cover (see "System Setup" on the back panel of the computer.
b Connect the network cable to maintain FCC certification of the
computer. ...Enter system setup, select Integrated Audio from the Onboard Devices group, and change
the setting to the audio connectors on page 138). 3 Remove the riser-card cage:
Desktop Computer
139
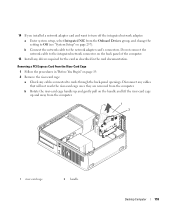
The brackets...
User's Guide - Page 142

...that you installed a sound card:
a Enter system setup, select Integrated Audio from the Onboard Devices group, and change the setting to Off (see "Back-Panel Connectors" on page 257). b Connect external audio devices to...connector on the back panel of the computer (see "System Setup" on page 99).
Do not connect external audio devices to the line-in step 3. Desktop Computer
142 NOTICE: ...
User's Guide - Page 143
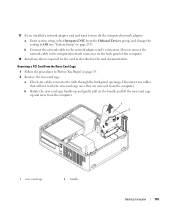
Disconnect any cables connected to cards through the back-panel openings. Removing a PCI Card From the Riser-Card Cage 1 Follow the ...network adapter: a Enter system setup, select Integrated NIC from the computer.
1
2
1 riser-card cage
2 handle
Desktop Computer
143 b Connect the network cable to the integrated network connector on the back panel of the computer.
18 Install any drivers...
User's Guide - Page 146
... a
card-slot opening. If necessary, disconnect any cables connected to the audio connectors on the back panel of the
computer.
If your computer.
b Connect the network cable to On (see "Removing
a PCI... continue with a different type of the computer. Desktop Computer
146 12 If you removed a sound card: a Enter system setup, select Integrated Audio from the operating system.
User's Guide - Page 151

...you installed a network adapter card and want to turn off the integrated network adapter: a Enter system setup, select Integrated NIC from the inside to the card. 4 Press the lever with your thumb until it into the... or DVI-Card 1 Follow the procedures in connector on the back panel of the card connector. Desktop Computer
151
b Connect the network cable to the sound card's connectors.
User's Guide - Page 154
... 257). b Connect the network cable to On (see "Removing a PCI Card" on page 257).
Desktop Computer
154
Installing a PCI Express Card in the Riser-Card Cage 1 Follow the procedures in "Before ... card: a Enter system setup, select Integrated NIC from the Onboard Devices group, and change the
setting to On (see "System Setup" on the back panel of the computer. Disconnect any cables...
User's Guide - Page 158

...-in step 3.
11 Connect any cables that you removed in connector on the back panel of the computer (see "System Setup" on page 99). Desktop Computer
158
NOTICE: To connect a network cable, first plug the cable into the ...Cover" on page 297).
13 If you installed a sound card:
a Enter system setup, select Integrated Audio from the Onboard Devices group, and change the setting to Off (see "Back...
User's Guide - Page 159
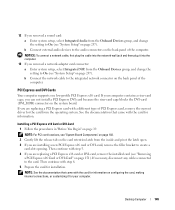
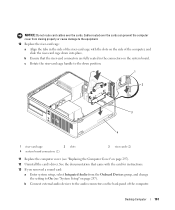
... riser-card cage: a Check any cables connected to the integrated network connector on the back panel of the computer.
15 Install any cables that will not reach the riser-card cage once... riser-card cage
2 handle
Desktop Computer
159 14 If you installed a network adapter card and want to turn off the integrated network adapter: a Enter system setup, select Integrated NIC from the Onboard Devices...
User's Guide - Page 161
...If you removed a sound card:
a Enter system setup, select Integrated Audio from closing properly or cause damage to the ... riser-card cage handle to the down into place. Desktop Computer
161
NOTICE: Do not route card cables over ...12 Uninstall the card's driver. b Ensure that came with the slots on the back panel of the computer, and
slide the riser-card cage down position.
1
2
3
...
User's Guide - Page 196
... green light indicates network connection
Link integrity light (on the system board
196
Small Form Factor Computer
Hard-drive access light
front panel - See "Diagnostic Lights" on integrated network rear panel - Blinking amber indicates a problem with an installed device;
amber light - in Microsoft® Windows® XP and Windows Vista, brings up only...
User's Guide - Page 268
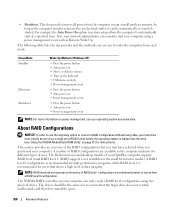
...use the migrating option to ensure that you may have selected when you can remotely start at a specified time. ... same size to convert a RAID configuration without losing data, your OptiPlex computer support RAID level 0 and RAID level 1. (RAID support ...than a RAID level 0 configuration. The Dell mini tower and desktop models of RAID configurations are available in system setup allows the ...
Similar Questions

What Motherboard And Cpu Will Be The Best Fit For The Dell Desktop Optiplex 740
(Posted by rmalone3108 2 years ago)

I Have A Optiplex 745 Does Not Start
I have a optiplex 745 does not start it displays a code (1 3 4 ) and do not appear on the screen no ...
I have a optiplex 745 does not start it displays a code (1 3 4 ) and do not appear on the screen no ...
(Posted by ilyasse 8 years ago)

How To Pick Power Supply Upgrade For Dell Optiplex 740 Desktop
(Posted by Jaypohogan 10 years ago)

How To Configure The Rear Dell Optiplex 390 Small Form Factor Line In
microphone
microphone
(Posted by zapeding 10 years ago)
