Dell Latitude E5430 Support Question
Dell Latitude E5430 Support Question
Find answers below for this question about Dell Latitude E5430.Need a Dell Latitude E5430 manual? We have 3 online manuals for this item!
Question posted by varisahel on February 7th, 2014
How To Disengage Optical Drive Bezel Tabs Dell E5430
The person who posted this question about this Dell product did not include a detailed explanation. Please use the "Request More Information" button to the right if more details would help you to answer this question.
Current Answers
Answer #1: Posted by geekyankit1991 on February 7th, 2014 3:07 AM
geekyankit1991

Member since:
December 16th, 2013 Points: 166,010

Member since:
December 16th, 2013 Points: 166,010
Refer to product manual :
Hope this helps
Tech freak
Related Dell Latitude E5430 Manual Pages
User Manual - Page 2
... Display Bezel...10 Removing the Camera...10 Installing the Camera...10 Removing the Display Panel...11 Installing the Display Panel...12 Removing the Keyboard Trim...12 Installing the Keyboard Trim...14 Removing the Keyboard...14 Installing the Keyboard...16 Removing the Access Panel...16 Installing the Access Panel...17 Removing the Optical Drive...
User Manual - Page 17
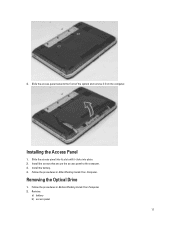
Slide the access panel into place. 2. Remove:
a) battery b) access panel
17 Follow the procedures in Before Working Inside Your Computer. 2. Removing the Optical Drive
1. Installing the Access Panel
1.
Follow the procedures in After Working Inside Your Computer. 4. Slide the access panel towards the front of the system and remove ...
User Manual - Page 18
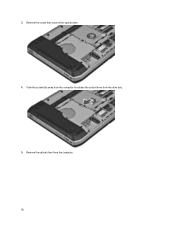
Remove the screw that secures the optical drive. 4. Remove the optical drive from the drive bay. 5. Push the screw tab away from the computer to release the optical drive from the computer. 18 3.
User Manual - Page 19
...Disengage the optical drive bezel tabs to the optical drive. 2. Installing the Optical Drive
1. Install the optical drive bracket. 3. Install:
a) access panel b) battery 7.
Remove the optical drive bracket.
8.
Insert the optical drive into the computer. 5. Follow the procedures in Before Working Inside Your Computer. 2. Remove:
a) battery b) access panel
19 Engage the optical...
User Manual - Page 25
...:
a) thermal module b) access panel c) right base panel d) battery e) SD memory card 4. Removing the Palm Rest
1. Remove:
a) SD memory card b) battery c) access panel d) keyboard trim e) keyboard f) optical drive g) right base panel 3. Follow the procedures in After Working Inside Your Computer. Follow the procedures in its socket on the computer. 2.
Place the processor in...
User Manual - Page 28
... e) keyboard trim f) access panel g) battery
28 Tighten the screws at the bottom of the computer. 5.
Remove:
a) SD memory card b) battery c) access panel d) keyboard trim e) keyboard f) optical drive g) right base panel h) palmrest 3. Remove the ExpressCard reader cage from the computer. Removing the ExpressCard Reader Cage
1. Install the screws that secure the ExpressCard reader...
User Manual - Page 29
... Working Inside Your Computer.
29 Install the screw that secures the bluetooth module in place. 5. Remove:
a) SD memory card b) battery c) access panel d) keyboard trim e) keyboard f) optical drive g) right base panel h) palm rest 3. Disconnect the bluetooth cable from the computer. 6. Disconnect the bluetooth cable from the bluetooth module. Follow the procedures in Before...
User Manual - Page 30
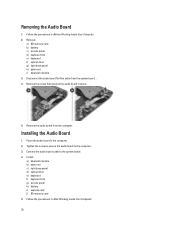
... Board
1. Tighten the screw to secure the audio board to the system board. 4. Installing the Audio Board
1. Install:
a) bluetooth module b) palm rest c) right base panel d) optical drive e) keyboard f) keyboard trim g) access panel h) battery i) express card j) SD memory card 5. Place the audio board in After Working Inside Your Computer.
30 Follow the procedures...
User Manual - Page 31
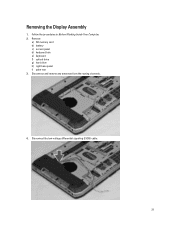
Disconnect the low-voltage differential signaling (LVDS) cable.
31 Remove:
a) SD memory card b) battery c) access panel d) keyboard trim e) keyboard f) optical drive g) hard drive h) right base panel i) palm rest 3. Follow the procedures in Before Working Inside Your Computer. 2. Disconnect and remove any antennae from the routing channels.
4. Removing the Display Assembly
1.
User Manual - Page 33
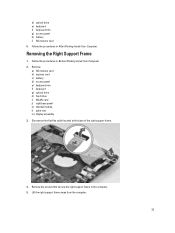
... flat flex cable located at the base of the right support frame.
4.
Remove:
a) SD memory card b) express card c) battery d) access panel e) keyboard trim f) keyboard g) optical drive h) hard drive i) WLAN card j) right base panel k) thermal module l) palm rest m) display assembly 3. Remove the screws that secure the right support frame to the computer. 5. Lift the...
User Manual - Page 34
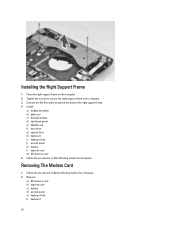
... memory card b) express card c) battery d) access panel e) keyboard trim f) keyboard
34 Install:
a) display assembly b) palm rest c) thermal module d) right base panel e) WLAN card f) hard drive g) optical drive h) keyboard i) keyboard trim j) access panel k) battery l) express card m) SD memory card 5. Follow the procedures in Before Working Inside Your Computer. 2. Connect the flat flex cable...
User Manual - Page 35

...computer. 4. g) optical drive h) hard drive i) right base ...panel j) thermal module k) palm rest l) express card m) display assembly n) right support frame 3. Remove the screw that secures the modem card to the computer. 5. Removing the Left Support Frame
1. Follow the procedures in Before Working Inside Your Computer. 2. Connect the RJ11 cable to disengage...
User Manual - Page 36
... on the computer. 2. Place the left support frame away from the computer.
Install:
a) display assembly b) palm rest c) thermal module d) right base panel e) WLAN card f) hard drive g) optical drive h) keyboard i) keyboard trim j) access panel k) battery
36 Installing the Left Support Frame
1. Tighten the screws to secure the left support frame to the computer. 3. Remove...
User Manual - Page 37
... board flat flex cable. 7. Follow the procedures in Before Working Inside Your Computer. 2. Disconnect the DC-in cable.
4. Remove:
a) battery b) access panel c) keyboard trim d) keyboard e) optical drive f) hard drive g) WLAN card h) right base panel i) thermal module j) palm rest k) express card reader cage l) display assembly m) left support frame 3. l) express card m) SD memory card 4.
User Manual - Page 40
Remove:
a) SD memory card b) ExpressCard c) battery d) access panel e) keyboard trim f) optical drive g) hard drive h) WLAN card i) right base panel j) thermal module k) palmrest l) ExpressCard reader cage m) display assembly n) left support frame c) display assembly d) ExpressCard reader cage
40 Installing the Coin-...
User Manual - Page 41
... the Input/Output (I /O) board in the computer. 4. Follow the procedures in After Working Inside Your Computer. e) palmrest f) thermal module g) right base panel h) WLAN card i) hard drive j) optical drive k) keyboard l) keyboard trim m) access panel n) battery o) ExpressCard p) SD memory card 4. Lift the Input/Output (IO) board out of the computer.
41 Remove:
a) SD memory card...
User Manual - Page 42
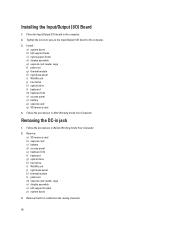
... cage n) display assembly o) left support frame c) right support frame d) display assembly e) express card reader cage f) palm rest g) thermal module h) right base panel i) WLAN card j) hard drive k) optical drive l) keyboard m) keyboard trim n) access panel o) battery p) express card q) SD memory card
4. Place the Input/Output (I/O) board in jack
1. Installing the Input/Output (I /O) board to...
User Manual - Page 44
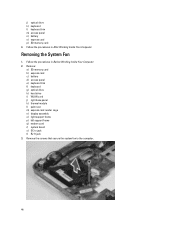
... that secure the system fan to the computer.
44 Removing the System Fan
1. Remove:
a) SD memory card b) express card c) battery d) access panel e) keyboard trim f) keyboard g) optical drive h) hard drive i) WLAN card j) right base panel k) thermal module l) palm rest m) express card reader cage n) display assembly o) right support frame p) left support frame q) modem card r) system...
Setup and Features Information Tech Sheet - Page 3
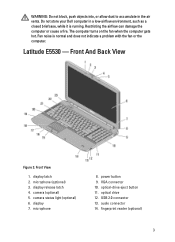
... The computer turns on the fan when the computer gets hot. Latitude E5530 - camera status light (optional) 6. VGA connector 10. ... computer or cause a fire. power button 9. optical-drive eject button 11. optical drive 12. fingerprint reader (optional)
3
Front And Back View
Figure 3. Fan noise is running. Do not store your Dell computer in the air vents. USB 2.0 connector...
Statement of Volatility - Page 2

... - Stores CMOS information. Non-volatile optical media. Yes
N/A
N/A Low-level ...DELL logo, Dell Precision™, OptiPlex™, Latitude™, PowerEdge™, PowerVault™, PowerConnect™, OpenManage™, EqualLogic™, KACE™, FlexAddress™ and Vostro™ are either registered trademarks or trademarks of Red Hat, Inc. CDROM/RW/ DVD/ DVD+RW/ Diskette Drives...
Similar Questions


How To Use The Optical Drive On Dell Latitude E5430 Using The Keyboard
(Posted by chaksgre 10 years ago)

How To Use Optical Drive Inspiron M731r Laptop
I've inserted a dvd inthe optical drive port and nothing happens. What am I doing wrong?
I've inserted a dvd inthe optical drive port and nothing happens. What am I doing wrong?
(Posted by 1crav4144 10 years ago)
Dell Latitude E5520 Optical Drives
Hello, I am looking at upgrading a Dell Latitude E5520 laptop DVD-ROM drive to a DVD-/+RW drive. Ho...
Hello, I am looking at upgrading a Dell Latitude E5520 laptop DVD-ROM drive to a DVD-/+RW drive. Ho...
(Posted by rexshaffer 11 years ago)