Dell Inspiron N7110 Support Question
Dell Inspiron N7110 Support Question
Find answers below for this question about Dell Inspiron N7110.Need a Dell Inspiron N7110 manual? We have 2 online manuals for this item!
Question posted by kimjessnc on September 14th, 2013
N7110 Wont Charge, Battery Is Fine, Adapter Is Fine
The person who posted this question about this Dell product did not include a detailed explanation. Please use the "Request More Information" button to the right if more details would help you to answer this question.
Current Answers
Related Dell Inspiron N7110 Manual Pages
Setup Guide - Page 5
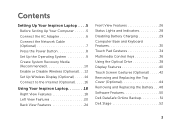
... Up Wireless Display (Optional 14 Connect to the Internet (Optional 16
Using Your Inspiron Laptop 18 Right View Features 18 Left View Features 20 Back View Features 24
Front View Features 26 Status Lights and Indicators 28 Disabling Battery Charging 29 Computer Base and Keyboard Features 30 Touch Pad Gestures 34 Multimedia Control...
Setup Guide - Page 8
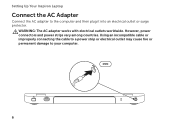
Setting Up Your Inspiron Laptop
Connect the AC Adapter
Connect the AC adapter to your computer.
6 Using an incompatible cable or improperly connecting the cable to a power strip or electrical outlet may cause fire... it into an electrical outlet or surge protector. However, power connectors and power strips vary among countries. WARNING: The AC adapter works with electrical outlets worldwide.
Setup Guide - Page 13
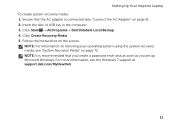
Ensure that the AC adapter is recommended that you create a password reset disk as soon as you set up Microsoft Windows. For more ...Insert the disc or USB key in the computer. 3. NOTE: It is connected (see "Connect the AC Adapter" on page 72. NOTE: For information on the screen. Click Create Recovery Media. 5. Setting Up Your Inspiron Laptop To create system recovery media: 1.
Setup Guide - Page 16
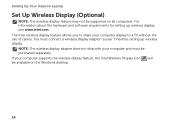
... display feature allows you to a TV without the use of cables. Setting Up Your Inspiron Laptop
Set Up Wireless Display (Optional)
NOTE: The wireless display feature may not be available...You must be purchased separately. NOTE: The wireless display adapter does not ship with your computer and must connect a wireless display adapter to your computer display to share your TV before setting...
Setup Guide - Page 17
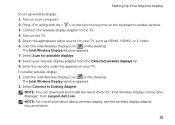
... display adapter documentation.
15 Setting Up Your Inspiron Laptop
To set up wireless display: 1. Press along with the < > on the function key row on your wireless display adapter from ... and install the latest driver for available displays. 8. Connect the wireless display adapter to Existing Adapter.
Enter the security code that appears on the desktop.
Select Scan for "Intel...
Setup Guide - Page 18
...programs.
3. Follow the instructions on page 12).
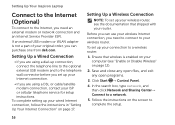
2. If an external USB modem or WLAN adapter is enabled on your wired Internet connection, follow the instructions in "Setting Up Your Internet ...8594; Connect to your ISP or cellular telephone service for setup instructions. Setting Up Your Inspiron Laptop
Connect to the Internet (Optional)
To connect to the Internet, you can use your ...
Setup Guide - Page 23
...of the total battery life remains.
2
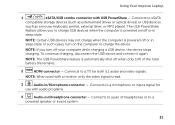
HDMI connector - NOTE: If you to a
powered speaker or sound system.
21
NOTE: Certain USB devices may not charge when the ...charge USB devices when the computer is read.
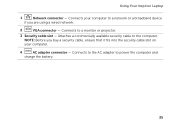
3
Audio-in/Microphone connector - NOTE: When used with audio programs.
4
Audio-out/Headphone connector - Connects to charge the device. Using Your Inspiron Laptop...
Setup Guide - Page 27
... it fits into the security cable slot on your computer to power the computer and
charge the battery.
25 Connects your computer.
4
AC adapter connector - Attaches a commercially available security cable to a monitor or projector.
3 Security cable slot - Using Your Inspiron Laptop
1
Network connector - Connects to the computer. NOTE: Before you are using a wired network.
2
VGA...
Setup Guide - Page 29
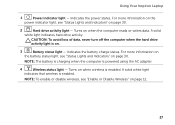
... computer when the hard drive
activity light is on when wireless is enabled. Turns on .
3
Battery status light -
Indicates the battery charge status. A solid white light
indicates that wireless is powered using the AC adapter.
4
Wireless status light -
Using Your Inspiron Laptop
1
Power indicator light - A solid
white light indicates hard drive activity. For more information on...
Setup Guide - Page 30
Using Your Inspiron Laptop
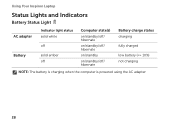
Status Lights and Indicators
Battery Status Light
AC adapter Battery
Indicator light status solid white
off
solid amber off
Computer state(s)
on/standby/off/ hibernate
on/standby/off/ hibernate
on/standby
on/standby/off/ hibernate
Battery charge status charging
fully charged
low battery (
Setup Guide - Page 31
Using Your Inspiron Laptop
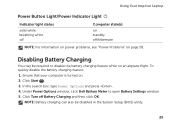
Power Button Light/Power Indicator Light
Indicator light status
solid white breathing white off
Computer state(s)
on standby off Battery Charging and then click OK. To quickly disable the battery charging feature: 1. Ensure that your computer is turned on page 58. In the search box, type Power Options and press . 4.
Disabling Battery Charging
You may...
Setup Guide - Page 35
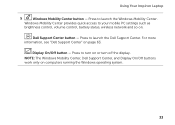
...- Press to launch the Windows Mobility Center. Press to your mobile PC settings such as
brightness control, volume control, battery status, wireless network and so on or turn on . For more information, see "Dell Support Center" on computers running... Center provides quick access to launch the Dell Support Center.
Using Your Inspiron Laptop
5
Windows Mobility Center button -
Setup Guide - Page 50
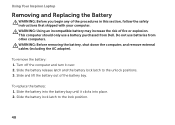
... external cables (including the AC adapter). Slide the battery into place. 2. WARNING: Using an incompatible battery may increase the risk of the battery bay. To remove the battery: 1. To replace the battery: 1. Turn off the computer and turn it clicks into the battery bay until it over. 2. Using Your Inspiron Laptop
Removing and Replacing the Battery
WARNING: Before you begin...
Setup Guide - Page 90

...:
Height
22.80 mm (0.90 inches)
Width
214 mm (8.43 inches)
Depth
78.76 mm (3.10 inches)
Weight
0.52 kg (1.15 lb)
Voltage
11.1 VDC
Charge time (approximate) Operating time
Coin-cell battery
4 hours (when the computer is turned off)
battery operating time varies depending on operating conditions
CR-2032
Setup Guide - Page 91

Physical
Height
Width
Depth
Weight (with 6-cell battery and optical drive)
29.70 mm to 34 mm (1.17 inches to 158°F)
89
Input voltage
100-240 VAC
Input current (maximum)
1.5 A/1.6 A/1.7 A/ 2.3 A/2.5 A
Specifications
AC Adapter
Input frequency 50-60 Hz
Output power
65 W/90 W/130 W
Output current:
65 W
3.34 A
90 W
4.62 A
130 W
6.7 A
Rated output...
Service Manual - Page 25

... configuration information.
Memory
25 CAUTION: Before turning on page 16), or connect
the AC adapter to your computer and an electrical outlet. To confirm the amount of memory installed in ...cover (see "Replacing the Module Cover" on page 22). 5 Replace the battery (see "Replacing the Battery" on the computer, replace all screws and ensure that no stray screws remain inside the computer.
Service Manual - Page 72

... (see "Replacing the Thermal
Cooling Assembly" on page 82). 4 Replace the coin-cell battery (see "Replacing the Coin-Cell Battery" on
page 76). 5 Turn the system board assembly over. 6 Slide the connectors on...9 Connect the speaker cable, subwoofer cable, status-light board cable,
camera cable, and AC-adapter cable to the connectors on the system board. 10 Slide the display cable into the connector ...
Service Manual - Page 73

...Battery" on the computer. 3 Press during POST to enter the system setup program. 4 Navigate to the security tab and enter the service tag in the BIOS" on the computer.
Entering the Service Tag in the BIOS
1 Ensure that the AC adapter...: Before turning on the computer, replace all screws and ensure that the main battery is plugged in damage to do so may result in and that no stray ...
Service Manual - Page 111
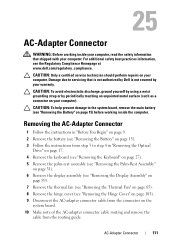
... step 4 in "Before You Begin" on page 9. 2 Remove the battery (see "Removing the Battery" on page 15). 3 Follow the instructions from step 3 to the system board, remove the main battery (see "Removing the Battery" on the
system board. 10 Make note of the AC-adapter connector cable routing and remove the
cable from the connector...
Service Manual - Page 113

... 4 to the computer. Failure to do so may result in damage to step 5 in "Replacing the Optical
Drive" on page 19. 11 Replace the battery (see "Replacing the Battery" on the computer, replace all screws and ensure that no stray screws remain inside the computer.
CAUTION: Before turning on page 16). AC...


