Dell Inspiron N7110 Support Question
Dell Inspiron N7110 Support Question
Find answers below for this question about Dell Inspiron N7110.Need a Dell Inspiron N7110 manual? We have 2 online manuals for this item!
Question posted by ratyeson on October 1st, 2013
Dell N7110 Replacement Adapter Won't Charge Battery
The person who posted this question about this Dell product did not include a detailed explanation. Please use the "Request More Information" button to the right if more details would help you to answer this question.
Current Answers
Related Dell Inspiron N7110 Manual Pages
Setup Guide - Page 5
... Up Wireless Display (Optional 14 Connect to the Internet (Optional 16
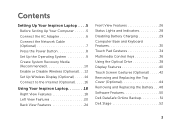
Using Your Inspiron Laptop 18 Right View Features 18 Left View Features 20 Back View Features 24
Front View Features 26 Status Lights and Indicators 28 Disabling Battery Charging 29 Computer Base and Keyboard Features 30 Touch Pad Gestures 34 Multimedia Control...
Setup Guide - Page 13
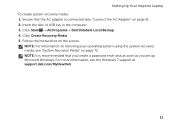
Click Create Recovery Media. 5. NOTE: It is connected (see the Windows 7 support at support.dell.com/MyNewDell.
11 Setting Up Your Inspiron Laptop To create system recovery media: 1. Follow the instructions on page 72.
Ensure that the AC adapter is recommended that you create a password reset disk as soon as you set up Microsoft Windows...
Setup Guide - Page 17
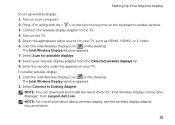
... 2. Enter the security code that appears on the keyboard to enable wireless. 3. Setting Up Your Inspiron Laptop
To set up wireless display: 1. Press along with the < > on the function key row ...HDMI2, or S-Video. 6. Click the Intel Wireless Display icon on your wireless display adapter from support.dell.com.
NOTE: You can download and install the latest driver for "Intel Wireless Display...
Setup Guide - Page 18
...; Connect to complete the setup.
16 Setting Up Your Inspiron Laptop
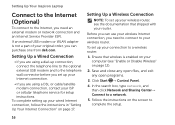
Connect to the Internet (Optional)
To connect to the ..., you set up your router. Before you can purchase one from dell.com. Setting Up a Wireless Connection
NOTE: To set up your wireless...to a wireless router:
1.
If an external USB modem or WLAN adapter is enabled on your Internet connection.
• If you need an...
Setup Guide - Page 23
...battery life remains.
2
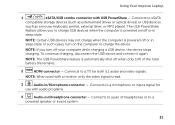
HDMI connector - Connects to a
powered speaker or sound system.
21
To continue charging..., disconnect the USB device and connect it again. Connects to a microphone or inputs signal for both 5.1 audio and video signals. NOTE: Certain USB devices may not charge when the computer is automatically shut off or in
sleep state. Using Your Inspiron Laptop...
Setup Guide - Page 27
... to a monitor or projector.
3 Security cable slot - Using Your Inspiron Laptop
1
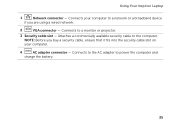
Network connector - NOTE: Before you are using a wired network.
2
VGA connector - Connects your computer.
4
AC adapter connector - Connects to power the computer and
charge the battery.
25 Attaches a commercially available security cable to a network or a broadband device
if you buy a security...
Setup Guide - Page 29
...
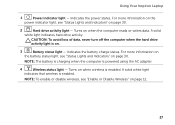
activity light is powered using the AC adapter.
4
Wireless status light -
NOTE: To...Battery status light - NOTE: The battery is charging when the computer is on page 30. For more information on
the battery status light, see "Status Lights and Indicators" on when wireless is enabled. Turns on page 12.
27
Indicates the battery charge status. Using Your Inspiron Laptop...
Setup Guide - Page 30
Using Your Inspiron Laptop
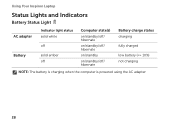
Status Lights and Indicators
Battery Status Light
AC adapter Battery
Indicator light status solid white
off
solid amber off
Computer state(s)
on/standby/off/ hibernate
on/standby/off/ hibernate
on/standby
on/standby/off/ hibernate
Battery charge status charging
fully charged
low battery (
Setup Guide - Page 31
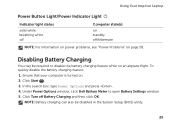
Click Start . 3. Under Power Options window, click Dell Battery Meter to disable the battery charging feature while on an airplane flight. Click Turn off /hibernate
NOTE: For information on power problems, see "Power Problems" on page 58.
Using Your Inspiron Laptop
Power Button Light/Power Indicator Light
Indicator light status
solid white breathing white off
Computer state...
Setup Guide - Page 35
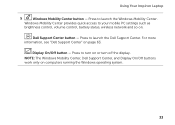
..., battery status, wireless network and so on computers running the Windows operating system.
33 NOTE: The Windows Mobility Center, Dell Support... Center, and Display On/Off buttons work only on . Press to launch the Windows Mobility Center. Windows Mobility Center provides quick access to turn on page 63.
Press to launch the Dell Support Center. Using Your Inspiron Laptop...
Setup Guide - Page 46
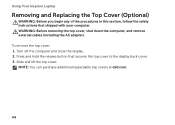
...top cover. Press and hold the release button that shipped with your computer. Using Your Inspiron Laptop
Removing and Replacing the Top Cover (Optional)
WARNING: Before you begin any of the procedures in this ...and remove external cables (including the AC adapter). NOTE: You can purchase additional replaceable top covers at dell.com.
44 Turn off the computer and close the display. 2.
Setup Guide - Page 48
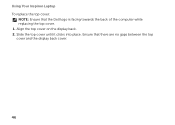
Slide the top cover until it clicks into place. Align the top cover on the display back. 2. Using Your Inspiron Laptop To replace the top cover:
NOTE: Ensure that there are no gaps between the top cover and the display back cover.
46 Ensure that the Dell logo is facing towards the back of the computer while replacing the top cover. 1.
Setup Guide - Page 50
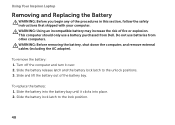
... out of fire or explosion. This computer should only use batteries from Dell. Slide the battery release latch and the battery lock latch to the lock position.
48 To remove the battery: 1. To replace the battery: 1. Do not use a battery purchased from other computers. Using Your Inspiron Laptop
Removing and Replacing the Battery
WARNING: Before you begin any of the procedures in...
Service Manual - Page 25

2 1
1 tab 2 notch
4 Replace the module cover (see "Replacing the Module Cover" on page 22). 5 Replace the battery (see "Replacing the Battery" on the computer, replace all screws and ensure that no stray screws remain inside the computer. CAUTION: Before turning on page 16), or connect
the AC adapter to your computer and an electrical outlet.
Memory
25 Failure to...
Service Manual - Page 27
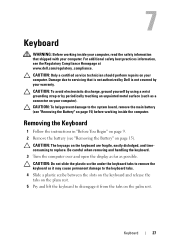
...keyboard tabs to remove the keyboard as it from the tabs on page 9. 2 Remove the battery (see the Regulatory Compliance Homepage at www.dell.com/regulatory_compliance. Removing the Keyboard
1 Follow the instructions in "Before You Begin" on the... 15). For additional safety best practices information, see "Removing the Battery" on your warranty. CAUTION: To help prevent damage to replace.
Service Manual - Page 48

Failure to do so may result in "Replacing the Optical
Drive" on page 19. 9 Replace the battery (see "Replacing the Battery" on page 16). CAUTION: Before turning on page 29). 8 Follow the instructions from a source other end of the Mini-Card down into the slot on the system board and replace the screw that no stray screws...
Service Manual - Page 72

... System Board
1 Follow the instructions in "Before You Begin" on page 9. 2 Replace the processor (see "Replacing the Processor Module" on page 86). 3 Replace the thermal cooling assembly (see "Replacing the Thermal
Cooling Assembly" on page 82). 4 Replace the coin-cell battery (see "Replacing the Coin-Cell Battery" on
page 76). 5 Turn the system board assembly over. 6 Slide the...
Service Manual - Page 73

... Tag in the BIOS
1 Ensure that the AC adapter is plugged in and that the main battery is installed properly.
2 Turn on the computer. 3 Press during POST to enter the system setup program. 4 Navigate to step 5 in "Replacing the Optical Drive" on page 19.
17 Replace the battery (see "Entering the Service Tag in the...
Service Manual - Page 111
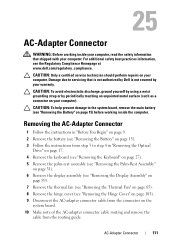
... (such as a connector on page 15) before working inside the computer. Damage due to the system board, remove the main battery (see the Regulatory Compliance Homepage at www.dell.com/regulatory_compliance.
AC-Adapter Connector
111 CAUTION: Only a certified service technician should perform repairs on the
system board. 10 Make note of the AC...
Service Manual - Page 113

... page 29). 10 Follow the instructions from step 4 to step 5 in damage to do so may result in "Replacing the Optical
Drive" on page 19. 11 Replace the battery (see "Replacing the Battery" on the computer, replace all screws and ensure that no stray screws remain inside the computer. Failure to the computer. CAUTION: Before turning...
Similar Questions


Dell Inspiron N7110 Brand New & Won't Charge Battery
(Posted by batr 10 years ago)
N7110 Wont Charge, Battery Is Fine, Adapter Is Fine
(Posted by kimjessnc 10 years ago)

Dell 1011 Turns Off When You Connect Power Supply/ Won't Charge Battery
Cannot charge battery even when using dell genuine charger and laptop turns off when you connect cha...
Cannot charge battery even when using dell genuine charger and laptop turns off when you connect cha...
(Posted by Jsg76 11 years ago)