Get support for Casio XJ-S41 - XGA DLP Projector

Casio XJ-S41 Support Question

Casio XJ-S41 Support Question

Find answers below for this question about Casio XJ-S41 - XGA DLP Projector.
Need a Casio XJ-S41 manual? We have 1 online manual for this item!
Question posted by hornergroup on May 30th, 2011

How To Move From Slide To Slide In Ppt Presentation.

How can I use the remote to move from one slide to the next slide in a powerpoint presentation?

Current Answers

There are currently no answers that have been posted for this question.
Be the first to post an answer!

Remember that you can earn up to 1,100 points for every answer you submit. The better the quality of your answer, the better chance it has to be accepted.

Related Casio XJ-S41 Manual Pages

Owners Manual - Page 1

E DATA PROJECTOR XJ-S31/XJ-S36 XJ-S41/XJ-S46 User's Guide z Be sure to keep all user documentation handy for future reference. z Be sure to read the precautions in the separate User's Guide (Basic Operation). For details about setting up the projector and lamp replacement, see the User's Guide (Basic Operation).
Owners Manual - Page 3

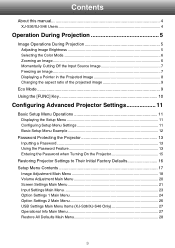
... Input Source Image 7 Freezing an Image ...7 Displaying a Pointer in the Projected Image 8 Changing the aspect ratio of the projected image 9 Eco Mode ...9 Using the [FUNC] Key 10 Configuring Advanced Projector Settings 11 Basic Setup Menu Operations 11 Displaying the Setup Menu 11 Configuring Setup Menu Settings 11 Basic Setup Menu Example 12...
Owners Manual - Page 4

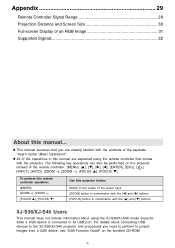
... "USB Function Guide" on the projector instead of an RGB Image 31 Supported Signals 32 About this projector button: Button in combination with the projector. For details about using the remote controller that you need to perform to the XJ-S36/XJ-S46 projector and procedures you are explained using the XJ-S36/XJ-S46 model projector while a USB device is connected...
Owners Manual - Page 5

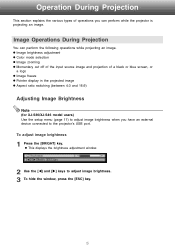
...brightness adjustment window. 2 Use the [W] and [X] keys to the projector's USB port. Operation ...During Projection This section explains the various types of a black or blue screen, or a logo z Image freeze z Pointer display in the projected image z Aspect ratio switching (between 4:3 and 16:9) Adjusting Image Brightness Note (for XJ-S36/XJ-S46 model users) Use...
Owners Manual - Page 6

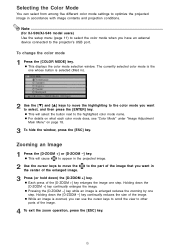
...is the one whose button is selected (filled in). 2 Use the [T] and [S] keys to move the the center of ...will cause to appear in the projected image. 2 Use the cursor keys to move the highlighting to the ...color mode name. Selecting the Color Mode You can use the cursor keys to scroll the view to other parts...image one step. Note (for XJ-S36/XJ-S46 model users) Use the setup menu (page 11...
Owners Manual - Page 7

... an input source, press the [FREEZE] key. z This will capture the image that is being projected from the input source and projects a black screen in projector memory.
Owners Manual - Page 9

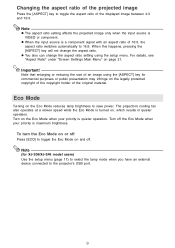
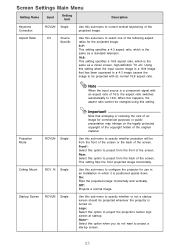
...lamp brightness to save power. Important! Turn off . Note (for commercial purposes or public presentation may infringe on the Eco Mode when your priority is a component signal with an aspect ... ratio setting using the [ASPECT] key for XJ-S36/XJ-S46 model users) Use the setup menu (page 11) to select the lamp mode when you have an external device connected to the projector's USB port...
Owners Manual - Page 10

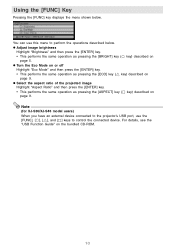
... pressing the [ECO] key (U key) described on the bundled CD-ROM. 10 Note (for XJ-S36/XJ-S46 model users) When you have an external device connected to the projector's USB port, use this menu to control the connected device. Using the [FUNC] Key Pressing the [FUNC] key displays the menu shown below . You can...
Owners Manual - Page 11

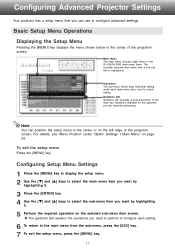
...the operations you want by highlighting it . 5 Perform the required operation on the XJ-S36/XJ-S46) main menu items. The currently selected main menu item is the one that... projection screen. Configuring Advanced Projector Settings Your projector has a setup menu that is highlighted. Configuring Setup Menu Settings 1 Press the [MENU] key to display the setup menu. 2 Use the [T] and [S] keys...
Owners Manual - Page 12

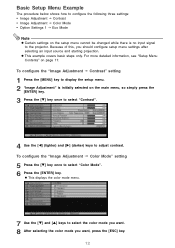
... to display the setup menu. 2 "Image Adjustment" is no input signal to the projector. For more detailed information, see "Setup Menu Contents" on the main menu, so simply press the [ENTER] key. 3 Press the [T] key once to select "Contrast". 4 Use the [W] (lighter) and [X] (darker) keys to adjust contrast. Basic Setup Menu Example...
Owners Manual - Page 13

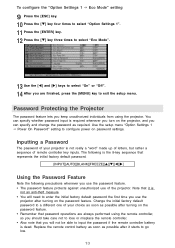
... finished, press the [MENU] key to configure power on password settings. Password Protecting the Projector The password feature lets you keep unauthorized individuals from using the remote controller, so you should take care not to lose or misplace the remote controller. • Also note that you will need to enter the initial factory default...
Owners Manual - Page 14

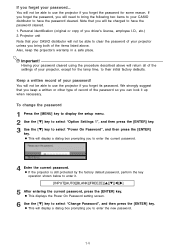
... password... You will not be able to use the projector if you forget the password for the lamp time, to clear the password of your password! z If the projector is still protected by the factory default password...On Password", and then press the [ENTER] key. You will not be able to use the projector if you bring the following two items to enter it up when necessary. If you forget...
Owners Manual - Page 15

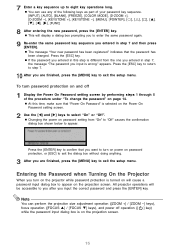
...If the password you entered in step 7, the message "The password you want to turn on the projector while password protection is different from "On" to "Off" causes the confirmation dialog box shown below ...On" or "Off". Entering the Password when Turning On the Projector When you turn on power on the Power On Password setting screen. 2 Use the [W] and [X] keys to appear. Press the [ENTER...
Owners Manual - Page 16

Restoring Projector Settings to Their Initial Factory Defaults You can select Image Adjustment, Volume Adjustment, Screen Settings, Input Settings, Option Settings 1, or Option Settings 2. 3 Press the [ENTER] key. 4 Use the [T]...factory defaults. z This will display a confirmation screen like the screen shown below. 6 Use the [S] key to select "Yes". 7 To restore the settings of the settings under...
Owners Manual - Page 19

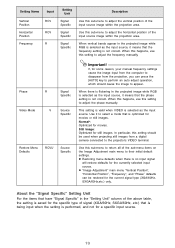
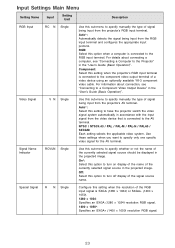
...type of signal (XGA/60Hz, SXGA/60Hz, etc.) that the phase setting is optimized for movies or still images. If, for a specific input source. 19 When this happens, use this setting to...mode that the frequency setting is selected as the input source. When this happens, use this setting to the projector's VIDEO terminal. When there is flickering in the projected image while RGB is ...
Owners Manual - Page 20

... signal will restore defaults for the currently selected input source. 20 Volume Adjustment Main Menu Setting Name Input Setting Unit Description Volume RCVUN Source Specific Use this sub-menu to return Volume to adjust the volume level of the currently selected signal source. z Changing this setting when there is no input...
Owners Manual - Page 21

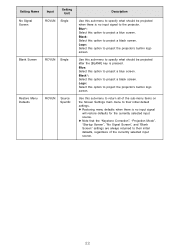
...-menu to 16:9. Front*: Select this option to project a startup screen. 21 Use this sub-menu to specify whether or not a startup screen should be changed using this setting. Use this sub-menu to configure the projector for commercial purposes or public presentation may infringe on . This setting flips the front projected image horizontally. On...
Owners Manual - Page 22

... to project a black screen. z Restoring menu defaults when there is no input signal to the projector. Black*: Select this option to project a blue screen. Setting Name No Signal Screen Input Setting ...Restore Menu Defaults RCVUN Source Specific Description Use this sub-menu to specify what should be projected after the [BLANK] key is pressed. Use this sub-menu to return all of...
Owners Manual - Page 23

...*: Select this sub-menu to the component video output terminal of signal being input from the projector's AV terminal. Auto*: Automatically detects the signal being input from the projector's RGB input terminal. Video Signal RCVUN Single Use this setting to the AV terminal. On*: Select this option when a computer is connected to have...
Owners Manual - Page 31

Because of an RGB Image The projector outputs images using XGA (1024 pixels × 768 pixels) video resolution. When the input signal from a computer are adjusted during projection. The following shows how different input signals from the computer connected to the projector is compressed so it matches the projector's video resolution and fills the entire screen...

Similar Questions

Casio Xj-a230 Dlp Dmd Chip Part Number Please
Casio XJ-A230 DLP DMD chip part number please
(Posted by naathan1952 5 years ago)
Part Number For Dlp Chip
what is the part number for the DLP chip so I can Order it
(Posted by Tommyrock2000 9 years ago)
I Cannot Connect The Projector To My Compaq Laptop, Running Windows Xp. Have Tr
I have tried function f4, have connected to the laptop before connecting and after connecting to th...
(Posted by annneedham43 13 years ago)
Red Lights...
When I put my projector on, there are a bunch of red lights that flare up. What can be the problem? ...
(Posted by kasia 14 years ago)
Ask a New Question
Use the box below to post a new question about this Casio product .
Points & Prizes
  • You can earn points for nearly everything you do on HelpOwl.com
  • You can trade in those points for gift cards at leading retailers such as Amazon.com and Walmart
  • It's that simple!
See How it Works
Create a Free Account

Casio Manuals

Find free Casio XJ-S41 - XGA DLP Projector manuals and user guides available at ManualOwl.com. Try out our unique manual viewer allowing you to interact with manuals from directly within your browser!

Casio Reviews

View thousands of Casio user reviews and customer ratings available at ReviewOwl.com.

Contact Information

Complete Casio customer service contact information including steps to reach representatives, hours of operation, customer support links and more from ContactHelp.com.

Scoreboard Ratings

See detailed Casio customer service rankings, employee comments and much more from our sister site.