Canon PIXMA MG8120 Support Question
Canon PIXMA MG8120 Support Question
Find answers below for this question about Canon PIXMA MG8120.Need a Canon PIXMA MG8120 manual? We have 2 online manuals for this item!
Question posted by smtmjmkm on July 12th, 2023
How Do I Reattach The Cannon Ts8120 Rear Paper Tray
Current Answers
Answer #1: Posted by SonuKumar on July 12th, 2023 8:40 PM

Member since:
May 9th, 2021 Points: 16,619,310

Please respond to my effort to provide you with the best possible solution by using the "Acceptable Solution" and/or the "Helpful" buttons when the answer has proven to be helpful.
Regards,
Sonu
Your search handyman for all e-support needs!!
Answer #2: Posted by ifasa on July 12th, 2023 11:04 AM

Member since:
July 4th, 2023 Points: 2,510
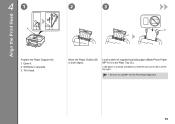
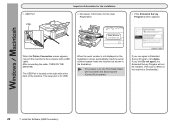
1. Guarantee the printer is switched off.
2. Adjust the plate to the comparing openings at the rear of the printer.
3. Delicately drive the plate into place until it snaps or locks safely.
4. Turn on the printer and check that the plate is appropriately connected.
In the event that you experience any challenges, counsel the printer's manual or contact Standard client care for additional help.
Irzath
Answer #3: Posted by ifasa on July 12th, 2023 11:05 AM
Member since:
July 4th, 2023 Points: 2,510
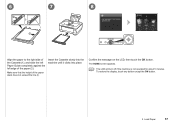
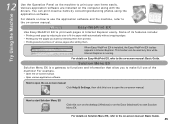
1. Guarantee the printer is switched off.
2. Adjust the plate to the relating spaces at the rear of the printer.
3. Tenderly slide the plate into place until it snaps or locks safely.
4. Turn on the printer and check that the plate is appropriately connected.
Assuming that you experience any troubles, counsel the printer's manual or contact Standard client service for additional help.
Irzath
Answer #4: Posted by ifasa on July 12th, 2023 11:06 AM
Member since:
July 4th, 2023 Points: 2,510
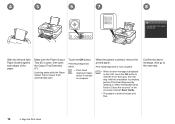
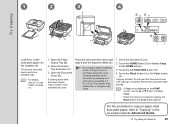
1. Switch off the printer and turn off it from the power source.
2. Find the back paper plate and adjust it to the comparing openings on the printer.
3. Tenderly supplement the plate into the spaces until it fits properly.
4. Guarantee that the plate is safely connected and level with the printer.
5. Plug in the printer and turn it on to confirm in the event that the plate is appropriately reattached.
Irzath
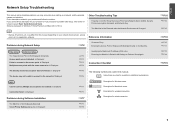
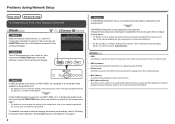
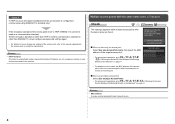
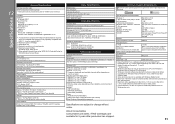
Related Canon PIXMA MG8120 Manual Pages


Similar Questions

While printing business envelopes they the address and return address always come out smudged


a cd rom

purchased canon printer pixma 2120 last night at walmarts. i toldkid working there my laptop didn't ...