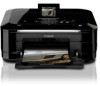
Canon PIXMA MG8120 Support Question
Canon PIXMA MG8120 Support Question
Find answers below for this question about Canon PIXMA MG8120.Need a Canon PIXMA MG8120 manual? We have 2 online manuals for this item!
Question posted by vullberg on February 8th, 2016
Printing Envelopes From Rear Tray Always Come Out Smudged
While printing business envelopes they the address and return address always come out smudged
Current Answers


Related Canon PIXMA MG8120 Manual Pages
Network Setup Troubleshooting - Page 3
...configure settings of the machine, refer to "Wireless Setup Using Easy Setup" in the printed manual: Getting Started. Check 3 Is SSID broadcast (connection via "ANY" SSID, ...address A unique number assigned to each network device.
• MAC address filtering A function to block access from unauthorized wireless devices by saving the MAC addresses of specific wireless devices (computers, printers...
Network Setup Troubleshooting - Page 8
... of the machine, refer to "Wireless Setup Using WPS (Wi-Fi Protected Setup)" in the printed manual: Getting Started.
• When using the { } [ ] and OK buttons, select... then click Update (A). If the machine is not connected to "Wireless Setup Using Easy Setup" in the printed manual: Getting Started.
is Not Displayed (Detected)
Cannot connect. Check the access point settings, then ...
Network Setup Troubleshooting - Page 10
...function of the access point, refer to the manual supplied with specified IP addresses.
• DHCP function A function to automatically assign required information (IP address, etc.) to computers, printers or other devices connected to the network.
• Privacy separator feature A ... in "Wireless Setup" and onward or "Wired Setup" and onward in the printed manual: Getting Started.
Network Setup Troubleshooting - Page 15
..."Wired
Setup" and onward in the printed manual: Getting Started. Wireless LAN
SSID Data encryption TCP/IP setting Wired LAN TCP/IP setting
Inactive BJNPSETUP Inactive Obtain an IP address automatically Inactive Obtain an IP address automatically
14 Restoring the Machine's Default ...Make sure that the completion screen appears, then touch the OK button.
• The LAN settings screen returns.
Network Setup Troubleshooting - Page 17
...the Internet.
16
Check 6 When using a router, are the Ethernet cables of the printer and computer connected to enable wireless LAN. • After enabling wireless LAN, perform setup ...again by following the procedures in "Wireless Setup" and onward in the printed manual: Getting Started. It protects computers and corporate networks against unauthorized access, or restricts ...
MG8120 series Getting Started - Page 4
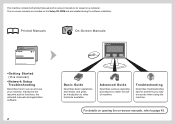
This machine contains both printed manuals and on-screen manuals to be viewed on the Setup CD-ROM and are included on a computer....up and use of machine. For details on opening the on-screen manuals, refer to other functions available. Printed Manuals
On-Screen Manuals
•Getting Started (this manual) •Network Setup Troubleshooting
Describes how to make full use your machine.
MG8120 series Getting Started - Page 6

... 5.
Other documents
• A USB cable is necessary to remove them.
1.
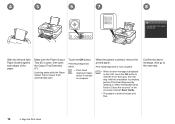
Some accessories (1) are stored within the Paper Output Tray (A). In addition, do not place any object on the top of the Paper Output Tray. Print Head 2. Ink tanks (6: M, BK, GY, PGBK, C, Y) 3. 1
1
2
Preparation
A
A
• Do not install the machine where an object may fall...
MG8120 series Getting Started - Page 8
7
H
8
I
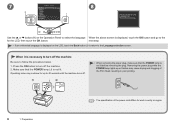
Use the { or } button (H) on the LCD, touch the Back button (I) to return to the Language selection screen. When it is not lit. Operating noise may cause drying and clogging of the Print Head, resulting in poor printing.
1 Preparation
• The specification of the power cord differs for each country or region. Make sure...
MG8120 series Getting Started - Page 9
... with the Scanning Unit (Cover).
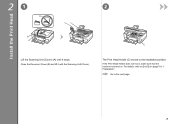
Go to the installation position. For details, refer to to on . If the Print Head Holder does not move, make sure that the machine is turned on page 5 in "1 Preparation". The Print Head Holder (C) moves to the next page.
Close the Document Cover (B) and lift it stops.
MG8120 series Getting Started - Page 10
... metal parts (G) of the protective cap - Remove the orange protective cap.
• Handle the Print Head carefully. The machine may be some transparent or light blue ink on the inside of the bag the Print Head comes in the Print Head Holder until it stops. Be careful not to it . Do not drop or...
MG8120 series Getting Started - Page 11
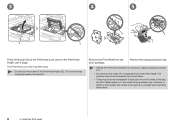
6
Tilt the Print Head forward and set it in place as shown. • Do not knock the Print Head against the sides of the holder. • Install in a well-lit environment.
7
Hold the Print Head Lock Lever firmly and lower it completely.
• Once you have installed the Print Head, do not remove it unnecessarily.
2 Install the Print Head
MG8120 series Getting Started - Page 15
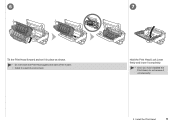
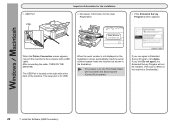
Load paper in the Rear Tray (C).
Load a sheet of supplied specialty paper (Matte Photo Paper MP-101) in portrait orientation so that the cut corner (D) is at the top right.
• Be sure to both edges. D C
B
Move the Paper Guides (B) to use MP-101 for Print Head Alignment.
13 Withdraw it back. 41
2
3
Align...
MG8120 series Getting Started - Page 16
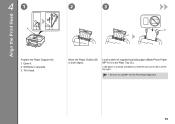
..., then go to complete. Make sure the Paper Output Tray (E) is closed, it will automatically open the Output Tray Extension (F). Print Head Alignment starts.
• Print Head Alignment takes about 4 minutes to the next step.
14
4 Align the Print Head
If printing starts while the Paper Output Tray is open, then open . Touch the OK button. 4
5
6
7
8
F
E
Slide...
MG8120 series Getting Started - Page 17

... on how to load specialty paper in the Rear Tray, refer to to load plain paper in the Rear Tray (A). Close the Paper Output Tray (E).
15 Loading specialty paper
• Load paper in "4 Align the Print Head" on page 13.
A
B
□ How to load specialty paper in the Rear
1
Tray
This section describes how to in portrait orientation...
MG8120 series Getting Started - Page 24
...not agree, the Extended Survey Program will not be installed. (This has no effect on , the Print Head Holder will move when the Scanning Unit (Cover) (B) is on the machine's functionality.)
22...for the User Registration
B
□ If the Extended Survey Program screen appears
When the Printer Connection screen appears, connect the machine to Extended Survey Program, click Agree.
The lower...
MG8120 series Getting Started - Page 40
... in .
Next, read "Registration (Macintosh)" on page 42! 7
7
38
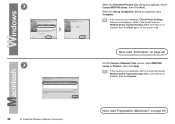
10 Install the Software (Network Connection)
When the Detected Printers List dialog box appears, select Canon MG8100 series, then click Next. Refer to the printed manual: Network Setup Troubleshooting.
Next, read "Information" on page 39! Make sure there is not detected, refer to...
MG8120 series Getting Started - Page 49

... closed, it will automatically open. 1
C
2
E
D
Load 4" x 6" (10 x 15 cm) photo paper in the Rear Tray (C) in portrait orientation with the printing side facing up , then close the Card Slot Cover.
• For details, refer to "5 Load Paper" on the memory card are read and the screen ...
MG8120 series Getting Started - Page 51
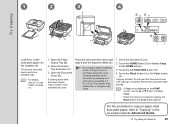
... procedure to copy on paper other than plain paper, refer to "Copying" in the on it with a force exceeding 4.4 lb / 2.0 kg. If printing starts while the Paper Output Tray is complete. Copying will automatically open the Document Cover until copying is closed, it will start. Place the document face-down and align...
MG8120 series Getting Started - Page 52
... from a Computer
1
2
3
4
C
A
B
Load 4" x 6" (10 x 15 cm) photo paper in the Rear Tray (A) in portrait orientation with the printing side facing up. When a photo is selected, the number of copies is closed, it will start printing.
Click Print. If you are using Macintosh, click Print on the Print dialog box to start . Easy-PhotoPrint EX starts. Select the...
MG8120 series Getting Started - Page 53
... 400% (1% unit)
Scan Specifications
Scanner driver
TWAIN/WIA (for printing only. *5 Maximum speed: 4 Mbps
Operating range: within 20 ... (D) X 199 (H) mm * With the Paper Support and Paper Output Tray retracted. space may not be available with Windows Media Center. • ...• Windows: Uninstall software bundled with the Canon inkjet printer. • Internet Explorer 7 or later is required....
Similar Questions

How Do I Reattach The Cannon Ts8120 Rear Paper Tray
I can't figure out how to reattach the rear paper tray on my ts8120 prithat got knocked off. Please ...
I can't figure out how to reattach the rear paper tray on my ts8120 prithat got knocked off. Please ...
(Posted by smtmjmkm 9 months ago)

How To Close Printer Canon Mg8120 After Replacing Cartridges
(Posted by fudhbe 9 years ago)

Need To Setup My Printer To Do Duplex Printing. How Do I Do This?
(Posted by virginiakaisand 10 years ago)

Printer Wont Recognize Command To Print From Rear Tray. Help!
(Posted by jsthmson05 10 years ago)