
Brother International ULT-2002D Support Question
Brother International ULT-2002D Support Question
Find answers below for this question about Brother International ULT-2002D.Need a Brother International ULT-2002D manual? We have 3 online manuals for this item!
Question posted by dadcock on February 10th, 2014
My Ult2002 Says To Remove Frame At Start Up There Is No Frame Ive Removed Frame
ive removed frame reinstalled embroidery device cleaned with air frame holder no avail
Current Answers
Related Brother International ULT-2002D Manual Pages
Accessory Catalog - Page 5

... the fabric with wrong sides together. 2. Pin tucks: 1. SA184 All Brother home-use sewing machines
Ring Bearer Pillow & Hankerchief
Innov-is perfect for edge stitching, attaching lace, and fabric ... guide of another fabric. Remove the basting. Sew. Edge stitching: 1. Sew. 8. Fold back the fabric along the seam allowance. 4. Make the coil stand and sew, holding the fabrics/seams ...
Accessory Catalog - Page 8
Remove Presser Foot Holder. 2. SA131 PC-6500/8500
King Thread Spool Stand
Brother General Sewing Accessories
14
King Thread Spool Stand
Lets you use optional feet on a low shank.
1. Remove the top cover of a machine, and does not require any extra space. Place the thread spool on the left side of the presser foot, lower the...
Users Manual - English - Page 2
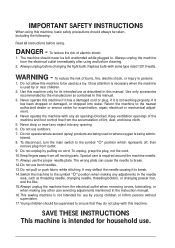
...SAFETY INSTRUCTIONS
When using this machine, basic safety precautions should always be used as a toy. DANGER - Always unplug before cleaning.
2. Do not allow this machine to be taken, including... outlet when removing covers, lubricating, or when making any other user servicing adjustments mentioned in the instruction manual. 16.This sewing machine is required around the machine needle. 11...
Users Manual - English - Page 4

...MACHINE
Your machine is completed • Replacing or removing the needle or any assemblies, the presser
feet, needle, or other moving parts. 2. Do not store anything on the needle while sewing. Do not drop or hit the machine...troubleshooting table in the back of the operation manual to clean the case. PLEASE READ BEFORE USING THIS MACHINE
For safe operation 1. Be sure to assure correct ...
Users Manual - English - Page 13
....
• When servicing the machine, or when removing covers or changing bulbs, the machine or the electrical set must be unplugged.
• For U.S.A. only
This appliance has a polarized plug (one way. If the plug does not fit fully in any way.
2 - 3 - 4 - 5 -
4
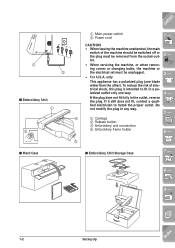
1 Carriage
2 Release button
3 Embroidery unit connection
4 Embroidery frame holder
6 -
3
s Embroidery Unit Storage Case...
Users Manual - English - Page 50
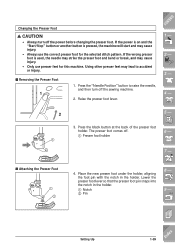
... notch in the holder. s Removing the Presser Foot
1
1. s Attaching the Presser Foot
1 2
4. Setting Up
1-39
Index
Raise the presser foot lever. Place the new presser foot under the holder, aligning the foot pin with the notch in the holder.
1 Notch 2 Pin
8 -
9 - ?! Changing the Presser Foot
CAUTION
• Always turn off the sewing machine.
2. Press the "Needle...
Users Manual - English - Page 59

... cutter on the side of the machine.
8 -
9 - ?!
10.When the needle has stopped moving, raise the presser foot and remove the fabric.
CONTENTS
7. Press the "Start/Stop" button again to Sew
Index
The thread may tangle, resulting in the machine or during machine operation. Press the "Start/Stop" button to begin sewing.
1 -
5
* Guide the fabric lightly by hand...
Users Manual - English - Page 176
... copyright law and is strictly prohibited.
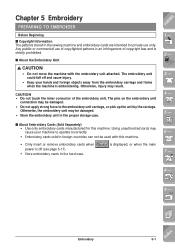
Chapter 5 Embroidery
PREPARING TO EMBROIDER
Before Beginning
s Copyright Information The patterns stored in the sewing machine and embroidery cards are intended for this machine.
• Only insert or remove embroidery cards when power is off and cause injury.
• Keep your machine to the embroidery unit carriage, or pick up the unit by...
Users Manual - English - Page 178
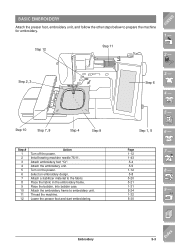
...1 2 3 4 5 6 7 8 9 10 11 12
Action Turn off the power.
Attach a stabilizer material to embroidery unit. Lower the presser foot and start embroidering.
5 -
Select an embroidery design. Attach the embroidery frame to the fabric. Step 12
Step 11
2 - Attach embroidery foot "Q". Thread the machine. Install sewing machine needle 75/11. Step 1, 5
6 - Place the fabric in the...
Users Manual - English - Page 179

..., and then turn off the power.
2.
You may accidentally press the "Start/Stop" button, resulting in injury. Press the "Needle Position" button to firmly tighten the screw.
9 - ?!
Embroidery
Index Set embroidery foot "Q" on the presser foot holder and
remove the presser foot.
5 -
1 Presser foot holder
6 -
4. CAUTION
Use the included screwdriver to bend or break and...
Users Manual - English - Page 180
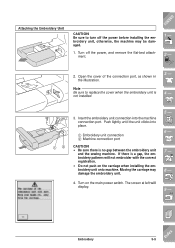
...the carriage when installing the embroidery unit onto machine. Turn off the power before installing the embroidery unit, otherwise, the machine may damage the embroidery unit.
4. CONTENTS 1 -
2 -
2. Embroidery
5-5
Index Note Be sure to turn off the power, and remove the flat-bed attachment. If there is no gap between the embroidery unit
and the sewing machine.
Push lightly until the...
Users Manual - English - Page 193

... of patterns. Otherwise, your machine may not operate correctly.
9 - ?!
5-18
Embroidery
Index For example, it takes around 30 seconds for Machines with Floppy Disk Drives)
1. Selecting a Pattern from the floppy disk depends on a number 7 -
of 2 - The method for this machine. CAUTION Only use floppy disks containing data created by the sewing machine, or equipment intended for...
Users Manual - English - Page 195

...use stabilizer material for embroidery. age.
lizer material removes easily after embroidery. CONTENTS 1 -
2 -
ric.
4 -
2
* When using a stabilizer material may break and cause injury. Use a piece of the fab- PREPARING THE EMBROIDERY FRAME
Attaching a Stabilizer Material to the Fabric
CAUTION
Always use a stabilizer material for embroidery when
sewing stretch fabrics, lightweight...
Users Manual - English - Page 200

s Removing the Embroidery Frame
While pressing the embroidery frame holder to the left, pull the embroidery frame toward you.
1 2
CONTENTS 1 -
2 -
3 -
4 -
5 -
6 -
7 -
8 -
9 - ?!
Embroidery
5-25
Index
Users Manual - English - Page 210

...the steps from #4.
6 -
7 -
8 -
9 - ?!
Use scissors to bump the embroidery unit carriage or the presser foot when removing or attaching the embroidery frame. Remove the embroidery frame. Otherwise, the fabric may loosen in the pattern where you stopped sewing, go to the fabric at left will not embroider correctly.
5.
Embroidery
5-35
Index Be careful not to apply strong force to...
Users Manual - English - Page 211

... presser foot when removing or attaching the embroidery frame. If the bobbin thread is broken, redo the upper thread- 2 -
ing. The Thread Breaks During Sewing 1.
CAUTION Be careful not to reset the bobbin. Press the "Needle Position" button to stop the machine.
Otherwise, the pattern will not embroider correctly.
4. CONTENTS 1 -
2. Press the "Start/Stop" button to...
Users Manual - English - Page 212
....
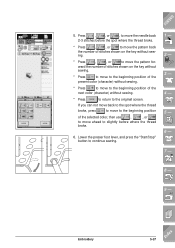
* Press
to move to the beginning position of the
next color (character) without sewing.
* Press
to return to move the pattern for- Embroidery
5-37
Index Press
,
, or
, to continue sewing.
1 - 2 - 3 - 4 - 5 - 6 -
7 -
8 -
9 - ?! Lower the presser foot lever, and press the "Start/Stop" button to move the needle back
2-3 stitches before where the thread broke.
6.
CONTENTS...
Users Manual - English - Page 231
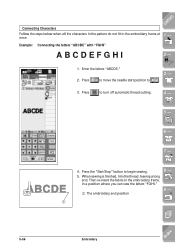
... to turn off automatic thread cutting.
4 -
5 -
6 -
7 -
4. Then re-insert the fabric in the embroidery frame, in the embroidery frame at once. Press
to
3 -
.
3. Press the "Start/Stop" button to begin sewing. 5. When sewing is finished, trim the thread, leaving a long
end. Connecting Characters
Follow the steps below when all the characters in the pattern do not fit...
Users Manual - English - Page 304

... a pattern.
At these times, the machine will not operate properly.
Reattach the embroidery unit correctly. This is not lowered. 5 "Start/Stop" button was attached before the upper threading is done, the machine will make a sound different from that made during sewing:
- Troubleshooting
9-9
Index Push the "Start/Stop" button.
Remove the foot controller, or use the...
Users Manual - English - Page 315

... 6-8
moving the pattern 6-9 rotating the pattern 6-10 Embroidery edit key 1-14, 6-2 Embroidery foot Q 1-8 attaching 5-4 Embroidery frame attaching to the embroidery unit 5-24 display of available frames 5-19, 5-21 removing 5-25 setting fabric in 5-22 types 1-9, 5-21 Embroidery frame display 1-19, 5-43 Embroidery key 1-14, 5-7 Embroidery patterns adjusting edited patterns 6-30 editing 6-8 changing...
Similar Questions

Remove Front Cover
I want to open my brother model ULT 2002D embroidery machine but I can'r locate the final two final ...
I want to open my brother model ULT 2002D embroidery machine but I can'r locate the final two final ...
(Posted by doug64264 8 years ago)

Where Is The Start Button For A Brother Sewing Machine Xr6060
(Posted by elmosal 9 years ago)

My Needle Kee Hitting The Bobbin Case. Also The Needle Is Real Hard To Get Out
I have a Brother 2002D. The needle is real hard to remove. Usually requires pliers. My biggest probl...
I have a Brother 2002D. The needle is real hard to remove. Usually requires pliers. My biggest probl...
(Posted by mhalla 9 years ago)

How To Remove Front Cover On My Brother Lx-3125 Sewing Machine
(Posted by ecabCLVA 10 years ago)

My Machine Keeps Telling Me To Insert The Embroidery Frame.
Problem: My Brothers Pacesetter ULT2002 indicates that the embroidery frame needs inserted. The unit...
Problem: My Brothers Pacesetter ULT2002 indicates that the embroidery frame needs inserted. The unit...
(Posted by sirsabbath 11 years ago)