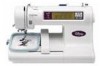
Brother International PE180D Support Question
Brother International PE180D Support Question
Find answers below for this question about Brother International PE180D - Disney Embroidery Machine.Need a Brother International PE180D manual? We have 1 online manual for this item!
Question posted by annabellefalzon on November 23rd, 2011
Shipping
Do you ship to MALTA EU?and how much it is?
Current Answers
Related Brother International PE180D Manual Pages
Users Manual - English - Page 2
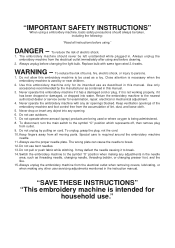
...aerosol (spray) products are being used or where oxygen is required around the embroidery machine
needle. 11. Keep fingers away from the electrical outlet when removing covers, ...or push fabric while stitching. The embroidery machine should always be left unattended while plugged in this embroidery machine to break. 14. Use this embroidery machine only for
household use the proper ...
Users Manual - English - Page 3
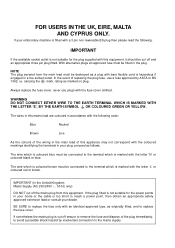
...is marked with this equipment. IMPORTANT
If the available socket outlet is not suitable for the power points in your embroidery machine is cut off the mains plug from the main lead must be connected to reach a power point, then ...coloured blue must be fitted in your dealer. FOR USERS IN THE UK, EIRE, MALTA AND CYPRUS ONLY. In the event of the wiring in a live socket outlet.
Users Manual - English - Page 4
... on the needle while sewing.
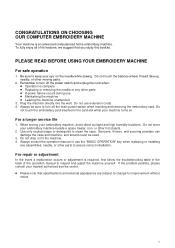
Do not touch the balance wheel, thread take-up, needle, or other parts to turn off the power switch and unplug the cord when: ● Operation is complete ● Replacing or removing the needle or any assemblies; PLEASE READ BEFORE USING YOUR EMBROIDERY MACHINE
For safe operation
1. needle...
Users Manual - English - Page 5

...of fabric 18 Setting the fabric in the embroidery frame 20 Fitting the embroidery frame to the machine 22 Removing the embroidery frame ...... 22 THREAD TENSION ADJUSTMENT....... 23 ... Changing thread density of the stitch on characters and some frame patterns ... 47 SEWING A BASIC EMBROIDERY PATTERN 48 Embroidering multi-color patterns ..... 48 Embroidering single color patterns ... 48 ...
Users Manual - English - Page 6
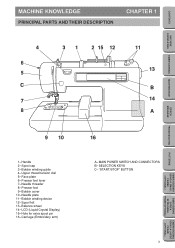
Carriage (Embroidery arm)
16
A- Needle threader 8- Bobbin winding device 12- Balance wheel 14- CONTENTS
MACHINE KNOWLEDGE
EMBROIDERING MAINTENANCE
MACHINE KNOWLEDGE
PRINCIPAL PARTS AND THEIR DESCRIPTION
CHAPTER 1
4
6 5 C
7 8
31
2 15 12
11
13 B 14 A
ERROR MESSAGE
TROUBLESHOOTING
PATTERNS
EMBROIDERING USING A SMALL
FRAME (OPTIONAL)
9 10
1- Face plate 6- ...
Users Manual - English - Page 7
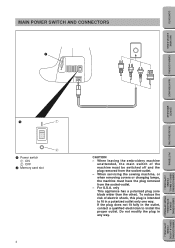
... than the other). When servicing the sewing machine, or when removing covers or changing lamps, the machine must be switched off and the plug removed from the socket-outlet. - To reduce the risk of the machine must have the plug removed from the socket-outlet. -
When leaving the embroidery machine
unattended, the main switch of electric...
Users Manual - English - Page 8
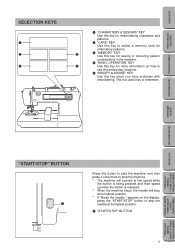
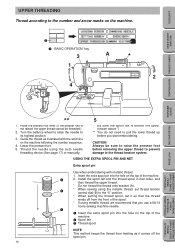
... is a useful key to stop at its highest position. * If "Raise the needle."
appears on how to
use this embroidery machine.
5 "MODIFY & ADVISE" KEY
Use this key for more to stop the machine. * The machine will stop the needle at its highest position.
1 "START/STOP" BUTTON
5
EMBROIDERING USING A LARGE
FRAME (OPTIONAL) EMBROIDERING MAINTENANCE
ERROR...
Users Manual - English - Page 9
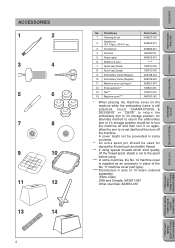
.../11 3pcs., 90/14 1 pc.
3 Screwdriver
4 Scissors
5 Seam ripper
6 Bobbins (4 pcs)
7 Spool cap (Small)
8 Spool cap (Large)
9 Embroidery sheet (Regular)
10 Embroidery frame (Regular)
11 Machine cover (soft type)*
12 Extra spool pin**
13 Net***
14 Machine cover****
Parts Code XA4527-001
X59535-001
X53666-001 184783-001 X54243-001
***** 130013-003 130012-003...
Users Manual - English - Page 10
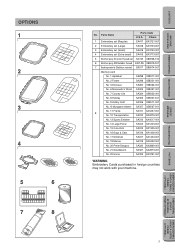
...Embroidery set (Regular)
SA417 XA3727-001
2 Embroidery set (Large)
SA418 XA3733-001
3 Embroidery set (Small)
SA416 XA3730-001
4 Embroidery set (Extra-small) SA415 XA3713-001
5 Brother poly 40 color thread set SA740 X80928-100
6 Brother poly #90 bobbin thread EBT-PE... XA3791-001
WARNING Embroidery Cards purchased in foreign countries may not work with your machine.
7
EMBROIDERING USING...
Users Manual - English - Page 17
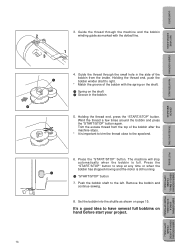
... close to stop automatically when the bobbin is still running.
1 "START/STOP" button
7. The machine will stop at any time or when the bobbin has stopped moving and the motor is full. ... spring on the shaft. 1 Spring on page 15. Remove the bobbin and continue sewing.
8. Guide the thread through the machine and the bobbin winding guide as shown on the shaft 2 Groove in the side ...
Users Manual - English - Page 18
...lower (bobbin) thread, it is no need to the right.
1 Bobbin cover 2 Bobbin cover release button.
2.
CONTENTS
MACHINE KNOWLEDGE
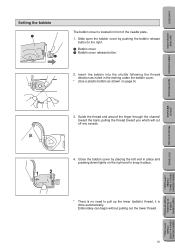
Setting the bobbin
1
2
The bobbin cover is located in the etching under the bobbin cover.
* (Use a...the thread toward you which will cut off any excess. Embroidery can begin without pulling out the lower thread.
15
EMBROIDERING USING A LARGE
FRAME (OPTIONAL)
Users Manual - English - Page 19
...prevent damage to pull the lower thread up before you use a 90/14
home sewing machine needle.
1 Insert the extra spool pin into the hole on the machine.
1
1 "BASIC OPERATION" key
3
A
*
1
2 4
EMBROIDERING MAINTENANCE
...PIN AND NET
Extra spool pin
Use when embroidering with the solid line on the machine following the number sequence.
4. Install the spool felt and the thread spool in ...
Users Manual - English - Page 21
...EXTRA-SMALL FRAME (OPTIONAL)
EMBROIDERING USING A LARGE
FRAME (OPTIONAL) CONTENTS
MACHINE KNOWLEDGE
EMBROIDERING MAINTENANCE
ERROR MESSAGE
TROUBLESHOOTING
PREPARATION BEFORE EMBROIDERING
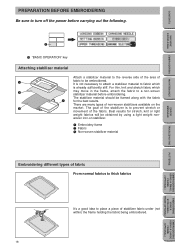
Be sure to ...to the reverse side of the area of non-woven stabilizers available on stabilizer. 1 Embroidery frame 2 Fabric 3 Non-woven stabilizer material
Embroidering different types of fabric From normal...
Users Manual - English - Page 23
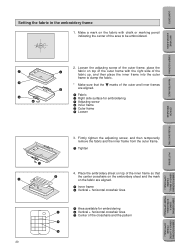
... outer frame to clamp the fabric.
* Make sure that the ᮢ marks of the area to be embroidered.
2. CONTENTS
MACHINE KNOWLEDGE
EMBROIDERING MAINTENANCE
ERROR MESSAGE
TROUBLESHOOTING
Setting the fabric in the embroidery frame
1. Loosen the adjusting screw of the outer frame, place the fabric on top of the outer frame with chalk...
Users Manual - English - Page 24
...the
correct location based on the fabric does not slip out of the embroidery sheet. Insert the fabric and inner frame back into the outer frame while ensuring that ...the mark on the crosshairs of position. CONTENTS
MACHINE KNOWLEDGE
EMBROIDERING MAINTENANCE
ERROR MESSAGE
TROUBLESHOOTING
5. Remove the embroidery sheet using the finger hole to be sure that the edges ...
Users Manual - English - Page 26
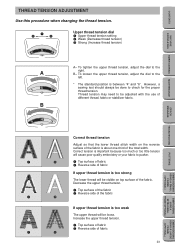
... much or too little tension will cause poor quality embroidery or your fabric to check for the proper thread tension. However, a sewing test should always be visible on the reverse surface ...(Decrease thread tension) 3 Strong (Increase thread tension)
A- B- CONTENTS
MACHINE KNOWLEDGE
EMBROIDERING MAINTENANCE
THREAD TENSION ADJUSTMENT
Use this procedure when changing the thread tension.
Users Manual - English - Page 32
...
PATTERNS
EMBROIDERING USING A SMALL
FRAME (OPTIONAL)
EMBROIDERING USING A
EXTRA-SMALL FRAME (OPTIONAL)
EMBROIDERING USING A LARGE
FRAME (OPTIONAL)
29
CONTENTS
MACHINE KNOWLEDGE
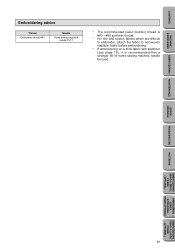
Embroidering advice
Thread Embroidery thread #50
Needle
Home sewing machine needle 75/11
* The recommended lower (bobbin) thread is #60 - #90 synthetic thread.
* For thin and stretch fabrics which are...
Users Manual - English - Page 46
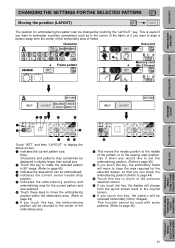
...be used with some patterns. (Refer to the center of the embroidery area. B If you can check the embroidering position.(Refer to ...which can be changed by touching the "LAYOUT" key.
CONTENTS
MACHINE KNOWLEDGE
CHANGING THE SETTINGS FOR THE SELECTED PATTERN
Moving the position... will change from the layout screen back to the sewing start position.
B
8 This moves the needle position...
Users Manual - English - Page 51
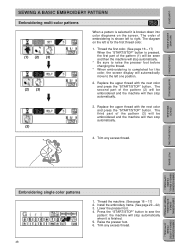
... the "START/STOP" button. Press the "START/STOP" button to sew the
pattern: the machine will automatically move to right. Trim any excess thread. The diagram on the screen. Thread the machine. (See page 16 - 17) 2. CONTENTS
MACHINE KNOWLEDGE
EMBROIDERING MAINTENANCE
SEWING A BASIC EMBROIDERY PATTERN
Embroidering multi-color patterns (1) (2) (3) (2) (3)
When a pattern is selected...
Users Manual - English - Page 69

...use only. CONTENTS
One point mark embroidery pattern
MACHINE KNOWLEDGE
EMBROIDERING MAINTENANCE
1...001 2...800 3...900
1...704 2...800 3...900
1...205 2...339 3...900
1...339 2...205 3...900
1...339 2...800 3...900
1...205 2...001 3...900
1...001 2...800 3...900
1...205 2...800 3...900
1...307 2...019 3...900
Order of sewing
Embroidery thread color
1...307 2...800 3...900
1...001...
Similar Questions

Where Can I Get Memory Cards For My Pe-180d Brother Embroidery Machine. Also A C
I need a memory card and a card reader for my pe-180d
I need a memory card and a card reader for my pe-180d
(Posted by Tinapage 2 years ago)

Can I Use Pes File In My Disney Brother Embroidery Machine Pe 180d
Can i use a pes file in my disney brother embroidery machine pe 180d
Can i use a pes file in my disney brother embroidery machine pe 180d
(Posted by emschwartz35 2 years ago)


How To Thread A Brother Disney Embroidery Machine Se270d To A Computer
(Posted by KEdiego 9 years ago)

I Need A User's Manual For The Pe-180d Embroidery Machine. Is It Free?
I need a user's manual for the PE-180D embroidery machine. I thought that by accessing the website...
I need a user's manual for the PE-180D embroidery machine. I thought that by accessing the website...
(Posted by rmarrero 12 years ago)