Brother International HL 5370DW Support Question
Brother International HL 5370DW Support Question
Find answers below for this question about Brother International HL 5370DW - B/W Laser Printer.Need a Brother International HL 5370DW manual? We have 3 online manuals for this item!
Question posted by annpet on January 25th, 2014
Do Not Reset The Drum Counter When You Only Replace The Toner Cartridge.
The person who posted this question about this Brother International product did not include a detailed explanation. Please use the "Request More Information" button to the right if more details would help you to answer this question.
Current Answers
Related Brother International HL 5370DW Manual Pages
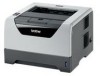
Users Manual - English - Page 11
DO NOT connect the interface cable at this Printer1 1
1
1
Quick Setup Guide
Printer CD-ROM
AC Power Cord
Drum Unit and Toner Cartridge Assembly
Interface cable 1
The interface cable is not a standard accessory. Purchase the appropriate cable for the interface you are using. „ USB cable
Please make ...
Users Manual - English - Page 106
...
cloth in case you accidentally spill or scatter toner.
6
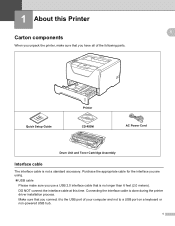
To prevent damage to the printer caused by static electricity, DO NOT touch the electrodes shown in the illustration. Routine Maintenance
IMPORTANT
We recommend that you put the drum unit and toner cartridge assembly on a piece of the drum unit.
96 b Take out the drum unit and toner cartridge assembly.
Users Manual - English - Page 109
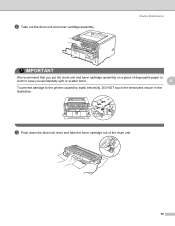
... the use only genuine Brother brand replacement toner cartridges. IMPORTANT
6
For UK and other manufacturer's products with toner of unauthorized third party toner and/or cartridges. To protect your printer.
If damage is caused by the warranty. Routine Maintenance
IMPORTANT
For USA and Canada
Brother strongly recommends that is caused to the drum unit or other part of...
Users Manual - English - Page 110
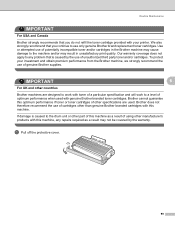
... you hear it may have a vertical stripe. Note
Make sure that you put it in the toner cartridge properly or it lock into place. Routine Maintenance
f Put the new toner cartridge firmly into the drum unit until the Status LED lights up.
100 h Put the drum unit and toner cartridge assembly back in the printer.
Close the front cover.
Users Manual - English - Page 112
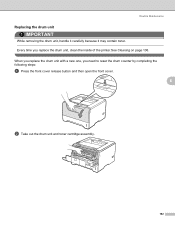
... you need to reset the drum counter by completing the following steps:
a Press the front cover release button and then open the front cover.
6
b Take out the drum unit and toner cartridge assembly.
102
Routine Maintenance
Replacing the drum unit
6
IMPORTANT
While removing the drum unit, handle it carefully because it may contain toner. When you replace the drum unit with a new...
Users Manual - English - Page 113
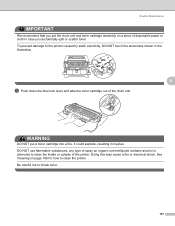
... NOT use flammable substances, any type of the printer. See Cleaning on a piece of the drum unit. Routine Maintenance
IMPORTANT
We recommend that you accidentally spill or scatter toner. WARNING
DO NOT put the drum unit and toner cartridge assembly on page 106 for how to the printer caused by static electricity, DO NOT touch the electrodes...
Users Manual - English - Page 115
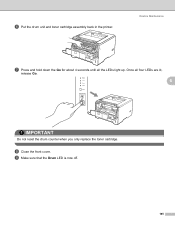
i Make sure that the Drum LED is now off.
105 Once all the LEDs light up.
f Put the drum unit and toner cartridge assembly back in the printer. Routine Maintenance
g Press and hold down the Go for about 4 seconds until all four LEDs are lit,
release Go.
6
IMPORTANT
Do not reset the drum counter when you only replace the toner cartridge. h Close the front cover.
Users Manual - English - Page 118
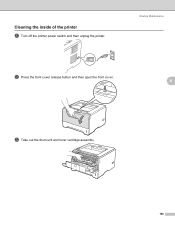
Cleaning the inside of the printer
a Turn off the printer power switch and then unplug the printer. Routine Maintenance
6
b Press the front cover release button and then open the front cover.
6
c Take out the drum unit and toner cartridge assembly.
108
Users Manual - English - Page 119

Wait for the printer to the printer caused by static electricity, DO NOT touch the electrodes shown in case you put the drum unit and toner cartridge assembly on your hands or clothes, wipe or wash it off with cold water at once. IMPORTANT
6
We recommend that you accidentally spill or scatter toner. If toner scatters on a piece...
Users Manual - English - Page 120
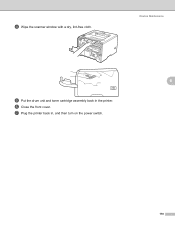
g Plug the printer back in the printer. f Close the front cover. Routine Maintenance
6
e Put the drum unit and toner cartridge assembly back in , and then turn on the power switch.
110
d Wipe the scanner window with a dry, lint-free cloth.
Users Manual - English - Page 123
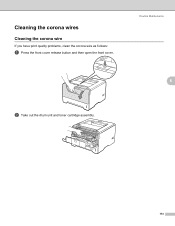
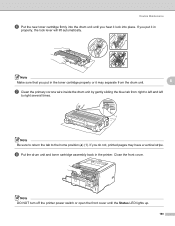
Cleaning the corona wires
Cleaning the corona wire
If you have print quality problems, clean the corona wire as follows:
a Press the front cover release button and then open the front cover. Routine Maintenance
6 6
6
b Take out the drum unit and toner cartridge assembly.
113
Users Manual - English - Page 124
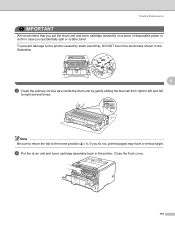
If you accidentally spill or scatter toner. d Put the drum unit and toner cartridge assembly back in the illustration.
6
c Clean the primary corona wire inside the drum unit by static electricity, DO NOT touch the electrodes shown in the printer.
To prevent damage to the printer caused by gently sliding the blue tab from right to left and...
Users Manual - English - Page 131
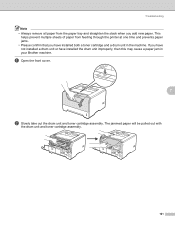
... paper tray and straighten the stack when you add new paper.
The jammed paper will be pulled out with
the drum unit and toner cartridge assembly.
121 Troubleshooting
Note • Always remove all paper from feeding through the printer at one time and prevents paper jams. • Please confirm that you have installed the...
Users Manual - English - Page 132
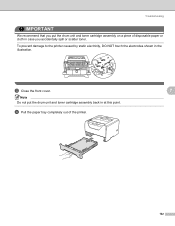
... out of disposable paper or cloth in case you put the drum unit and toner cartridge assembly back in the illustration. c Close the front cover.
7
Note Do not put the drum unit and toner cartridge assembly on a piece of the printer.
122 To prevent damage to the printer caused by static electricity, DO NOT touch the electrodes shown...
Users Manual - English - Page 134
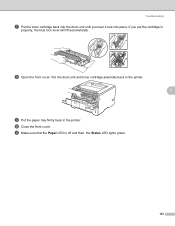
... then, the Status LED lights green.
124 h Open the front cover. Troubleshooting
g Put the toner cartridge back into the drum unit until you put the cartridge in the printer. j Close the front cover. Put the drum unit and toner cartridge assembly back in the printer.
7
i Put the paper tray firmly back in
properly, the blue lock lever will lift...
Users Manual - English - Page 136
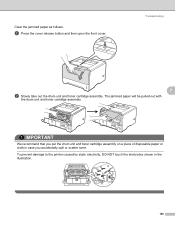
... then open the front cover. IMPORTANT
We recommend that you accidentally spill or scatter toner. To prevent damage to the printer caused by static electricity, DO NOT touch the electrodes shown in case you put the drum unit and toner cartridge assembly on a piece of disposable paper or cloth in the illustration.
126
The jammed...
Users Manual - English - Page 138
..., the Status LED lights green.
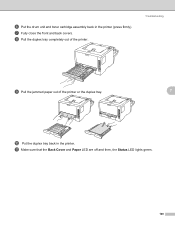
128 g Fully close the front and back covers.
f Put the drum unit and toner cartridge assembly back in the printer. h Pull the duplex tray completely out of the printer or the duplex tray.
7
j Put the duplex tray back in the printer (press firmly). Troubleshooting
i Pull the jammed paper out of the...
Quick Setup Guide - English - Page 1
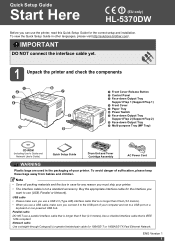
... Tray)
CD-ROM
(including User's Guide and Network User's Guide)
Quick Setup Guide
Drum Unit and Toner Cartridge Assembly
AC Power Cord
WARNING
Plastic bags are used in other languages, please visit http://...Setup Guide
Start Here
(EU only)
HL-5370DW
Before you can use the printer, read this Quick Setup Guide for any reason you must ship your printer. • The interface cable is no...
Quick Setup Guide - English - Page 3
....
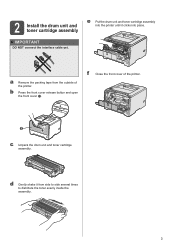
b Press the front cover release button and open the front cover a.
IMPORTANT
DO NOT connect the interface cable yet. f Close the front cover of the printer. 2 Install the drum unit and toner cartridge assembly
e Put the drum unit and toner cartridge assembly into the printer until it from the outside of the printer.
11
c Unpack the drum unit and toner cartridge assembly.
Quick Setup Guide - English - Page 49
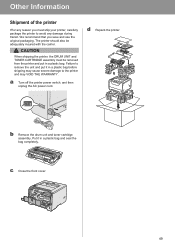
... remove the unit and put in a plastic bag.
b Remove the drum unit and toner cartridge assembly. Put it in a plastic bag and seal the bag completely. CAUTION
When shipping the printer, the DRUM UNIT and TONER CARTRIDGE assembly must ship your printer, carefully package the printer to the printer and may cause severe damage to avoid any reason you save...
Similar Questions

How To Reset Drum Counter On Brother Hl-4040cdn
(Posted by Thifa 10 years ago)

How To Reset Drum Counter On Brother Hl 5370dw
(Posted by bomon 10 years ago)
How To Reset Drum Counter On Brother Hl 5370 Printer
(Posted by blackmea 10 years ago)

Hl-5370dw Trouble How To Reset Drum Counter
(Posted by dbnan 10 years ago)

Why Is Print Quality Poor With Newly Replaced Toner Cartridge?
I moved the cleaning tab back and forth, and shook cartridge side to side to distribute toner. Spot ...
I moved the cleaning tab back and forth, and shook cartridge side to side to distribute toner. Spot ...
(Posted by gerischu 11 years ago)