
Brother International CS6000i Support Question
Brother International CS6000i Support Question
Find answers below for this question about Brother International CS6000i - Computerized Sewing Machine.Need a Brother International CS6000i manual? We have 1 online manual for this item!
Question posted by jothlilsho on July 12th, 2014
How To Finish Hems Brother Cs6000i
The person who posted this question about this Brother International product did not include a detailed explanation. Please use the "Request More Information" button to the right if more details would help you to answer this question.
Current Answers
Related Brother International CS6000i Manual Pages
User Guide - Page 1

... off, then
remove plug from all instructions before using and before cleaning. Always use . This sewing machine is not intended for household use the proper needle plate.
SAVE THESE INSTRUCTIONS This machine is being used as described in this machine only for examination, repair, electrical or mechanical adjustment.
4.
To reduce the risk of burns...
User Guide - Page 3
... authorized Brother dealer.
Plug the machine directly into the wall. Benzene, thinner, and scouring powders can damage the case and machine, and should never be used. 3. For repair or adjustment In the event a malfunction occurs or adjustment is required, first follow the troubleshooting table in the back of the most advanced computerized household sewing machines. Do...
User Guide - Page 4

...5
The main parts ...5 Needle and presser foot section ...6 Operation buttons ...6 Operation panel ...7 Flat bed attachment ...7
ACCESSORIES ...8
Optional accessories ...8
USING YOUR SEWING MACHINE 9
Power supply precautions ...9 Power supply ...9 Foot controller ...10 Sewing speed controller (for models equipped with the start/stop button 10 Changing the needle stop position ...10
THREADING THE...
User Guide - Page 5
...32 BASIC STITCHING ...33
Basic stitching ...33
BLIND HEM STITCHING 34 BUTTONHOLE SEWING 35
Button sewing ...38
ZIPPER INSERTION ...40 SEWING STRETCH FABRICS AND ELASTIC TAPE 41
Stretch stitching ...41... APPENDIX ...52
STITCH SETTINGS ...52
Utility stitches ...52
MAINTENANCE ...57
Cleaning the machine surface ...57 Cleaning the bobbin case ...57
TROUBLESHOOTING ...59 ERROR MESSAGES ...62
Operation ...
User Guide - Page 6

... in the foot controller plug.
q Foot controller (page 10) You can turn the main power and sewing light switch on and off. NCBC2000.book Page 5 Thursday, October 21, 2004 4:32 PM
1 KNOWING YOUR SEWING MACHINE
1
NAMES OF MACHINE PARTS AND THEIR FUNCTIONS
The main parts
a Bobbin winder (page 11) This winds the thread onto...
User Guide - Page 7
... dogs feed the fabric in place.
b Reverse/reinforcement stitch button Press the reverse/reinforcement stitch button to easily perform various basic sewing machine operations. The machine sews at a slow speed at the beginning of sewing while the button is lowered in the fabric. For details, refer to "Starting to raise and lower the presser foot...
User Guide - Page 8
... to "Selecting stitching" (page 27).
NCBC2000.book Page 7 Thursday, October 21, 2004 4:32 PM
Operation panel
The operation panel, located on the front of the sewing machine, allows you wish to use.
User Guide - Page 9

... XC1944-002
No. Part Code
U.S.A. NCBC2000.book Page 8 Thursday, October 21, 2004 4:32 PM
KNOWING YOUR SEWING MACHINE
ACCESSORIES
The following machine models: CS-6000, CS-5100, CS-4000, BC-2500, BC-2300, BC-2100, ES-2400, ES-2200, ES-2000, ES-2410, ES-...
13.
14.
15.
75/11 1 needle 90/14 1 needle 100/16 1 needle
No. We have designed these accessories to carry out most sewing tasks.
User Guide - Page 10
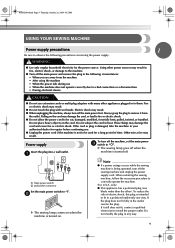
... plugged in the following precautions concerning the power supply. Otherwise a fire may result. ● When unplugging the machine, always turn off .
When restarting the sewing machine, follow the necessary procedure to "I".
Electric shock may result. b
X The sewing lamp comes on . To reduce the risk of time. Pulling on the cord. These things may damage...
User Guide - Page 11
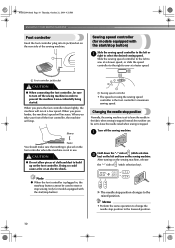
... the needle stop position to the lowered position.
10
Memo
• Perform the same operation to change the needle stop position
Normally, the sewing machine is set using the sewing speed controller is not in order to build up on the foot controller. Doing so could cause a fire or an electric shock.
When...
User Guide - Page 12
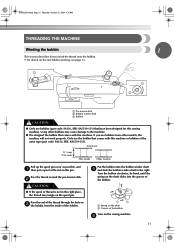
... use bobbins (part code: SA156, SFB: XA5539-151) that comes with this sewing machine.
Pass the end of the bobbin
Turn on the spool pin. Actual size
11... thread on c the bobbin from other bobbins may tangle on the sewing machine.
NCBC2000.book Page 11 Thursday, October 21, 2004 4:32 PM
THREADING THE MACHINE
Winding the bobbin
1
This section describes how to wind the thread ...
User Guide - Page 27

...; Never use bent needles. Turn on replacing the presser foot, refer to "Selecting stitching" (page 27).
↓
3
Attach the presser foot. For details on the sewing machine. For details on selecting a stitch, refer to "Replacing the presser foot" (page 24).
↓
4 Start sewing. CAUTION
● While the machine is finished, cut the threads.
User Guide - Page 32
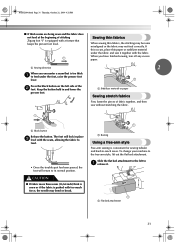
...feed under the fabric and sew it .
a Basting
Using a free-arm style
Free-arm sewing is too thick a to the left side of the b foot. a Sewing direction
2
When you have finished sewing, tear off any excess ... has been passed, the foot will lock in and lower the
presser foot. To change your machine to its normal position. NCBC2000.book Page 31 Thursday, October 21, 2004 4:32 PM
■...
User Guide - Page 35
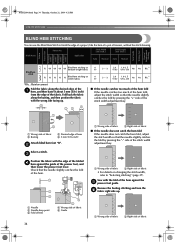
...Sew with the fold of the hem against the guide of the presser foot, and
then lower the presser foot lever. Fold back the fabric along the desired edge of the a hem, and then baste it about 5 mm (3/16 inch)
from the edge of the folded d hem... hem stitching on changing the stitch width, refer to finish the edge of a project, like the hem of a pair of hem d 5 mm (3/16 inch)
Attach blind hem ...
User Guide - Page 39
... .
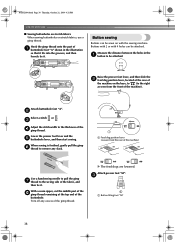
With a seam ripper, cut the middle part of the h gimp thread remaining at the rear of
the machine on stretch fabrics, use a gimp thread. Buttons with 2 or with the sewing machine. Attach buttonhole foot "A". When sewing is finished, gently pull the gimp f thread to be attached. Trim off any slack.
NCBC2000.book Page 38 Thursday...
User Guide - Page 40
i
• After sewing for about 10 seconds at the beginning of the button. When you are finished attaching the button,
k slide the feed dog position lever to
(to
the left as ...wrong side of the fabric, and
then tie it is the same as seen from the front of the sewing machine, and then sew them in the button.
NCBC2000.book Page 39 Thursday, October 21, 2004 4:32 PM
Place a button ...
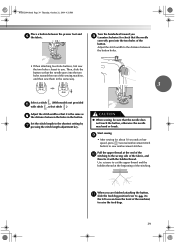
User Guide - Page 46

... the presser foot and the presser foot
a holder.
3
• For details, refer to follow the pattern.
a Pattern
After sewing is finished, slide the feed dog
g position lever to
(to the left side b of the machine)
Align the quilting foot with the screwdriver, otherwise the needle may touch the presser foot, causing it to...
User Guide - Page 49

... (3/32-1/4) (3/32) (1/16-3/16) ( J )
No
of fabrics, such as with this sewing machine.
thin, medium weight and 5.0 plain weave fabrics, heir- (3/16)
1.5-7.0 (1/16-1/4)
2.0 ...16)
0.0-7.0 (0-1/4)
1.2 0.2-4.0 Yes (1/16) (1/64-3/16) ( J )
No
Patchwork stitching, deco-
Decorative hemming on
N
26
26
26
24
thin, medium weight and plain weave fabrics, heir-
5.0 (3/16)
1.5-7.0 (1/16...
User Guide - Page 52
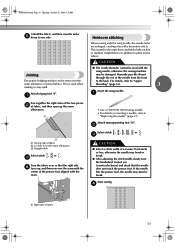
..., , , or . c
CAUTION
● Select a stitch width of fabric
51
This is used to decorate hems and tablecloths on inserting a needle, refer to one side.
If the needle hits the presser foot, the needle may...pieces b of fabric, and then open up , and then sew over the seam with the
wing needle, otherwise the sewing machine
Joining
Decorative bridging stitches can be sewn over so that the ...
User Guide - Page 64
...
bar tack 46 basic stitching 33 blind hem stitching 34 bobbin 14
bobbin case 14, 57 bobbin cover 6, 14 bobbin winder 11, 59, 62
button sewing 38
needle bar thread guide 6
needle ...
joining 51
joining stitch 42, 48
L
LCD 7
S
scallop stitching 49 seam ripper 37 sewing machine needles 20 sewing speed controller 6 sleeve holes 46 smocking 50
spool pin 11, 16 start/stop button 6,...
Similar Questions

I Would Like To Know From Where I Can Purchase Brother Cs6000i Which Is Design T
I am searching from everywhere I want to know from where i can purchase Brother CS6000i which is des...
I am searching from everywhere I want to know from where i can purchase Brother CS6000i which is des...
(Posted by phathimathchimla 4 years ago)

Brother Cs6000i Wide Extension Table
I am looking for the wide extension table that comes with the Brother CS6000i. I have the machine, j...
I am looking for the wide extension table that comes with the Brother CS6000i. I have the machine, j...
(Posted by lauriedaniels49 9 years ago)

Where Can I Find Brother Cs6000i Service Manual
(Posted by AMINMbassm 10 years ago)


From Where Can I Buy Brother Cs6000i Machine Design For Uk (230v).
(Posted by ranjithdassanayake 11 years ago)