
Brother International CS6000i Support Question
Brother International CS6000i Support Question
Find answers below for this question about Brother International CS6000i - Computerized Sewing Machine.Need a Brother International CS6000i manual? We have 1 online manual for this item!
Question posted by allenlorene030 on March 29th, 2021
My Brother Cs-6000i
Will not see error F5 will not stop beeping
Current Answers
Answer #1: Posted by Troubleshooter101 on March 30th, 2021 12:49 PM
Troubleshooter101

Member since:
September 30th, 2015 Points: 2,927,040

Member since:
September 30th, 2015 Points: 2,927,040
You receive the error message E5 when the start/stop button was pressed while the foot controller was connected. 1. Disconnect the foot controller, and then press the Start/Stop button. - Otherwise, operate the machine by using the foot controller.
https://help.brother-usa.com/app/answers/detail/a_id/54054/~/e5-error-message
Thanks
Please respond to my effort to provide you with the best possible solution by using the "Acceptable Solution" and/or the "Helpful" buttons when the answer has proven to be helpful. Please feel free to submit further info for your question, if a solution was not provided. I appreciate the opportunity to serve you!
Troublshooter101
Related Brother International CS6000i Manual Pages
User Guide - Page 1

... bent needles. 13. Do not use the proper needle plate. Never operate the machine with this machine only for use . Never drop or insert any air openings blocked. Keep fingers away... needle, threading bobbin, or changing presser foot, and the like. 15. This sewing machine is intended for examination, repair, electrical or mechanical adjustment.
4. Young children should be taken,...
User Guide - Page 3
... safe operation 1. Be sure to keep your local authorized Brother dealer. Always consult the operation manual when replacing or installing any other moving parts. 2. For repair or adjustment In the event a malfunction occurs or adjustment is one of the most advanced computerized household sewing machines. Remember to turn off the power switch and unplug...
User Guide - Page 4

... Operation panel ...7 Flat bed attachment ...7
ACCESSORIES ...8
Optional accessories ...8
USING YOUR SEWING MACHINE 9
Power supply precautions ...9 Power supply ...9 Foot controller ...10 Sewing speed controller (for models equipped with the start/stop button 10 Changing the needle stop position ...10
THREADING THE MACHINE 11
Winding the bobbin ...11 Lower threading ...14 Upper threading ...16...
User Guide - Page 5
...Basic stitching ...33
BLIND HEM STITCHING 34 BUTTONHOLE SEWING 35
Button sewing ...38
ZIPPER INSERTION ...40 SEWING STRETCH FABRICS AND ELASTIC TAPE 41
Stretch stitching ... ...52
MAINTENANCE ...57
Cleaning the machine surface ...57 Cleaning the bobbin case ...57
TROUBLESHOOTING ...59 ERROR MESSAGES ...62
Operation beep (for models equipped with the operation beep 62
INDEX ...63
4 NCBC2000.book...
User Guide - Page 6

... the tension of thread. j Operation panel (page 7) This is used to start and stop sewing.
5 l Main power and sewing light switch (page 9) You can use as the lower thread.
k Handwheel Used to ... onto the bobbin and then threading the machine.
q Foot controller (page 10) You can turn the main power and sewing light switch on the sewing machine model. f Thread take-up lever (page...
User Guide - Page 7
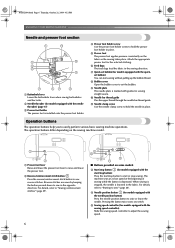
... equipped with the start/stop button) Press the start/stop button (for models equipped with the sewing speed controller) Slide the sewing speed controller to raise or lower the needle.
a Presser foot lever Raise and lower the presser foot lever to easily perform various basic sewing machine operations. Pressing the button twice sews one stitch. e Presser foot...
User Guide - Page 8
... fall out, and be sewn. NCBC2000.book Page 7 Thursday, October 21, 2004 4:32 PM
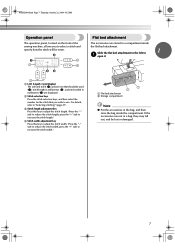
Operation panel
The operation panel, located on the front of the sewing machine, allows you wish to use. a LCD (Liquid crystal display)
The selected stitch (1), presser foot that you to select a stitch and specify how the stitch will...
User Guide - Page 9

only) ● Foot controller: Model T
This foot controller can be used on machine) 6 Blind stitch foot "R" 7 Button fitting foot "M" 8 Seam ripper
Part Code
...121
X54243-001
No. NCBC2000.book Page 8 Thursday, October 21, 2004 4:32 PM
KNOWING YOUR SEWING MACHINE
ACCESSORIES
The following machine models: CS-6000, CS-5100, CS-4000, BC-2500, BC-2300, BC-2100, ES-2400, ES-2200, ES-2000, ES...
User Guide - Page 10
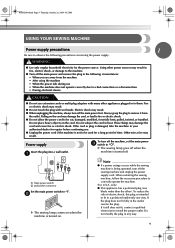
... the proper outlet.
WARNING
● Use only regular household electricity for repairs before continuing use. ● Unplug the power cord if the machine is being operated, turn off the sewing machine and unplug the power supply cord. Electric shock may result.
● Do not touch the plug with many other appliances plugged in...
User Guide - Page 11
... controller jack/socket
CAUTION
● When connecting the foot controller, be used to start or stop sewing (only for models equipped with the start /stop position changes to build up on the sewing machine. When you take your foot off the sewing machine in use. CAUTION
● Do not allow pieces of cloth and dust to the...
User Guide - Page 12
... of the bobbin. e
11
NCBC2000.book Page 11 Thursday, October 21, 2004 4:32 PM
THREADING THE MACHINE
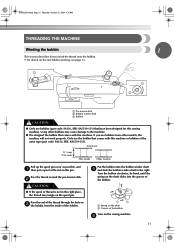
Winding the bobbin
1
This section describes how to wind the thread onto the bobbin. • For details on the sewing machine. If you use bobbins (part code: SA156, SFB: XA5539-151) that comes with this pin.
User Guide - Page 13
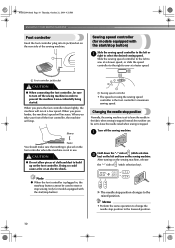
... the foot controller, connect the foot controller before turning on the machine.
● When the foot controller is plugged in, the start/stop button cannot be used to start or stop sewing (only for models equipped with the sewing speed controller.)
Memo
● When the sewing machine is started or the handwheel is not a malfunction.
● The...
User Guide - Page 14
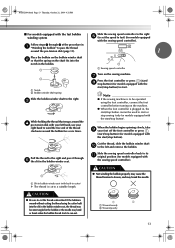
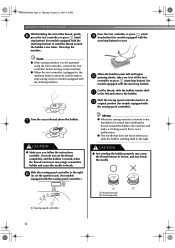
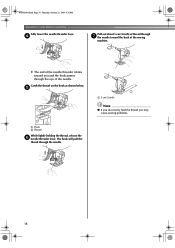
... winder shaft b so that wraps around the d pre-tension disk with
the sewing speed controller). Note
● If the sewing machine is to be operated using the cutter built into the
notch in , the start/stop button). Pull the thread to start /stop sewing (only for models equipped with your left and remove the bobbin. CAUTION...
User Guide - Page 15

...-set the bobbin so the thread unrolls in c the direction shown by turning a the handwheel toward you (counterclockwise) or
press (needle position button) (for this sewing machine.
CAUTION
● Make sure you could be injured. If the thread unrolls in the wrong direction, it is turned after winding the thread around the...
User Guide - Page 16
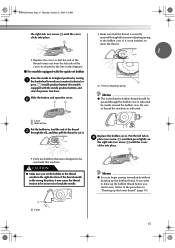
... bobbin
Raise the needle to be incorrect or break the needle.
1
a Cutter
Memo
● You can begin sewing immediately without drawing up the bobbin thread before you start to sew, follow to thread the machine as shown by marks around the bobbin case. CAUTION
● Make sure you (counterclockwise) or
press (needle position...
User Guide - Page 17
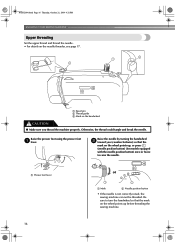
... to turn the handwheel so that the
mark on the wheel points up before threading the sewing machine.
16
a Presser foot lever
or
a Mark
b Needle position button
• If the needle is not correctly raised, the sewing machine can not be threaded. Raise the presser foot using the presser foot a lever. Otherwise, the thread...
User Guide - Page 18
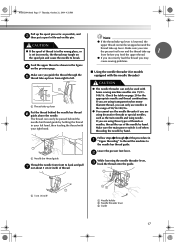
... thread as shown in the figure d on page 20 for models equipped with home sewing machine needles size 75/11100/16.
Note
● If the thread take-up lever is...only use needles in a "Upper threading" to thread the machine to
the needle bar thread guide. Make sure the main power switch is set incorrectly, the thread may
cause sewing problems.
■ Using the needle threader (for the ...
User Guide - Page 19
e
a Hook b Thread
While lightly holding the thread, release the f needle threader lever. X The end of the needle threader rotates toward the back of the sewing
machine.
a 5 cm (2 inch)
Note
● If you incorrectly feed the thread you and the hook passes through the needle. The hook will pull the
thread through ...
User Guide - Page 20
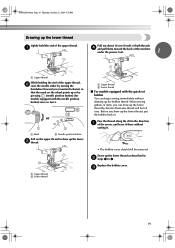
... (4 inch) of both threads
d and pull them toward the back of the machine under the presser foot.
1
a Upper thread
While holding the end of the upper...
a Upper thread b Lower thread
■ For models equipped with the needle position button) once or twice. When sewing gathers or darts, you (counterclockwise) so that some thread will be removed.
Replace the bobbin cover.
Draw up the...
User Guide - Page 29
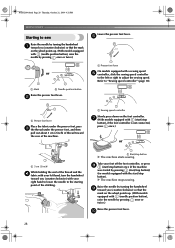
... down on the wheel points up . (With models equipped with (needle position button), raise the needle by pressing (start/stop button)) (for models equipped with the start /stop button
X The machine starts sewing. X The machine stops sewing.
Refer to sew
Lower the presser foot lever.
b
a Presser foot lever
Place the fabric under the presser foot, pass c the thread...
Similar Questions

I Need A Needle Plate For Brother Cs-8072
(Posted by jledman 1 year ago)

How To Disable The Brother Cs-6000i Computer Sound
(Posted by DavidSadd 9 years ago)

Can I Use A Wing Needle On The Brother Cs 6000 Sewing Machine
(Posted by aorgejleary 9 years ago)

How To Set Up The Bobin Case Brothers Cs-6000i
(Posted by sarejche 9 years ago)

Brother Cs-6000i Computer Sewing Machine Needle Will Not Lower
(Posted by briatheres 9 years ago)