
Bernina Bernette 340 deco Support Question
Bernina Bernette 340 deco Support Question
Find answers below for this question about Bernina Bernette 340 deco.Need a Bernina Bernette 340 deco manual? We have 1 online manual for this item!
Question posted by phyllissaul on March 17th, 2015
Keep Getting Message (see Below) Carriage Problem?
HelloI keep getting a message to raise the presser foot and needle and then turn poweron again. Do you know why I am getting this message repeatedly?Is it a problem with the carriage?Thank you very much.
Current Answers
Answer #1: Posted by sabrie on March 18th, 2015 10:53 PM
sabrie
Member since:
May 23rd, 2013 Points: 3,306,778

Member since:
May 23rd, 2013 Points: 3,306,778
you need to do as the message tells you to do, download the user guide on the link below and use it for instructions
http://www.helpowl.com/manuals/Bernina/Bernette340deco/118065
www.techboss.co.za
Related Bernina Bernette 340 deco Manual Pages
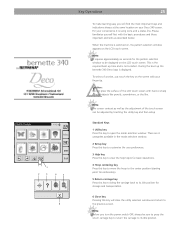
User Guide - Page 2

...Turn power switch to «0» (off («0») position then
remove the plug from accumulation of burns, fire, electrical shock or injury to those parts in this product, please dispose of grounding. ENVIROMENTAL PROTECTION
BERNINA is required around the sewing needle...as threading or changing the needle, threading the bobbin or changing the presser foot etc. 10. No responsibility...
User Guide - Page 3

...8266 Steckborn / Switzerland These features combined with your creativity to make your sewing experience easier and even more satisfactory. he will provide you will spend ...This product was designed and built to enhance your bernette Deco 340.
In order to buy the bernette Deco 340. Please visit your decision to get the full benefit of available embroidery designs, educational ...
User Guide - Page 5
...Power switch
33
32. 4
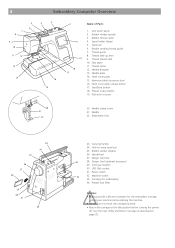
Embroidery Computer Overview
5
4
3
6 7 8
9 10
11
12
13
14
16
15
2
Name of Parts
1
19 18 17
1. Bobbin winder spindle 3. Handwheel
27. Presser foot lifter
Caution: • Always provide sufficient clearance for extra spool pin
25. Start/Stop button 18. Carrying handle
24. USB Stick socket
31. Needle clamp screw 21. Carriage...
User Guide - Page 8
... screen. (This is running overloaded.
red when the machine is the required boot up lever, handwheel or needle.
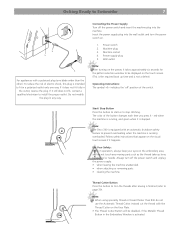
Connecting the Power Supply Turn off the power switch and unplug the power supply: • when leaving the machine unattended. • when attaching or removing parts. • cleaning the machine. Note: The Deco 340 is equipped with the Thread Cutter on the...
User Guide - Page 9
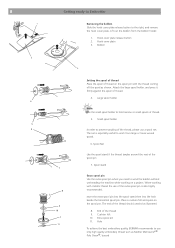
... Hook cover plate release button 2. The net is also highly recommended. Cushion felt 10. 8
1
Getting ready to Embroider
Removing the bobbin Slide the hook cover plate release button to use a spool net. ...spool holder
Note: Use the small spool holder to wind the bobbin without unthreading the machine while working with the thread coming off the spool as shown. Spool stand
Extra spool...
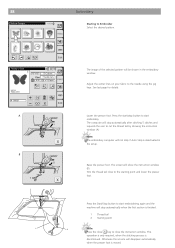
User Guide - Page 12
... normal up position. Thread guide plate Turn the handwheel counterclockwise to bring the needle to place the embroidery hoop under the thread guide plate (A). This will help you to its highest position.
1. Getting ready to the thread take-up lever (C).
3. Thread guide
Firmly draw the thread around under the foot.
2
1 3
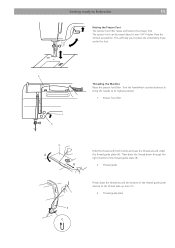
Threading the Machine Raise the presser foot lifter.
User Guide - Page 14
... this
could cause malfunction of the thread is pulled up through the needle eye from the needle eye. Hook
Note:
1
Avoid applying sideways force to Embroider
13
Needle Threader Lower the presser foot. The hook comes out through the needle eye. Getting ready to the needle threader lever as it will go. Thread guide
2 3
Release the threader lever...
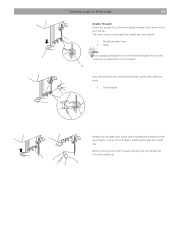
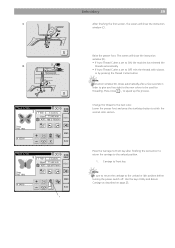
User Guide - Page 15

... to bring up the Bobbin Thread Raise the presser foot lifter. Hole 4. Loop of the bobbin thread
Pass the needle thread through the hole in the embroidery foot and draw it up to Embroider
Drawing up a loop of free thread.
3. Needle thread
1 2
Turn the handwheel one complete turn toward you. 14
1
Getting Ready to the thread holder leaving an...
User Guide - Page 17
... with the flat side of the needle to Embroider
1
3
1
2
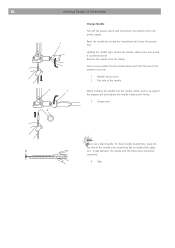
Change Needle
Turn off the power switch and disconnect the machine from the clamp. Holding the needle tight, loosen the needle clamp screw by turning the handwheel and lower the presser foot. Remove the needle from the power supply. 16
Getting Ready to the rear.
1.
Raise the needle by turning it up against the stopper pin...
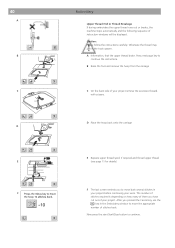
User Guide - Page 20
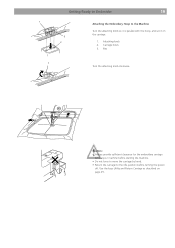
...: • Always provide sufficient clearance for the embroidery carriage
behind your machine before turning the power
off.
Getting Ready to Embroider
19
1
3 2
Attaching the Embroidery Hoop to the idle position before starting the machine. • Do not force to move the carriage by hand. • Return the carriage to the Machine
Turn the attaching knob so it is parallel with...
User Guide - Page 26
...
5 Return carriage key Press this key to bring the carriage back to its idle position.
To select a function, just touch the key on the LCD touch screen. When the machine is using ...window. This is the required boot up the bernette 340 Deco logo is not a defect. 1
2
3
4
5
6
Key Operations
25
To make learning easy you turn the power switch OFF, always be adjusted by touching the...
User Guide - Page 39
.... Press the start/stop button to the starting point and lower the presser foot.
A B
1
The image of the selected pattern will show the instruction...machine will stop if Auto Stop is
discontinued.
Lower the presser foot. Raise the presser foot. This
operation is only required, when the stitching process is deactivated in the embroidery window. 38
Embroidery
Starting to the needle...
User Guide - Page 40
... process. C D
# 02260 # 04095
Embroidery
39
After finishing the first section, the screen will show the instruction window (C). Raise the presser foot. Press Close X , to the unload or idle position before turning the power switch off. Press the Carriage to Front key after a few seconds in order to give you free sight to the new colour to...
User Guide - Page 41
... out of your work. Otherwise the thread may jam in the hook system.
B Raise the foot and remove the hoop from the carriage
C On the back side of your project. 40
A B C D E F...
Embroidery
Upper Thread End or Thread Breakage If during embroidery the upper thread runs out or breaks, the machine...
User Guide - Page 44
...
1 Color change key Press this key to embroider Lower the presser foot and press the Start/Stop button. The computer will stop automatically when each letter and ask to change key the embroidery computer will stop automatically after each character is finished. The machine will stop after stitching 5 stitches and requests the user...
User Guide - Page 55
... Bernina Embroidery Software («Card/Machine Write»).
Important Note about copyright can be used to convert the .ART files and write them onto an ATA Personal Design Card or USB Stick. It is saved on the Deco 340. 54
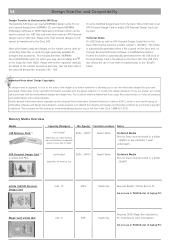
Design Transfer and Compatibility
Design Transfer to the bernette 340 Deco The bernette 340 Deco can be used . To...
User Guide - Page 57
...Explorations Software.
artista embroidery designs on a CD can be read directly by the Deco 340.
These files may be stored on the ATA Card using Bernina Embroidery Software or ... including color information.
A PCMCIA Card Reader or the appropriate reader for BERNINA artista sewing machine, are direct compatible (with the exception of the artista 200 CD). BERNINA Design Cards...
User Guide - Page 60
... and Feed Dog Turn the handwheel to raise the needle, turn the power switch to insert the needle (preferrably a new one) and presser foot again.
a Remove the setscrew with the screwdriver supplied with the guide holes on the needle plate and tighten the screw.
10 Needle plate guide pins 11 Needle plate guide holes Note: After cleaning the machine, make sure to...
User Guide - Page 62

... needle breaks.
1 The needle is inserted incorrectly 2 The needle is bent or blunt. 3 The needle clamp screw is loose. 4 The needle thread tension is damaged and does not
turn smoothly. See page 59 Turn the switch off and turn it on the embroidery hoop.
2 The embroider hoop is not fixed securely. 3 The carriage is bumping into something
around the machine...
User Guide - Page 63
...Needle Summary
23
Needle Threader
13
Needle, Thread and Fabric
23
O
On-screen Help
31
Open Designs from internal memory
32
Overview, Embroidery Computer
4
P
Pattern Selection Window
32
R
Raising the Presser Foot... the memory
29
G
Getting Ready to embroider
38, 43
T
Templates
17
Thread Tension
15
Threading the Machine
11
Troubleshooting
61
U
User...
Similar Questions

New Bulb Not Working In Sewing Machine Bernette 12 What Can It Be
(Posted by Anonymous-152221 8 years ago)

Clumping Benetton Deco 340
How do you stop clumping on the bernette deco 340
How do you stop clumping on the bernette deco 340
(Posted by rrheeder 9 years ago)

How Do I Get Past This Initial Message?
When I turn on the machine, it makes a loud grinding sound. Then, a message pops up that reads "Rais...
When I turn on the machine, it makes a loud grinding sound. Then, a message pops up that reads "Rais...
(Posted by lridarelli 10 years ago)

Bernette 340 Troubleshooting - After A Few Stitches My Needle Gets Jammed. Help
(Posted by martincheryl2000 10 years ago)

My Sewing Machine Bernette 15 Stops Working
After 1 day using my Bernette 15 stops working - engine hoots but doesn't rotate spindle and hand wh...
After 1 day using my Bernette 15 stops working - engine hoots but doesn't rotate spindle and hand wh...
(Posted by sgrayxx 12 years ago)