Asus VE208N Support Question
Asus VE208N Support Question
Find answers below for this question about Asus VE208N.Need a Asus VE208N manual? We have 1 online manual for this item!
Current Answers
Related Asus VE208N Manual Pages
User Guide - Page 2
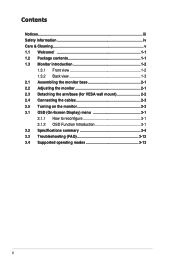
... information iv Care & Cleaning v 1.1 Welcome 1-1 1.2 Package contents 1-1 1.3 Monitor introduction 1-2
1.3.1 Front view 1-2 1.3.2 Back view 1-3 2.1 Assembling the monitor base 2-1 2.2 Adjusting the monitor 2-1 2.3 Detaching the arm/base (for VESA wall mount 2-2 2.4 Connecting the cables 2-3 2.5 Turning on the monitor 2-3 3.1 OSD (On-Screen Display) menu 3-1 3.1.1 How to reconfigure...
User Guide - Page 3

... off and on a circuit different from digital apparatus set out in a residential installation. If this equipment. The use of shielded cables for connection of the monitor to the graphics card is subject to the following measures: • Reorient or relocate the receiving antenna. • Increase the separation between the equipment and...
User Guide - Page 4
... receptacles marked between 100-240V AC. • If you encounter technical problems with the monitor, contact a qualified service technician or your retailer. • Before using the product, ... extremes. This symbol of electronic products. Safety information
• Before setting up the monitor, carefully read all cables are correctly connected and the
power cables are not damaged.
...
User Guide - Page 5

...it. Conventions used in completing a task. Follow the correct lifting techniques when positioning the monitor. Never spray cleaner directly on the desktop pattern you use due to aid in this ...to make sure that you MUST follow to disconnect the cables and power cord. Clean the monitor surface with the monitor:
• The screen may flicker during the initial use .
• When the same...
User Guide - Page 7
... ASUS provides a crisper, broader, and brighter display, plus a host of features that the monitor brings you!
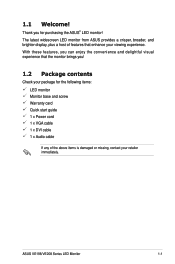
1.2 Package contents
Check your package for purchasing the ASUS® LED monitor! With these features, you for the following items: LED monitor Monitor base and screw Warranty card Quick start guide 1 x Power cord 1 x VGA cable 1 x DVI cable 1 x Audio...
User Guide - Page 8
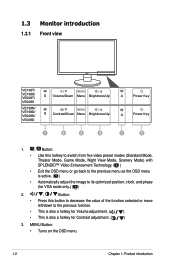
MENU Button: • Turns on the OSD menu.
1-2
Chapter 1: Product introduction 1.3 Monitor introduction
1.3.1 Front view
VE198T/ VE198S/ VE208T/ VE208S
VE198N/ VE198D/ VE208N/ VE208D
S Volume/Down Menu Brightness/Up S Contrast/Down Menu Brightness/Up
1
2
3
4
A
Power Key
A
Power Key
1
5
1.
, Button:
• Use this hotkey to switch from five video ...
User Guide - Page 9
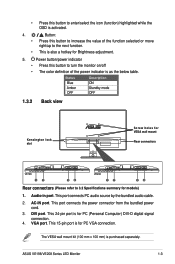
... of the power indicator is also a hotkey for Brightness adjustment.
5. ASUS VE198/VE208 Series LED Monitor
1-3 • Press this button to enter/select the icon (function) highlighted while the OSD is... bundled audio cable.
2.
Power button/power indicator
• Press this button to turn the monitor on/off
• The color definition of the function selected or move right/up to 3.2...
User Guide - Page 11
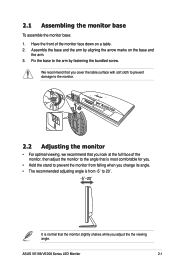
... falling when you change its angle. • The recommended adjusting angle is from -5˚ to the monitor.
2
1
2.2 Adjusting the monitor
• For optimal viewing, we recommend that you look at the full face of the monitor face down on the base and
the arm. 3. We recommend that you cover the table surface with...
User Guide - Page 12
...
1
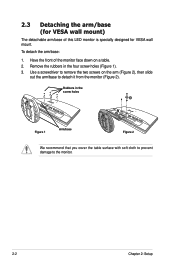
Release Lock
2
Figure 1
Arm/base
Figure 2
We recommend that you cover the table surface with soft cloth to prevent damage to detach it from the monitor (Figure 2). Use a screwdriver to remove the two screws on a table. 2.
2.3 Detaching the arm/base (for VESA wall mount. Have the front of this LED...
User Guide - Page 13
... page 1-3 for the location of the OSD functions.
2.
Cable management slot
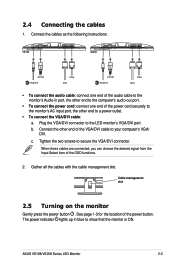
2.5 Turning on the monitor
Gently press the power button . Connect the cables as the following instructions:
VE198
VE208
Audio-in
...out port.
• To connect the power cord: connect one end of the audio cable to the monitor's Audio-in blue to a power outlet.
• To connect the VGA/DVI cable: a. Gather ...
User Guide - Page 15
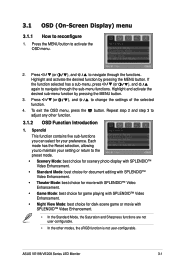
... button to change the settings of the selected
4. Spendid
This function contains five sub-functions you to maintain your preference. ASUS VE198/VE208 Series LED Monitor
3-1 3.1 OSD (On-Screen Display) menu
3.1.1 How to navigate through the sub-menu functions. Press
(or
), and
to reconfigure
1.
User Guide - Page 17

... function, you can select your selection, including English, German, Italian, French, Dutch, Spanish, Russian, Traditional Chinese,
Simplified Chinese, Japanese, and Korean.
• Information: shows the monitor information. • All Reset: "Yes" allows you to adjust the system.
• Splendid Demo Mode: turns on/off ASUS Splendid Demo function.
• Volume: the...
User Guide - Page 19

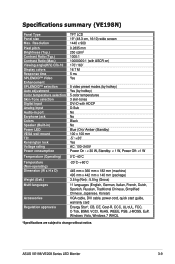
... No Black No Blue (On)/ Amber (Standby) 100 x 100 mm -5˚~+20˚ Yes AC: 100~240V Power On : < 30 W, Standby: < 1 W, Power Off: Specifications summary (VE208N)
Panel Type Panel size Max.
User Guide - Page 21

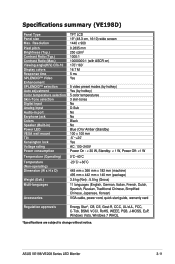
Specifications summary (VE208D)
Panel Type Panel size Max. Resolution Pixel pitch Brightness (Typ.) Contrast Ratio (Typ.) Contrast Ratio (Max.) Viewing angle(H/V) CR>10 Display colors Response time SPLENDID™ Video Enhancement SPLENDID™ selection Auto adjustment Color temperature selection Skin-Tone selection Digital input Analog input Audio-in port Earphone jack Colors Speaker (...
User Guide - Page 23
Specifications summary (VE198N)
Panel Type Panel size Max. Resolution Pixel pitch Brightness (Typ.) Contrast Ratio (Typ.) Contrast Ratio (Max.) Viewing angle(H/V) CR>10 Display colors Response time SPLENDID™ Video Enhancement SPLENDID™ selection Auto adjustment Color temperature selection Skin-Tone selection Digital input Analog input Audio-in port Earphone jack Colors Speaker (...
User Guide - Page 25
Resolution Pixel pitch Brightness (Typ.) Contrast Ratio (Typ.) Contrast Ratio (Max.) Viewing angle(H/V) CR>10 Display colors Response time SPLENDID™ Video Enhancement SPLENDID™ selection Auto adjustment Color temperature selection Skin-Tone selection Digital input Analog input Audio-in port Earphone jack Colors Speaker (Built-in) Power LED VESA wall mount Tilt Kensington lock Voltage...
User Guide - Page 26
... interference.
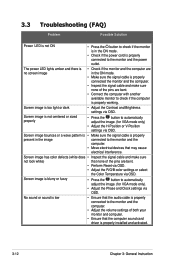
No sound or sound is low
• Ensure that the computer sound card driver is properly installed and activated.
3-12
Chapter 3: General Instruction
3.3
Troubleshooting (FAQ)
Problem...
Possible Solution
Power LED is not ON
• Press the button to check if the monitor is in the ON mode.
• Check if the power cord is properly connected to ...
User Guide - Page 27
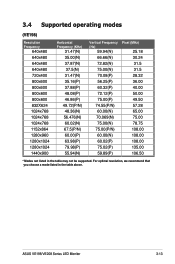
For optimal resolution, we recommend that you choose a mode listed in the table may not be supported. ASUS VE198/VE208 Series LED Monitor
3-13 3.4 Supported operating modes
(VE198)
Resolution Frequency
640x480 640x480 640x480 640x480 720x400 800x600 800x600 800x600 800x600 832X624 1024x768 1024x768 1024x768 1152x864 1280x960 1280x1024 1280x1024 1440x900
...
Similar Questions


Drivers For The Monitor Aus Mm19s
Best Regards
Juan Pamies
(Posted by jpamiesb1712 11 years ago)


Do I Need A To Download A Driver For Asus Vh192d Monitor
(Posted by redrockers 14 years ago)