
AIWA CX-NA71 Support Question
AIWA CX-NA71 Support Question
Find answers below for this question about AIWA CX-NA71.Need a AIWA CX-NA71 manual? We have 1 online manual for this item!
Question posted by wendycutler2 on February 20th, 2014
I Have Unplugged The System When I Plug It Back In, There Is No Power.
There is power in the outlet but system does not have power. Is there some trick?
Current Answers
Related AIWA CX-NA71 Manual Pages
Operating Instructions - Page 2
... outlet, please call a qualified service technician to the power socket. - The unit is connected, -
Power cords should be mounted on circuit different
from that generate heat. Avoid overloading AC power plugs and extension cords beyond their capacity, as near sources of heat, including heating vents, stoves, or other appliances that to radio communications. The heating system...
Operating Instructions - Page 3
...change in use a polarized AC power plug with an extension cord, receptacle, or other outlet unless the polarized plug can be used for grounding terminals...25 PRINCIPLE OF AIWAS FRONT 180" SPE:AKER SYSTEM 26
PARTS INDEX Back cover
ENGLISH ~ The ...Unplug the AC power cord from power lines. 2 Outdoor antenna grounding - The unit does not seem to prevent exposure of the blades of the plug...
Operating Instructions - Page 4
...other optional equipment,
the stereo system itself, the AC ...system and accessories -.
-('2
o
(2
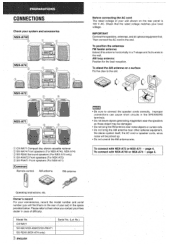
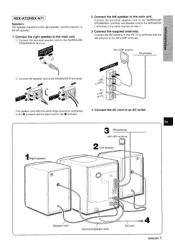
Before connecting the AC cord The rated voltage of difficulty. To position the antennas FM feeder antenna: Extend this antenna horizontally the wall, AM loop antenna: Position for the best reception. in case of your unit shown on a surface Fix the claw to the slot.
~ CX-NA71 Compact disc stereo...
Operating Instructions - Page 5
... 1.
3 Connect the suppllied antenlnas. O Connect the surround speaker cord to the SURROUND SPEAKERS R terminal.
2 Connect the left speaker.
7 Connect the right speaker to an AC outlet.
.-
3 FM antenna
AM LOOP antenna
2 a Left speaker
1
m
Speaker cord
/ Surround speaker cord
AC cord
4 ENGLISH The speaker cord with the white stripe should be connected...
Operating Instructions - Page 8

When the power is turned on, the DEMO display is displayed as a guide to setting the current time. To turn back on the remote control. The volume level is overridden by the operation display. BBE SYSTEM
The BBE system enhances the clarity of low-frequency sound. Select one of the three levels, or the...
Operating Instructions - Page 9
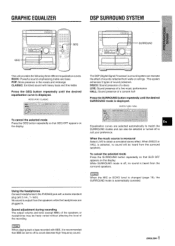
... appears on the display. Equalization curves are selected automatically to the PHONES jack with a stereo standard plug (06.3 mm, '/4 inch).
ROCK /POP / CLASSIC
until the desired SURROUND mode is... is output from the surround speakers. ENGLISH 8 This system enhances 3 types of the recording. No sound is displayed.
ROCK: Powerful sound emphasizing treble and bass POP: More presence in ...
Operating Instructions - Page 10
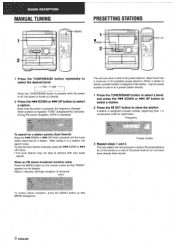
... a band, and press the l++ DOWN or PFl UP button to select the desired band. AM I
When the TUNER/BAND button is pressed while the power is off, the power is turned on directly.
2 Press the l++ DOWN or M UP button to select
The unit can store a total of 32 preset stations. (Each band...
Operating Instructions - Page 12

... number
Playback side indicator
II IWSIL d LC+W WILII
lolder to stop mode.
To play both decks
To play when the power is opened.
.13 ENGLISH or press the s button to close. The power isturned on UU NR. TAPEI
DECK 112
II+
.
\
-4-
rusil
LIW udssette
To select a reverse mode (deck 2 only) Each time...
Operating Instructions - Page 13
...band.
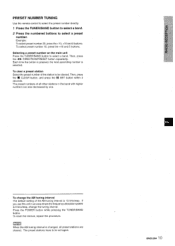
2 Press the numbered buttons to be cleared. To select preset number 15, press the +10 and 5 buttons. Press the POWER button while pressing the TUNER/BAND button. To reset the interval, repeat this unit in the band with higher numbers are cleared.
The... m
When the AM tuning interval is changed, all other stations in an area where the frequency allocation system is
selected.
Operating Instructions - Page 14
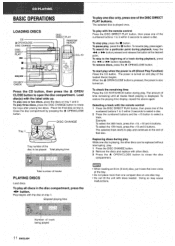
...trays after placing two discs.
buttons.
To pause play , press the W button. To resume play when the power is turned on tray 1 "and 2. To search for a particular point during play . 1 Press the ... above again. Example: To select the 25th track, press the +1 O, +10 and 5 buttons. The power is off (Direct Play Function) Press the CD button. To check the remaining time Press the CD EDIT/...
Operating Instructions - Page 15
...until the s button is displayed, playback of the next track starts. DOLBY NR system The Dolby Noise Reduction system reduces tape hiss noise. button is pressed while F is pressed. Slack tape may ... Take up any slack in the tape with the DOLBY NR system, turn on the DOLBY NR system.
.> ENGLISH 14
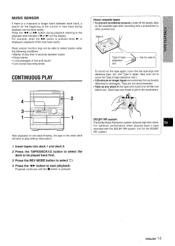
Music sensor function may break cx jam in 'the other pointed tool.
\ Type II tape
...
Operating Instructions - Page 20
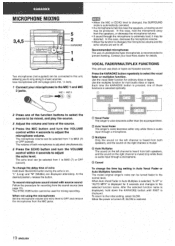
VOCAL FADER/MULTIPLEX FUNCTIONS
This unit can be connected to this unit, allowing you to sing along to music sources.
Use microphones with mini plugs (03.5 mm, '/8 inch).
1 Connect your local Aiwa dealer for details. Use'the multiplex function for ordinary discs or tapes. from the speakers, or decrease the ...
Operating Instructions - Page 21
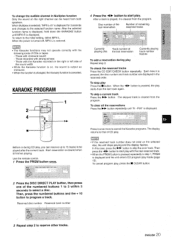
When the power is turned off, MPX-L is cleared
from the
To clear all the reservations Press the ® F button repeatedly until MPX-R is canceled. Those recorded with ...
Operating Instructions - Page 22
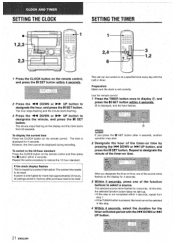
The unit can be displayed during recording.
2 Designate the hour of the timer-on the remote control,
and press the I I
designate the minute, and press the II SET button. O is
If you press the II SET button after 4 seconds, another operation may start. mlip,p~g$p~ $,9@,,,Fq!"?p~&iP#B&~~i'$~b#~JJ~$,@#**#l$*$nJ,kik* ~~% z..
The minute stops flashing on the remote control. m
To display ...
Operating Instructions - Page 23
...external timer) sources only.
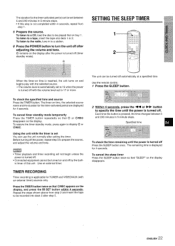
m
q Timer playback and timer recording will not begin unless the power is turned off with the selected source. Press the TIMER button twice so that "SLEEP ... insert the tape into deck 2 after step 5.
\2
The unit can use the unit normally after the power is turned off (timer
standby mode).
Use the remote control.
1 Press the SLEEP button.
2 Within 4...
Operating Instructions - Page 24
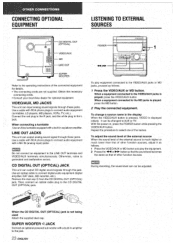
...level can 'be adjusted.
.
When a equipment connected to connect audio equipment with RCA phono plugs to the MD jacks is much higher or
much lower than that of other function sources.... is played:
press the MD button. SUPER WOOFER 4 JACK
Connect an optional powered sub woofer with RCA phono plugs to connect digital audio equipment (digital amplifier, DAT deck, MD recorder, etc...
Operating Instructions - Page 25
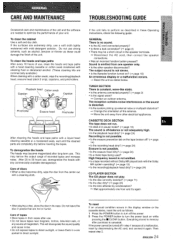
..., or
any commercially available demagnetizer,
Care of discs q When a disc becomes
with the Dolby
NR system operating? (+ page 13) q Is the recording/playback head dirty? (+ page 24)
CD PLAYER ...power. 2 Press the POWER button to turn off ? (+ page
14) q Is the recording head dirty? (-+ page 24) Erasure is not stereo. This may be turned off -balance or not adequately high. q Is the system...
Operating Instructions - Page 26
...
are subject to change without
. notice.
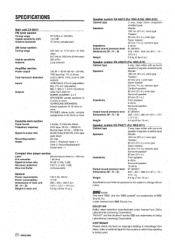
,! SPECIFICATIONS
~
Main unit CX-NA71
FM tuner section
Tuning range
. Tweeter:
50 mm (2 in.) cone...response
Signal-to-noise ratio
Recording system Heads
4 tracks, 2 channels stereo CrOz tape: 50 Hz -16000...(1 kHz, O dB)
Wow and flutter
Unmeasurable
General Power requirements Power consumption Dimensions of main unit (W XHXD) Weight of ...
Operating Instructions - Page 27
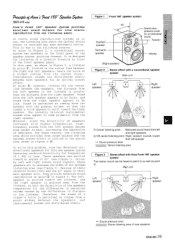
...'s voice is greater
than leftspeaker
area
EEiEIz-" Stereoeffectwith Aiwa Front180° speaker system True stereo sound can be
loud. Instrumental sounds are pointed inward at angles of their...provide enhanced sound reproduction at point@ as well as shown in Figure 2, a conventional stereo
system has speakers on the center line between both speakers for the differences in distance to...
Operating Instructions - Page 80
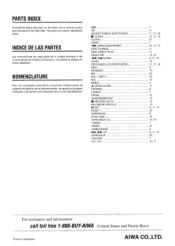
NOMENCLATURE
Pour Ies principals instructions concernant chaque partie de I 'ordre alphabetique.
BBE 7
CD 11
CD EDIT/CHECK (EDIT/CHECK)
. 11, 17, 18
W CLEAR
10. 11, 13
CLOCK 21
DEMO 7 The parts are indicated on the main unit or remote control are listed in alphabetic order. INDICE DE LAS PARTES
Las instrucciones de cada parte de la unidad principal o del control remoto se ...
Similar Questions

How Do You Repair The Volume Control On The Aiwa Stereo Model No. Cx-na71 ?
Once the volume is up and you try to turn it back down, the volume continues to go up.
Once the volume is up and you try to turn it back down, the volume continues to go up.
(Posted by Anonymous-120754 10 years ago)

I Dont Have A Remote For My Aiwa Cx - Na222 Digital Audio System.
(Posted by littlemissbitchrpt 11 years ago)

Cx-na71 When Sound Is Turned Up, The Numbers Go 0 1 2 Then Back To 0 And No Soun
When the sound is turned up it goes 0 1 2 then 0 and no sound.
When the sound is turned up it goes 0 1 2 then 0 and no sound.
(Posted by btdia1 11 years ago)

Remote Working Intermittently, New Batteries Doesn't Help. Aiwa Cx-na71
Remote doesn't work consistently. Aiwa CX-Na71 stereo. Remote is RC-7ASO8. What are my options?
Remote doesn't work consistently. Aiwa CX-Na71 stereo. Remote is RC-7ASO8. What are my options?
(Posted by Meredieth 12 years ago)