

User Guide
Page 3
Contents 17f3 Monitor 1 Setting up the monitor 2 Adjusting settings 5 On-screen display menu options 6 Video modes 8 Maintenance 9 Troubleshooting 10 Specifications 12 Safety, Regulatory, and Legal Information 13 www.emachines.com i
Contents 17f3 Monitor 1 Setting up the monitor 2 Adjusting settings 5 On-screen display menu options 6 Video modes 8 Maintenance 9 Troubleshooting 10 Specifications 12 Safety, Regulatory, and Legal Information 13 www.emachines.com i

User Guide
Page 8
Power button 2 Turn on the front of the monitor. MENU button EXIT button Brightness/ button Contrast/ button 4 www.emachines.com To turn on the monitor: 1 Press the power button on your computer.
Power button 2 Turn on the front of the monitor. MENU button EXIT button Brightness/ button Contrast/ button 4 www.emachines.com To turn on the monitor: 1 Press the power button on your computer.

User Guide
Page 9
... on and off. OSD active: Navigates to and adjusts the selected OSD menu option. The OSD menu opens. 1024 x 768 / 85Hz CONTRAST OSD i EXIT www.emachines.com 5 Brightness/ button. Power indicator. OSD inactive: Adjusts the contrast. To adjust monitor settings: 1 Press the MENU button. Turns blue when the monitor is operating normally, then flashes...
... on and off. OSD active: Navigates to and adjusts the selected OSD menu option. The OSD menu opens. 1024 x 768 / 85Hz CONTRAST OSD i EXIT www.emachines.com 5 Brightness/ button. Power indicator. OSD inactive: Adjusts the contrast. To adjust monitor settings: 1 Press the MENU button. Turns blue when the monitor is operating normally, then flashes...

User Guide
Page 10
... example Contrast), then press the MENU button to the options menu. OR- BRIGHTNESS. Adjusts the amount of light in the darkest portion of the display image. Controls the horizontal size of the display image. 6 www.emachines.com Controls the vertical size of the display image.... V POSITION. 2 Press the or buttons to highlight an OSD menu option to adjust (for that option is displayed. 1024 x 768 / 85Hz CONTRAST...
... example Contrast), then press the MENU button to the options menu. OR- BRIGHTNESS. Adjusts the amount of light in the darkest portion of the display image. Controls the horizontal size of the display image. 6 www.emachines.com Controls the vertical size of the display image.... V POSITION. 2 Press the or buttons to highlight an OSD menu option to adjust (for that option is displayed. 1024 x 768 / 85Hz CONTRAST...

User Guide
Page 11
...image to counteract horizontal moire. Adjusts the display to the left or right. LANGUAGE. Provides information on the screen. www.emachines.com 7 Curves the sides of the display image. Slants the display image to counteract vertical moire. TOP CORNER. Adjusts ... monitor settings to the factory default settings. INFORMATION. COLOR. TRAPEZOID. H MOIRE. OSD TIME. Displays current settings and exits the OSD menu. PIN BALANCE. PARALLELOGRAM. DEGAUSS. Curves the top of the display image in or out. PINCUSHION. Icon Description TILT. Curves the bottom...
...image to counteract horizontal moire. Adjusts the display to the left or right. LANGUAGE. Provides information on the screen. www.emachines.com 7 Curves the sides of the display image. Slants the display image to counteract vertical moire. TOP CORNER. Adjusts ... monitor settings to the factory default settings. INFORMATION. COLOR. TRAPEZOID. H MOIRE. OSD TIME. Displays current settings and exits the OSD menu. PIN BALANCE. PARALLELOGRAM. DEGAUSS. Curves the top of the display image in or out. PINCUSHION. Icon Description TILT. Curves the bottom...

eMachines 17F3 User Guide
Page 3
Contents Using Your 17f3 Monitor 1 Setting up the monitor 2 Adjusting settings 4 On-screen display menu options 5 Video modes 6 Maintaining 7 Cleaning 7 Troubleshooting 7 Specifications 9 Safety, Regulatory, and Legal Information 11 i
Contents Using Your 17f3 Monitor 1 Setting up the monitor 2 Adjusting settings 4 On-screen display menu options 5 Video modes 6 Maintaining 7 Cleaning 7 Troubleshooting 7 Specifications 9 Safety, Regulatory, and Legal Information 11 i

eMachines 17F3 User Guide
Page 8
... the monitor on -screen display (OSD) menu or selects an OSD menu option. Enters the on and off. Exits the OSD menu or sub-menu. 4 OSD active: Navigates to and adjusts the OSD menu options. Contrast/ button. OSD active: Navigates to and adjusts the selected OSD menu option. MENU button. www.emachines.com To turn on the monitor...
... the monitor on -screen display (OSD) menu or selects an OSD menu option. Enters the on and off. Exits the OSD menu or sub-menu. 4 OSD active: Navigates to and adjusts the OSD menu options. Contrast/ button. OSD active: Navigates to and adjusts the selected OSD menu option. MENU button. www.emachines.com To turn on the monitor...

eMachines 17F3 User Guide
Page 9
...emachines.com To adjust monitor settings: 1 Press the MENU button. H. H. SIZE. POSITION. PINCUSHION. Increases or decreases the trapezoid distortion of the display image. Adjusting settings 2 Press the or buttons to highlight an OSD menu option, then press the MENU button to select the option. 3 Press the or buttons to adjust an OSD menu...of light in the darkest portion of the display image. Press the or buttons to highlight a different OSD menu option. - POSITION. Controls the vertical position of the picture. Rotates the display image. Controls the horizontal ...
...emachines.com To adjust monitor settings: 1 Press the MENU button. H. H. SIZE. POSITION. PINCUSHION. Increases or decreases the trapezoid distortion of the display image. Adjusting settings 2 Press the or buttons to highlight an OSD menu option, then press the MENU button to select the option. 3 Press the or buttons to adjust an OSD menu...of light in the darkest portion of the display image. Press the or buttons to highlight a different OSD menu option. - POSITION. Controls the vertical position of the picture. Rotates the display image. Controls the horizontal ...
eMachines 17F3 User Guide
Page 10
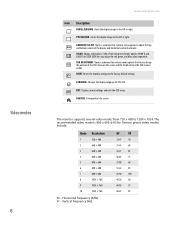
...) VF - Video modes 6 www.emachines.com Icon Description PARALLELOGRAM. ADVANCED SELECT. Select from 720 × 400 to the left or right. R LANGUAGE. The recommended video mode is visible. Displays current settings and exits the OSD menu. PIN BALANCE. RESET. Changes the display...Opens a submenu that let you adjust the red, green, and blue colors separately. COLOR. Opens a submenu that contains menu options that contains menu options to the factory default settings. Adjusts color balance. The monitor supports several video modes from two preset factory options ...
...) VF - Video modes 6 www.emachines.com Icon Description PARALLELOGRAM. ADVANCED SELECT. Select from 720 × 400 to the left or right. R LANGUAGE. The recommended video mode is visible. Displays current settings and exits the OSD menu. PIN BALANCE. RESET. Changes the display...Opens a submenu that let you adjust the red, green, and blue colors separately. COLOR. Opens a submenu that contains menu options that contains menu options to the factory default settings. Adjusts color balance. The monitor supports several video modes from two preset factory options ...

