eMachines Desktop PC User Guide
Page 5
www.emachines.com Chapter 6: Customizing Windows 57 Adjusting the screen and desktop settings 58 Adjusting the color depth 58 Adjusting the screen resolution 59 Changing the colors ... television settings 66 Changing the mouse settings 67 Adding and modifying user accounts 67 Changing power-saving settings 69 Changing the power scheme 69 Changing advanced power settings 69 Activating and using Hibernate mode 70 Installing an uninterruptible power supply 71 Chapter 7: Protecting Your Computer 73 Hardware security 74 Kensington lock slot 74 Data security...
www.emachines.com Chapter 6: Customizing Windows 57 Adjusting the screen and desktop settings 58 Adjusting the color depth 58 Adjusting the screen resolution 59 Changing the colors ... television settings 66 Changing the mouse settings 67 Adding and modifying user accounts 67 Changing power-saving settings 69 Changing the power scheme 69 Changing advanced power settings 69 Activating and using Hibernate mode 70 Installing an uninterruptible power supply 71 Chapter 7: Protecting Your Computer 73 Hardware security 74 Kensington lock slot 74 Data security...

eMachines Desktop PC User Guide
Page 70
... before starting your computer. 64 To view your computer display on a television: 1 With your computer off, connect one end of headphones or external powered speakers to the video out or S-Video out jack on the television or VCR. 4 Start your computer. Use a set of an appropriate video cable...playback to a VCR will be scrambled by default, connect the television (or other end of the cable to install the driver from the disc supplied by the manufacturer or download the driver from the manufacturer's Web site. 5 After the driver is not transmitted through the Video out or S-Video...
... before starting your computer. 64 To view your computer display on a television: 1 With your computer off, connect one end of headphones or external powered speakers to the video out or S-Video out jack on the television or VCR. 4 Start your computer. Use a set of an appropriate video cable...playback to a VCR will be scrambled by default, connect the television (or other end of the cable to install the driver from the disc supplied by the manufacturer or download the driver from the manufacturer's Web site. 5 After the driver is not transmitted through the Video out or S-Video...
eMachines Desktop PC User Guide
Page 77
... Properties dialog box, then click the Advanced tab. www.emachines.com 3 Click the Hibernate tab. 4 Click the Enable hibernation check box, then click Apply. Installing an uninterruptible power supply To install an uninterruptible power supply (UPS): Help For more information about setting up an uninterruptible power supply, see the UPS documentation, or click Start, then click Help...
... Properties dialog box, then click the Advanced tab. www.emachines.com 3 Click the Hibernate tab. 4 Click the Enable hibernation check box, then click Apply. Installing an uninterruptible power supply To install an uninterruptible power supply (UPS): Help For more information about setting up an uninterruptible power supply, see the UPS documentation, or click Start, then click Help...
eMachines Desktop PC User Guide
Page 91
....emachines.com O online help 2, 3 opening documents 16 files 7 files across network 54 folders 9 programs 7 P pasting files and folders 10, 18 text and graphics 18 playing audio CD 33 audio file 32, 33 Media Player file 33 multimedia files 33 music CD 33 Windows Media Player file 33 power ...advanced settings 69 changing advanced settings 69 changing schemes 69 Hibernate mode 70 schemes 69 using UPS 71 power supply uninterruptible 71 printer sharing 53 printing documents 17 files across network 55 Program Guide ...
....emachines.com O online help 2, 3 opening documents 16 files 7 files across network 54 folders 9 programs 7 P pasting files and folders 10, 18 text and graphics 18 playing audio CD 33 audio file 32, 33 Media Player file 33 multimedia files 33 music CD 33 Windows Media Player file 33 power ...advanced settings 69 changing advanced settings 69 changing schemes 69 Hibernate mode 70 schemes 69 using UPS 71 power supply uninterruptible 71 printer sharing 53 printing documents 17 files across network 55 Program Guide ...
8512635 - eMachines Desktop Hardware Reference Guide
Page 20
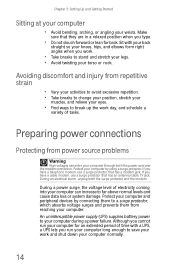
... your torso or neck. Protect your computer through both the surge protector and the modem. During a power surge, the voltage level of tasks. Although you work. • Take breaks to your wrists. An uninterruptible power supply (UPS) supplies battery power to stand and stretch your legs. • Avoid twisting your work day, and schedule a variety...
... your torso or neck. Protect your computer through both the surge protector and the modem. During a power surge, the voltage level of tasks. Although you work. • Take breaks to your wrists. An uninterruptible power supply (UPS) supplies battery power to stand and stretch your legs. • Avoid twisting your work day, and schedule a variety...

8512635 - eMachines Desktop Hardware Reference Guide
Page 21
... computer is supplied at a nominal 115 volts at 50 Hz. The power supply, a component built into your computer's power cable. 2 Use a tool such as Europe, the utility power is operating in the United States. The power supply should be ...power cable connector. The power supply's voltage selection for your location before turning on page 8. 15 To set correctly for your location is set the voltage selection switch: 1 Disconnect your computer, provides power to the system board, add-in cards, and peripheral devices. For the location, see "Back" on your computer. www.emachines...
... computer is supplied at a nominal 115 volts at 50 Hz. The power supply, a component built into your computer's power cable. 2 Use a tool such as Europe, the utility power is operating in the United States. The power supply should be ...power cable connector. The power supply's voltage selection for your location before turning on page 8. 15 To set correctly for your location is set the voltage selection switch: 1 Disconnect your computer, provides power to the system board, add-in cards, and peripheral devices. For the location, see "Back" on your computer. www.emachines...

8512635 - eMachines Desktop Hardware Reference Guide
Page 24
... to keyboard or mouse input, you may need to remove all power (such as for servicing internal components), also disconnect the power cord. When the checks are finished, Windows starts. 18 We recommend disconnecting the power cord and modem cable when your computer, certain components in Windows ... Warning When you turn off your computer, press and hold the power button for about five seconds, then release it. In order to restart (reboot) your computer. Important If for some reason you cannot use the Shut Down option in the power supply and system board remain energized.
... to keyboard or mouse input, you may need to remove all power (such as for servicing internal components), also disconnect the power cord. When the checks are finished, Windows starts. 18 We recommend disconnecting the power cord and modem cable when your computer, certain components in Windows ... Warning When you turn off your computer, press and hold the power button for about five seconds, then release it. In order to restart (reboot) your computer. Important If for some reason you cannot use the Shut Down option in the power supply and system board remain energized.

8512635 - eMachines Desktop Hardware Reference Guide
Page 36
... these guidelines: • Avoid static-causing surfaces such as electrostatic discharge (ESD). Before opening the case. The components inside of the power supply. Avoid touching the edge connectors and components on the outside of antistatic bags because only the inside your computer are ready to a bare... metal part of your computer. • Turn off your computer and unplug the power cord and modem and network cables before opening the computer case, follow these guidelines: • Wear a grounding wrist strap (available at ...
... these guidelines: • Avoid static-causing surfaces such as electrostatic discharge (ESD). Before opening the case. The components inside of the power supply. Avoid touching the edge connectors and components on the outside of antistatic bags because only the inside your computer are ready to a bare... metal part of your computer. • Turn off your computer and unplug the power cord and modem and network cables before opening the computer case, follow these guidelines: • Wear a grounding wrist strap (available at ...

8512635 - eMachines Desktop Hardware Reference Guide
Page 52
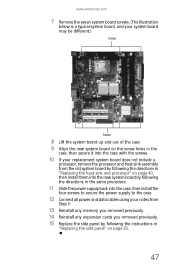
... system board To replace the system board: 1 Remove the side panel by following the directions in "Installing memory" on page 34. 5 Disconnect all the power and data cables from the system board, noting their locations and orientation. (You will reconnect the cables after you install the new board.) Tip You... can label each cable with tape to make it easier to re-connect them later. 6 Remove the four screws that secure the power supply to your computer, then slide it on a towel or other non-abrasive surface. 3 Remove all expansion cards by following the directions in "Adding or...
... system board To replace the system board: 1 Remove the side panel by following the directions in "Installing memory" on page 34. 5 Disconnect all the power and data cables from the system board, noting their locations and orientation. (You will reconnect the cables after you install the new board.) Tip You... can label each cable with tape to make it easier to re-connect them later. 6 Remove the four screws that secure the power supply to your computer, then slide it on a towel or other non-abrasive surface. 3 Remove all expansion cards by following the directions in "Adding or...
8512635 - eMachines Desktop Hardware Reference Guide
Page 53
www.emachines.com 7 Remove the seven system board screws. (The illustration below is a typical system board, and your system board may be different.) Screws Screws 8 Lift the ... into the new system board by following the directions in the same procedure. 11 Slide the power supply back into the case, then install the four screws to secure the power supply to the case. 12 Connect all power and data cables using your notes from Step 5. 13 Reinstall any memory you removed previously. 14...
www.emachines.com 7 Remove the seven system board screws. (The illustration below is a typical system board, and your system board may be different.) Screws Screws 8 Lift the ... into the new system board by following the directions in the same procedure. 11 Slide the power supply back into the case, then install the four screws to secure the power supply to the case. 12 Connect all power and data cables using your notes from Step 5. 13 Reinstall any memory you removed previously. 14...

8512635 - eMachines Desktop Hardware Reference Guide
Page 74
Warning To avoid bodily injury, do not attempt to your computer and an AC outlet and that the AC outlet is supplying power. • If you use a power strip or surge protector, make sure that it is turned on. • If a peripheral device (such as a keyboard ... contact a qualified computer technician. Warning Make sure that you are damaged - Liquid has been spilled into your computer problem if: - Power cords or plugs are correctly grounded before accessing internal components. For more information about preventing damage from static electricity, see "Preventing static electricity...
Warning To avoid bodily injury, do not attempt to your computer and an AC outlet and that the AC outlet is supplying power. • If you use a power strip or surge protector, make sure that it is turned on. • If a peripheral device (such as a keyboard ... contact a qualified computer technician. Warning Make sure that you are damaged - Liquid has been spilled into your computer problem if: - Power cords or plugs are correctly grounded before accessing internal components. For more information about preventing damage from static electricity, see "Preventing static electricity...
8512635 - eMachines Desktop Hardware Reference Guide
Page 99
... XP. Your computer restarts, and Windows finishes its setup and installation. 8 Reconnect your hard drive. www.emachines.com Caution The Full System Restore option deletes all files on . • If a peripheral device, such as it is supplying power. Format and Recover dialog box opens. 6 Click Yes. Important After you use this process. •...
... XP. Your computer restarts, and Windows finishes its setup and installation. 8 Reconnect your hard drive. www.emachines.com Caution The Full System Restore option deletes all files on . • If a peripheral device, such as it is supplying power. Format and Recover dialog box opens. 6 Click Yes. Important After you use this process. •...
8512635 - eMachines Desktop Hardware Reference Guide
Page 119
www.emachines.com screen 69, 82 screen area 82 screen resolution 82 technical support 93 telephone support 93 Web site connection speed 73 Windows Media Center 75 turning off computer 7, 18 turning on computer 7, 17 tutoring fee-based 95 U uninterruptible power supply (UPS) 14 updating Windows 54 UPS 14 USB port 7, 9, 27 V volume adjusting 25 adjusting modem 82 controls 25 muting 25 troubleshooting 88 W Windows key 20 Windows Media Center troubleshooting 75 Windows Product Key Code 3 Windows Update 54 wired Ethernet troubleshooting 70 working safely 12 Z Zip drive 60 Zip drive port 9 113
www.emachines.com screen 69, 82 screen area 82 screen resolution 82 technical support 93 telephone support 93 Web site connection speed 73 Windows Media Center 75 turning off computer 7, 18 turning on computer 7, 17 tutoring fee-based 95 U uninterruptible power supply (UPS) 14 updating Windows 54 UPS 14 USB port 7, 9, 27 V volume adjusting 25 adjusting modem 82 controls 25 muting 25 troubleshooting 88 W Windows key 20 Windows Media Center troubleshooting 75 Windows Product Key Code 3 Windows Update 54 wired Ethernet troubleshooting 70 working safely 12 Z Zip drive 60 Zip drive port 9 113


