
User Guide
Page 58
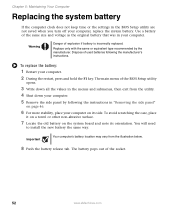
... and note its side. Use a battery of the BIOS Setup utility opens. 3 Write down your computer, replace the system battery. Warning Danger of the socket. 52 www.eMachines.com To replace the battery: 1 Restart your computer. Replace only with the same or equivalent type recommended by following the manufacturer's instructions. The main...
... and note its side. Use a battery of the BIOS Setup utility opens. 3 Write down your computer, replace the system battery. Warning Danger of the socket. 52 www.eMachines.com To replace the battery: 1 Restart your computer. Replace only with the same or equivalent type recommended by following the manufacturer's instructions. The main...
User Guide
Page 59
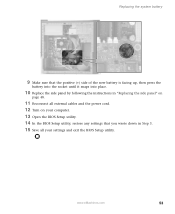
www.eMachines.com 53 Replacing the system battery 9 Make sure that the positive (+) side of the new battery is facing up, then press the battery into the socket until it snaps into place. 10 Replace the side panel by following the instructions in "Replacing the side panel" on page 48. 11 Reconnect all external cables and the power cord. 12 Turn on your computer. 13 Open the BIOS Setup utility. 14 In the BIOS Setup utility, restore any settings that you wrote down in Step 3. 15 Save all your settings and exit the BIOS Setup utility.
www.eMachines.com 53 Replacing the system battery 9 Make sure that the positive (+) side of the new battery is facing up, then press the battery into the socket until it snaps into place. 10 Replace the side panel by following the instructions in "Replacing the side panel" on page 48. 11 Reconnect all external cables and the power cord. 12 Turn on your computer. 13 Open the BIOS Setup utility. 14 In the BIOS Setup utility, restore any settings that you wrote down in Step 3. 15 Save all your settings and exit the BIOS Setup utility.
NG3 Hardware Reference
Page 166
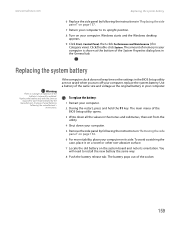
To replace the battery: 1 Restart your computer. Replacing the system battery Warning There is a danger of the socket. 159 The main menu of the BIOS Setup utility opens. 3 Write down all the values in the menus and submenus, then exit from the utility. 4... a battery of used batteries following the instructions in "Removing the side panel" on page 154. 6 For more stability, place your computer on its orientation. www.emachines.com Replacing the system battery 6 Replace the side panel by following the instructions in "Replacing the side panel" on page 157. 7 Return your computer to...
To replace the battery: 1 Restart your computer. Replacing the system battery Warning There is a danger of the socket. 159 The main menu of the BIOS Setup utility opens. 3 Write down all the values in the menus and submenus, then exit from the utility. 4... a battery of used batteries following the instructions in "Removing the side panel" on page 154. 6 For more stability, place your computer on its orientation. www.emachines.com Replacing the system battery 6 Replace the side panel by following the instructions in "Replacing the side panel" on page 157. 7 Return your computer to...
NG3 Hardware Reference
Page 167
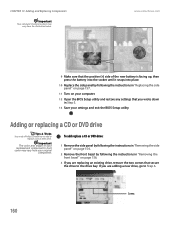
... cover may vary from your original component. Important The color and shape of the new battery is facing up, then press the battery into the socket until it snaps into place. 10 Replace the side panel by following the instructions in Step 3. 13 Save your settings and exit the BIOS Setup... utility. www.emachines.com 9 Make sure that secure the drive to Step 6. If you are adding a new drive, go to the drive bay. Adding or replacing a CD or...
... cover may vary from your original component. Important The color and shape of the new battery is facing up, then press the battery into the socket until it snaps into place. 10 Replace the side panel by following the instructions in Step 3. 13 Save your settings and exit the BIOS Setup... utility. www.emachines.com 9 Make sure that secure the drive to Step 6. If you are adding a new drive, go to the drive bay. Adding or replacing a CD or...
NG3 Hardware Reference
Page 175
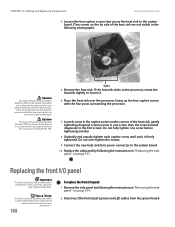
... the first screw). Tips & Tricks To make note of each is firmly tightened. Screws 5 Remove the heat sink. CHAPTER 13: Adding and Replacing Components www.emachines.com 4 Loosen the four captive screws that secure the heat sink to the system board later, make it easier to reconnect the cables to the... system board. (Two screws on the far side of the heat sink are not visible in the captive screws on the corners of the processor socket, the processor could be damaged. Use caution when you unpack the heat sink so you remove the heat sink from the system board. Caution The...
... the first screw). Tips & Tricks To make note of each is firmly tightened. Screws 5 Remove the heat sink. CHAPTER 13: Adding and Replacing Components www.emachines.com 4 Loosen the four captive screws that secure the heat sink to the system board later, make it easier to reconnect the cables to the... system board. (Two screws on the far side of the heat sink are not visible in the captive screws on the corners of the processor socket, the processor could be damaged. Use caution when you unpack the heat sink so you remove the heat sink from the system board. Caution The...
NG3 Hardware Reference
Page 180
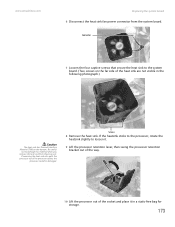
...sink has Thermal Interface Material (TIM) on the bottom. Be careful not to the system board. (Two screws on the far side of the processor socket, the processor could be damaged. Screws 8 Remove the heat sink. Connector 7 Loosen the four captive screws that secure the heat sink to damage this... material when you remove the heat sink from the system board. www.emachines.com Replacing the system board 6 Disconnect the heat sink fan power connector from the processor. If removing the heat sink also pulls the processor ...
...sink has Thermal Interface Material (TIM) on the bottom. Be careful not to the system board. (Two screws on the far side of the processor socket, the processor could be damaged. Screws 8 Remove the heat sink. Connector 7 Loosen the four captive screws that secure the heat sink to damage this... material when you remove the heat sink from the system board. www.emachines.com Replacing the system board 6 Disconnect the heat sink fan power connector from the processor. If removing the heat sink also pulls the processor ...
NG3 Hardware Reference
Page 181
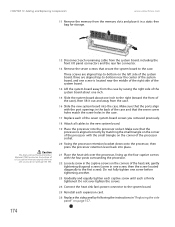
...system board about one inch to the new system board. 19 Place the processor into the processor socket. Three screws are aligned top-to-bottom near the center of the system board, and one ...system board, three are aligned top-to the case. CHAPTER 13: Adding and Replacing Components www.emachines.com 11 Remove the memory from the memory slots and place it out and away from the ...card. 26 Replace the side panel by matching the small triangle on the corner of the processor socket. 20 Swing the processor retention bracket down onto the processor, then press the processor retention lever back...
...system board about one inch to the new system board. 19 Place the processor into the processor socket. Three screws are aligned top-to-bottom near the center of the system board, and one ...system board, three are aligned top-to the case. CHAPTER 13: Adding and Replacing Components www.emachines.com 11 Remove the memory from the memory slots and place it out and away from the ...card. 26 Replace the side panel by matching the small triangle on the corner of the processor socket. 20 Swing the processor retention bracket down onto the processor, then press the processor retention lever back...

