

User Guide
Page 14
... steps: 1. 4. Press the power button on the monitor, and any other peripheral devices connected to shut down the system. 4. To start Windows, remove the Restore CD and restart the computer. When the Turn Off Computer dialog box is booting, the computer will be booted with Restore CD... panel of your information and close all application programs you use. 2. Before turning off . In this case, the "Microsoft Windows Startup Menu" menu will load Microsoft ® Windows ® . Click the Start button, and then click Turn Off Computer. 3. Turning On the Computer To turn it off...
... steps: 1. 4. Press the power button on the monitor, and any other peripheral devices connected to shut down the system. 4. To start Windows, remove the Restore CD and restart the computer. When the Turn Off Computer dialog box is booting, the computer will be booted with Restore CD... panel of your information and close all application programs you use. 2. Before turning off . In this case, the "Microsoft Windows Startup Menu" menu will load Microsoft ® Windows ® . Click the Start button, and then click Turn Off Computer. 3. Turning On the Computer To turn it off...

User Guide
Page 15
... Never remove a disk or turn off , and then press the eject button. Using Your Computer 3-1 The procedures in this manual assume that you are using Windows® with that came with your system. When the disk pops, remove it clicks into the drive, as OS/2 Warp or UNIX, see the manual... computer while a disk drive light is off the computer. Also, remove all disks before you must install the operating system on . You could lose data. Windows® may come with the label facing up and the metal shutter leading into place.
... Never remove a disk or turn off , and then press the eject button. Using Your Computer 3-1 The procedures in this manual assume that you are using Windows® with that came with your system. When the disk pops, remove it clicks into the drive, as OS/2 Warp or UNIX, see the manual... computer while a disk drive light is off the computer. Also, remove all disks before you must install the operating system on . You could lose data. Windows® may come with the label facing up and the metal shutter leading into place.
User Guide
Page 19
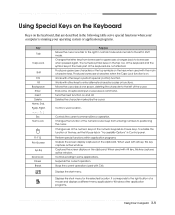
...Displays the short menu for the selected location. It corresponds to the right button of a mouse and displays a different menu applicable to Windows other keys to the left in Shift mode. Produces uppercase characters or the top symbols on the keys when used with other application ...) function. Stops the current operation (used with Alt key, this key captures active window. Changes the letter keys from entering numbers to uppercase; Works with alt key, this key captures active window. When used with the main character keys. Changes use of the cursor. When used...
...Displays the short menu for the selected location. It corresponds to the right button of a mouse and displays a different menu applicable to Windows other keys to the left in Shift mode. Produces uppercase characters or the top symbols on the keys when used with other application ...) function. Stops the current operation (used with Alt key, this key captures active window. Changes the letter keys from entering numbers to uppercase; Works with alt key, this key captures active window. When used with the main character keys. Changes use of the cursor. When used...
User Guide
Page 20
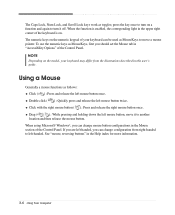
... mouse button once. press the key once to turn it to move it off. Using a Mouse Generally a mouse functions as toggles; When using Microsoft® Windows®, you can change configuration from the illustrations described in the Help index for more information. 3-6 Using Your Computer To use the numeric keys as...
... mouse button once. press the key once to turn it to move it off. Using a Mouse Generally a mouse functions as toggles; When using Microsoft® Windows®, you can change configuration from the illustrations described in the Help index for more information. 3-6 Using Your Computer To use the numeric keys as...
User Guide
Page 21
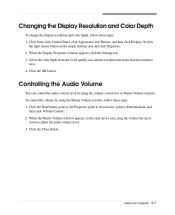
Or click the right mouse button on the empty desktop area and click Properties. 2. To control the volume by using the Master Volume window, follow these steps: 1. Select the color depth from the Color quality area and the resolution from the Screen resolution area. 4. Click the Start...Audio Volume You can control the audio volume level by using the volume control box or Master Volume window. When the Display Properties window appears, click the Settings tab. 3. When the Master Volume window appears, in the each device area, drag the volume bar up or down to Entertainment, and ...
Or click the right mouse button on the empty desktop area and click Properties. 2. To control the volume by using the Master Volume window, follow these steps: 1. Select the color depth from the Color quality area and the resolution from the Screen resolution area. 4. Click the Start...Audio Volume You can control the audio volume level by using the volume control box or Master Volume window. When the Display Properties window appears, click the Settings tab. 3. When the Master Volume window appears, in the each device area, drag the volume bar up or down to Entertainment, and ...
User Guide
Page 37
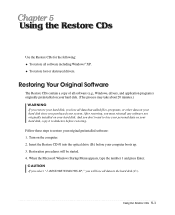
...process may take about 20 minutes.) WARNING Chapter 1 If you restore your system. Restoration procedures will lose all software including Windows® XP. RESTORE WINDOWS XP," you must reinstall any software not originally installed on your hard disk. Using the Restore CDs 5-1 After restoring, you... will be started. 4. And you select "1. When the Microsoft Windows Startup Menu appears, type the number 1 and press Enter. To restore lost or destroyed drivers. Insert the Restore CD #1 into the optical...
...process may take about 20 minutes.) WARNING Chapter 1 If you restore your system. Restoration procedures will lose all software including Windows® XP. RESTORE WINDOWS XP," you must reinstall any software not originally installed on your hard disk. Using the Restore CDs 5-1 After restoring, you... will be started. 4. And you select "1. When the Microsoft Windows Startup Menu appears, type the number 1 and press Enter. To restore lost or destroyed drivers. Insert the Restore CD #1 into the optical...
User Guide
Page 38
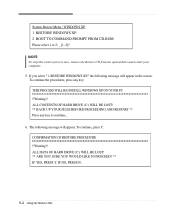
If you select "1. RESTORE WINDOWS XP," the following message will appear in the screen. The following message will appear. ALL DATA OF HARD DRIVE (C:) WILL BE LOST! ** ARE YOU SURE ... computer. 5. ALL CONTENTS OF HARD DRIVE (C:) WILL BE LOST! ** BACK UP YOUR FILES BEFORE PROCEEDING AND RESTART ** Press any key. THIS PROCESS WILL RE-INSTALL WINDOWS XP ON YOUR PC !!Warning!! System Restore Menu / WINDOWS XP 1 RESTORE WINDOWS XP 2 BOOT TO COMMAND PROMPT FROM CD-ROM Please select 1 or 2: _ [1, 2]?
If you select "1. RESTORE WINDOWS XP," the following message will appear in the screen. The following message will appear. ALL DATA OF HARD DRIVE (C:) WILL BE LOST! ** ARE YOU SURE ... computer. 5. ALL CONTENTS OF HARD DRIVE (C:) WILL BE LOST! ** BACK UP YOUR FILES BEFORE PROCEEDING AND RESTART ** Press any key. THIS PROCESS WILL RE-INSTALL WINDOWS XP ON YOUR PC !!Warning!! System Restore Menu / WINDOWS XP 1 RESTORE WINDOWS XP 2 BOOT TO COMMAND PROMPT FROM CD-ROM Please select 1 or 2: _ [1, 2]?

User Guide
Page 39
... CD #2 with #2 in the Drivers folder of you lose drivers, install these by using your personal information. In this case, the "Microsoft Windows Startup Menu" menu will start. message appears, replace the Restore CD #1 with #3 (if there is booting, the computer will be copied to...restart the computer. 13. Press Enter to install a driver. You can update drivers in the optical drive. The restoration process will appear. Windows XP starts and the registration program runs. 14. When the "Insert next media and press enter to continue. 9. And press Enter to ...
... CD #2 with #2 in the Drivers folder of you lose drivers, install these by using your personal information. In this case, the "Microsoft Windows Startup Menu" menu will start. message appears, replace the Restore CD #1 with #3 (if there is booting, the computer will be copied to...restart the computer. 13. Press Enter to install a driver. You can update drivers in the optical drive. The restoration process will appear. Windows XP starts and the registration program runs. 14. When the "Insert next media and press enter to continue. 9. And press Enter to ...

User Guide
Page 43
... your computer. Solving Common Problems This chapter instructs you how to see whether the wall outlet works, plug other wall outlet. To open Windows Help, click the Start button, and then click Help and Support.) Solving Common Problems A-1 To check to deal with the problems you...might experience when using your hard disk may be corrupted. Check for lost allocation units by running Disk Defragmenter. (For more information,refer to the Windows Help. Power Cause My computer doesn't work Chapter 1 Solution Computer is not working , use other device (such as a lamp) into the ...
... your computer. Solving Common Problems This chapter instructs you how to see whether the wall outlet works, plug other wall outlet. To open Windows Help, click the Start button, and then click Help and Support.) Solving Common Problems A-1 To check to deal with the problems you...might experience when using your hard disk may be corrupted. Check for lost allocation units by running Disk Defragmenter. (For more information,refer to the Windows Help. Power Cause My computer doesn't work Chapter 1 Solution Computer is not working , use other device (such as a lamp) into the ...
User Guide
Page 44
... the Start button, point to All Programs, point to Accessories, point to seat it operates well, the CD/DVD is defected. When the Master Volume window appears, drag the volume bar upward. Clean the CD/DVD with a CD/DVD cleaning kit (available in the each device area, you press the eject... to stop the running of the spindle motor and eject the tray. Wait about 5 to 10 seconds to open the tray. When the Master Volume window appears, in computer stores). Computer doesn't produce any sound Solution You can drag the volume bar up .) CD/DVD is not properly seated in the...
... the Start button, point to All Programs, point to Accessories, point to seat it operates well, the CD/DVD is defected. When the Master Volume window appears, drag the volume bar upward. Clean the CD/DVD with a CD/DVD cleaning kit (available in the each device area, you press the eject... to stop the running of the spindle motor and eject the tray. Wait about 5 to 10 seconds to open the tray. When the Master Volume window appears, in computer stores). Computer doesn't produce any sound Solution You can drag the volume bar up .) CD/DVD is not properly seated in the...

User Guide
Page 45
...of the diskette to a diskette Floppy disk drive can 't write to cover the hole. Remove the write-protection or use the Display Properties window. Make sure that is not write-protected. Click Start, click Control Panel, click Appearance and Themes, and then click Display. Floppy Disk ...display resolution or color depth, use another diskette or check the diskette by running Check Disk. (For detail information, refer to your Windows Help in Windows. Remove the diskette and reinsert it. Or click the right mouse button on the monitor. Diskette is damaged. Make sure the ...
...of the diskette to a diskette Floppy disk drive can 't write to cover the hole. Remove the write-protection or use the Display Properties window. Make sure that is not write-protected. Click Start, click Control Panel, click Appearance and Themes, and then click Display. Floppy Disk ...display resolution or color depth, use another diskette or check the diskette by running Check Disk. (For detail information, refer to your Windows Help in Windows. Remove the diskette and reinsert it. Or click the right mouse button on the monitor. Diskette is damaged. Make sure the ...


