eMachines T2245 Support and Manuals
Get Help and Manuals for this eMachines item

View All Support Options Below
Free eMachines T2245 manuals!
Problems with eMachines T2245?
Ask a Question
Free eMachines T2245 manuals!
Problems with eMachines T2245?
Ask a Question
Most Recent eMachines T2245 Questions

Password Change
How do I change my dad's name and password on a computer he gave me
How do I change my dad's name and password on a computer he gave me
(Posted by senoragrant48 2 years ago)
Popular eMachines T2245 Manual Pages
User Guide - Page 2
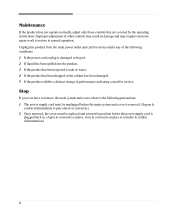
... are covered by the operating instructions. Improper adjustment of the following precautions: 1 The power supply cord must be unplugged before the main system unit cover is removed. (Separe le
cordon d'alimentation et puis enleve le couvercle.) 2 Once removed, the cover must be replaced and screwed in position before the power supply cord is damaged or frayed...
User Guide - Page 9

...(optional) Power button
Emergency eject hole Load/Eject button Floppy disk drive(optional)
Media reader slots(optional) Power indicator Hard disk drive access indicator
IEEE 1394 connectors (optional)
USB 2.0 connectors (optional)
Headphone jack
Microphone jack USB 2.0 connectors (optional)
NOTE
Chapter 1 Your optical drives may differ from the illustrations described in this user's guide.
User Guide - Page 11

...a telephone, which can move freely. Appropriate power sources. Setting Up Your System 2-1 Moderate environment conditions. ... chapter.
1. Setting Up Your System
This chapter describes how to set up and turn... charges, connect all of heat. A flat and hard surface. You need one outlet for the computer,... devices. Selecting a Location
Before you set up your computer, it is important to choose...
User Guide - Page 12
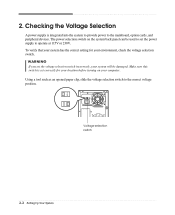
... clip, slide the voltage selection switch to operate at 115V or 230V. The power selection switch on your system will be used to set the power supply to the correct voltage position. Make sure this switch is integrated into the system to provide power to the mainboard, option cards, and peripheral devices. WARNING If you...
User Guide - Page 14

... Restore CD is in the optical drive (D:) while your computer, follow these steps: 1. Turning the Computer On and Off
Follow the instructions below to turn on the computer or to turn on your computer. 3. Turn on the front panel of your computer, follow these steps: 1. To start Windows, remove the Restore CD and...
User Guide - Page 15

... facing up and the metal shutter leading into the drive, as shown below. The procedures in this manual assume that system for instructions on installation and use. Using an Optional Floppy Disk Drive
To use your system.
Using Your Computer
To use your computer, you are using Windows® with your computer.
Using Your Computer 3-1 You...
User Guide - Page 17
...
Insertion Facing up Facing up
CF
MICRODRIVE
NOTE
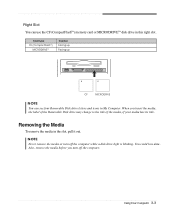
You can use the CF (CompactFlashTM) memory card or MICRODRIVETM disk drive in this right slot. Removing the Media
To remove the media in My Computer.
...data. Also, remove the media before you insert the media, the label of the Removable Disk drive may change to the title of the media, if your media has its title. NOTE Never remove...
User Guide - Page 19
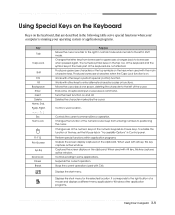
...cursor one tab to the right in the main part of keyboard input or executes a command. Ends...used with alt key, this key captures active window. Displays the start menu. Produces uppercase characters... again. Changes the function of the key, set the Mouse tab in "Accessibility Options" in ...cursor keys from lowercase to enter alternate character codes or functions. Works with other keys to...
User Guide - Page 20
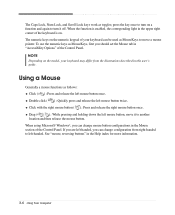
...holding down the left -handed, you should set the Mouse tab in "Accessibility Options" of the keyboard is enabled, the corresponding light in this user's guide. When the function is on a function and...pointer. Using a Mouse
Generally a mouse functions as toggles; The numeric keys on the model, your keyboard can be used as MouseKeys, first you can change configuration from the ...
User Guide - Page 30

Connect the power and hard disk drive cable to the instructions in "Replacing the Cover" in this chapter. 4-8 Installing and Removing Drives Slide the HDD bracket into the chassis and secure it .)
9. Replace the system cover according to your hard disk drive. (If you removed the hard disk drive cable from the motherboard, replace it with the retaining screw, as shown below.
8. 7.
User Guide - Page 38
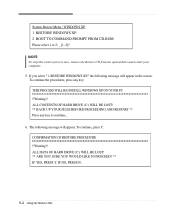
...," the following message will appear in the screen. THIS PROCESS WILL RE-INSTALL WINDOWS XP ON YOUR PC !!Warning!! CONFIRMATION OF RESTORE PROCEDURE !!Warning!! ALL CONTENTS OF HARD DRIVE (C:) WILL BE LOST! ** BACK UP YOUR FILES BEFORE PROCEEDING AND RESTART ** Press any key. IF NO, PRESS N.
5-2 Using the Restore CDs
The following message will ...
User Guide - Page 39

... computer.
13. NOTE Depending on the model, your optical drive. 12. NOTE If the Restore CD is in the Restore CD #2 will be copied to install a driver. In this case, the "Microsoft Windows Startup Menu" menu will start. All data in the optical drive while your hard disk. 10. message appears, replace the Restore CD
#2 with #2 in the...
User Guide - Page 41
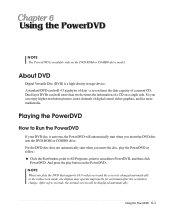
...the DVD that supports 16:9 widescreen ...is auto-run, the PowerDVD will be displayed automatically. Playing the PowerDVD
How to emachines PowerDVD, and then click PowerDVD. After a few seconds, the normal screen will ...automatically start when you insert the DVD disc into the DVD-ROM or COMBO drive. a seven times the data capacity of data -
Using the PowerDVD 6-1 A standard DVD...
User Guide - Page 43

... your hard disk may be corrupted. To open Windows Help, click the Start button, and then click Help and Support.)
The files stored on your computer and wait about 10 seconds for lost allocation units by the solution. Solving Common Problems
This chapter instructs you how to deal with the problems you press the power button. The problem...
User Guide - Page 45

..., click the Start button, and then click Help and Support.)
Diskette is unformatted.
Your current screen will reappear. Monitor is not write-protected. When the Display Properties window appears, click the Settings tab. 3. Format the diskette. (Refer to your computer. Solving Common Problems A-3 Diskette is unformatted. The cable connecting the monitor to your mouse...
eMachines T2245 Reviews
We have not received any reviews for eMachines yet.