

User Guide
Page 2
Copyright © 2009. eMachines User Guide Original Issue: 06 / 2009 Model number Serial number Purchase date Place of purchase Visit http://registration.emachines.com and discover the benefits of being an eMachines customer. All Rights Reserved.
Copyright © 2009. eMachines User Guide Original Issue: 06 / 2009 Model number Serial number Purchase date Place of purchase Visit http://registration.emachines.com and discover the benefits of being an eMachines customer. All Rights Reserved.

User Guide
Page 3
Do not use this product near or over a radiator or heat register, or in a built-in a fire or electric shock. Use a damp cloth for plug as disconnecting device Observe the following guidelines when connecting and disconnecting power to the power supply unit: Install the power supply unit before connecting the power cord to unplug the power cord from the electrical outlet. When you plug the power cord into is provided. • Never push objects of any kind onto or into the product. • To avoid damage of power, disconnect power from the system by placing the product on the ...
Do not use this product near or over a radiator or heat register, or in a built-in a fire or electric shock. Use a damp cloth for plug as disconnecting device Observe the following guidelines when connecting and disconnecting power to the power supply unit: Install the power supply unit before connecting the power cord to unplug the power cord from the electrical outlet. When you plug the power cord into is provided. • Never push objects of any kind onto or into the product. • To avoid damage of power, disconnect power from the system by placing the product on the ...

User Guide
Page 4
If you . Do not locate this product. If power strips are not sure of the type of power indicated on the marking label. Warning! Using electrical power • This product should not exceed 80% of the power strip's input rating. • This product's AC adapter is used , the load should be operated from the type of power available, consult your dealer or local power company. • Do not allow anything to rest on the power cord. Make sure the power outlet is not properly grounded may interfere with the performance of this product where people will probably cause ...
If you . Do not locate this product. If power strips are not sure of the type of power indicated on the marking label. Warning! Using electrical power • This product should not exceed 80% of the power strip's input rating. • This product's AC adapter is used , the load should be operated from the type of power available, consult your dealer or local power company. • Do not allow anything to rest on the power cord. Make sure the power outlet is not properly grounded may interfere with the performance of this product where people will probably cause ...
User Guide
Page 5
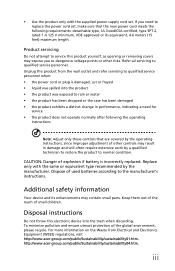
Product servicing Do not attempt to service this product yourself, as opening or removing covers may expose you need for service • the product does not operate normally after following the operating instructions Note: Adjust only those controls that the new power cord meets the following requirements: detachable type, UL listed/CSA certified, type SPT-2, rated 7 A 125 V minimum, VDE approved or its enhancements may result in performance, indicating a need to the manufacturer's instructions. Replace only with the supplied power supply cord set , make sure that are covered by...
Product servicing Do not attempt to service this product yourself, as opening or removing covers may expose you need for service • the product does not operate normally after following the operating instructions Note: Adjust only those controls that the new power cord meets the following requirements: detachable type, UL listed/CSA certified, type SPT-2, rated 7 A 125 V minimum, VDE approved or its enhancements may result in performance, indicating a need to the manufacturer's instructions. Replace only with the supplied power supply cord set , make sure that are covered by...

User Guide
Page 6
For lamp-specific disposal information, check www.lamprecycle.org. Products that help customers save your money by the U.S. Environmental Protection Agency. Acer is applicable only to Acer system with the ENERGY STAR mark. Note: The statement above is committed to offer our customers products with an ENERGY STAR sticker. The more energy we can save more than 80% energy at www.eiae.org. ENERGY STAR and the ENERGY STAR mark are ENERGY STAR qualified use less energy and prevent greenhouse gas emissions by meeting strict energy efficiency guidelines set by reducing ...
For lamp-specific disposal information, check www.lamprecycle.org. Products that help customers save your money by the U.S. Environmental Protection Agency. Acer is applicable only to Acer system with the ENERGY STAR mark. Note: The statement above is committed to offer our customers products with an ENERGY STAR sticker. The more energy we can save more than 80% energy at www.eiae.org. ENERGY STAR and the ENERGY STAR mark are ENERGY STAR qualified use less energy and prevent greenhouse gas emissions by meeting strict energy efficiency guidelines set by reducing ...

User Guide
Page 7
Users are also at the center of your desk to minimize neck strain Taking care of the monitor, using a footrest, or raising your eyes. Finding your comfort zone Find your comfort zone by looking away from staying too long in one fixed posture • avoid slouching forward and/or leaning backward • stand up and walk around regularly to remove the strain on your leg muscles • take short rests to achieve maximum comfort. The following symptoms may appear in front of physical injury after prolonged use. Eyes • Rest your eyes frequently. • Give your eyes...
Users are also at the center of your desk to minimize neck strain Taking care of the monitor, using a footrest, or raising your eyes. Finding your comfort zone Find your comfort zone by looking away from staying too long in one fixed posture • avoid slouching forward and/or leaning backward • stand up and walk around regularly to remove the strain on your leg muscles • take short rests to achieve maximum comfort. The following symptoms may appear in front of physical injury after prolonged use. Eyes • Rest your eyes frequently. • Give your eyes...

User Guide
Page 8
: • Blink frequently to keep your display to an awkward viewing angle. • Avoid looking at bright light sources, such as open windows, for extended periods of time. We do some stretching exercises. • Breathe fresh air as often as a piece of cardboard extended from the display's top front edge • Avoid adjusting your eyes from drying out. Developing good work habits Develop the following work for enhanced text readability and graphics clarity. • Eliminate glare and reflections by: • placing your display in such a way that the side faces the window ...
: • Blink frequently to keep your display to an awkward viewing angle. • Avoid looking at bright light sources, such as open windows, for extended periods of time. We do some stretching exercises. • Breathe fresh air as often as a piece of cardboard extended from the display's top front edge • Avoid adjusting your eyes from drying out. Developing good work habits Develop the following work for enhanced text readability and graphics clarity. • Eliminate glare and reflections by: • placing your display in such a way that the side faces the window ...

User Guide
Page 9
Contents Chapter 1: Checking Out Your Computer . . . 1 About this guide 2 Product Registration 2 Front 3 Back 4 Chapter 2: Setting Up and Getting Started 7 Working safely and comfortably 8 Avoiding discomfort and injury from repetitive strain 8 Preparing power connections 9 Protecting from power source problems 9 Checking the voltage selection 10 Connecting to a broadband modem or network . . 11 Connecting a dial-up modem 11 Using the World Wide Web 12 Connecting to a Web site 13 Downloading files 14 Ethernet networking 15 Wired Ethernet networking 15 Establishing your Ethernet...
Contents Chapter 1: Checking Out Your Computer . . . 1 About this guide 2 Product Registration 2 Front 3 Back 4 Chapter 2: Setting Up and Getting Started 7 Working safely and comfortably 8 Avoiding discomfort and injury from repetitive strain 8 Preparing power connections 9 Protecting from power source problems 9 Checking the voltage selection 10 Connecting to a broadband modem or network . . 11 Connecting a dial-up modem 11 Using the World Wide Web 12 Connecting to a Web site 13 Downloading files 14 Ethernet networking 15 Wired Ethernet networking 15 Establishing your Ethernet...

User Guide
Page 10
Contents Ethernet 27 Expansion cards 29 File management 29 Hard drive 29 Internet 31 Keyboard 33 Memory 33 Memory card reader 34 Modem (cable or DSL 34 Modem (dial-up 34 Monitor 37 Mouse 38 Networks 39 Optical disc drives 39 Passwords 41 Power 41 Printer 42 Sound 43 Recovering your system 44 Creating recovery discs 45 Recovering pre-installed software and drivers . 46 Returning your system to its factory condition . 47 Telephone support 49 Before calling Customer Care 49 Self-help 50 Appendix A: Regulations and safety notices . 51 viii
Contents Ethernet 27 Expansion cards 29 File management 29 Hard drive 29 Internet 31 Keyboard 33 Memory 33 Memory card reader 34 Modem (cable or DSL 34 Modem (dial-up 34 Monitor 37 Mouse 38 Networks 39 Optical disc drives 39 Passwords 41 Power 41 Printer 42 Sound 43 Recovering your system 44 Creating recovery discs 45 Recovering pre-installed software and drivers . 46 Returning your system to its factory condition . 47 Telephone support 49 Before calling Customer Care 49 Self-help 50 Appendix A: Regulations and safety notices . 51 viii

User Guide
Page 11
Chapter 1 Checking Out Your Computer 1
Chapter 1 Checking Out Your Computer 1

User Guide
Page 12
... a confirmation email with a more personable customer service experience. How to some useful benefits, such as: • Faster service from eMachines Hurry and register, as other advantages await you will give you access to Register During the initial startup of computer. Please fill in... a safe place. 2 After we receive your product registration, you ! Product Registration When using your eMachines product is recommended that will invite you with important data that are specific to register. Choose your notebook or desktop, a window will...
... a confirmation email with a more personable customer service experience. How to some useful benefits, such as: • Faster service from eMachines Hurry and register, as other advantages await you will give you access to Register During the initial startup of computer. Please fill in... a safe place. 2 After we receive your product registration, you ! Product Registration When using your eMachines product is recommended that will invite you with important data that are specific to register. Choose your notebook or desktop, a window will...
User Guide
Page 13
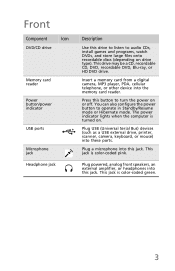
Insert a memory card from a digital camera, MP3 player, PDA, cellular telephone, or other device into these ports. This jack is color-coded green. 3 Front Component Icon DVD/CD drive Memory card reader Power button/power indicator USB ports Microphone jack Headphone jack Description Use this drive to listen to audio CDs, install games and programs, watch DVDs, and store large files onto recordable discs (depending on . This jack is color-coded pink. Plug USB (Universal Serial Bus) devices (such as a USB external drive, printer, scanner, camera, keyboard, or mouse) into ...
Insert a memory card from a digital camera, MP3 player, PDA, cellular telephone, or other device into these ports. This jack is color-coded green. 3 Front Component Icon DVD/CD drive Memory card reader Power button/power indicator USB ports Microphone jack Headphone jack Description Use this drive to listen to audio CDs, install games and programs, watch DVDs, and store large files onto recordable discs (depending on . This jack is color-coded pink. Plug USB (Universal Serial Bus) devices (such as a USB external drive, printer, scanner, camera, keyboard, or mouse) into ...
User Guide
Page 14
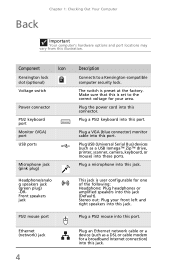
This jack is user configurable for your front left and right speakers into this is preset at the factory. Make sure that this jack. Back Chapter 1: Checking Out Your Computer Important Your computer's hardware options and port locations may vary from this port. Plug USB (Universal Serial Bus) devices (such as a DSL or cable modem for a broadband Internet connection) into this illustration. Plug a PS/2 mouse into this jack (Default). Plug a VGA (blue connector) monitor cable into this port. Plug a microphone into this jack. Plug the power cord into this jack...
This jack is user configurable for your front left and right speakers into this is preset at the factory. Make sure that this jack. Back Chapter 1: Checking Out Your Computer Important Your computer's hardware options and port locations may vary from this port. Plug USB (Universal Serial Bus) devices (such as a DSL or cable modem for a broadband Internet connection) into this illustration. Plug a PS/2 mouse into this jack (Default). Plug a VGA (blue connector) monitor cable into this port. Plug a microphone into this jack. Plug the power cord into this jack...
User Guide
Page 15
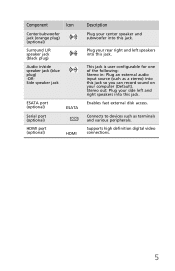
Stereo out: Plug your side left speakers into this jack. Enables fast external disk access. Supports high definition digital video connections. 5 Component Icon Center/subwoofer jack (orange plug) (optional) Surround L/R speaker jack (black plug) Audio in : Plug an external audio input source (such as terminals and various peripherals. Connects to devices such as a stereo) into this jack. Plug your rear right and left and right speakers into this jack. This jack is user configurable for one of the following: Stereo in /side speaker jack (blue plug) -ORSide speaker ...
Stereo out: Plug your side left speakers into this jack. Enables fast external disk access. Supports high definition digital video connections. 5 Component Icon Center/subwoofer jack (orange plug) (optional) Surround L/R speaker jack (black plug) Audio in : Plug an external audio input source (such as terminals and various peripherals. Connects to devices such as a stereo) into this jack. Plug your rear right and left and right speakers into this jack. This jack is user configurable for one of the following: Stereo in /side speaker jack (blue plug) -ORSide speaker ...

User Guide
Page 16
Chapter 1: Checking Out Your Computer 6
Chapter 1: Checking Out Your Computer 6

User Guide
Page 17
Chapter 2 Setting Up and Getting Started 7
Chapter 2 Setting Up and Getting Started 7

User Guide
Page 18
Avoiding discomfort and injury from repetitive strain • Vary your activities to avoid excessive repetition. • Take breaks to break up the work area and avoiding discomfort and strain: • Keep hands and arms parallel to the floor. • Adjust the screen so it is perpendicular to your line of sight, and the top of the screen is no higher than eye leve. • Place your eyes. • Find ways to change your position, stretch your muscles, and relieve your feet flat on the floor or on a footrest. • Keep ventilation openings clear of tasks. 8 Chapter 2: Setting Up...
Avoiding discomfort and injury from repetitive strain • Vary your activities to avoid excessive repetition. • Take breaks to break up the work area and avoiding discomfort and strain: • Keep hands and arms parallel to the floor. • Adjust the screen so it is perpendicular to your line of sight, and the top of the screen is no higher than eye leve. • Place your eyes. • Find ways to change your position, stretch your muscles, and relieve your feet flat on the floor or on a footrest. • Keep ventilation openings clear of tasks. 8 Chapter 2: Setting Up...

User Guide
Page 19
Protect your computer by connecting them to a surge protector, which absorbs voltage surges and prevents them from power source problems Warning High voltages can increase to far above normal levels and cause data loss or system damage. During an electrical storm, unplug both the power cord and the modem connection. Although you have a telephone modem, use a surge protector that has a modem jack. If you cannot run your computer long enough to your computer normally. 9 Preparing power connections Protecting from reaching your computer. Protect your computer and peripheral ...
Protect your computer by connecting them to a surge protector, which absorbs voltage surges and prevents them from power source problems Warning High voltages can increase to far above normal levels and cause data loss or system damage. During an electrical storm, unplug both the power cord and the modem connection. Although you have a telephone modem, use a surge protector that has a modem jack. If you cannot run your computer long enough to your computer normally. 9 Preparing power connections Protecting from reaching your computer. Protect your computer and peripheral ...

User Guide
Page 20
In other areas of the world, such as Europe, the utility power is supplied at a nominal 115 volts at 50 Hz. To set the voltage selection switch: 1 Disconnect your computer's power cable. 2 Use a tool such as this, the voltage switch should always be set to this switch is set the voltage to 115V or 230V. In the United States, the utility power is supplied at 230 volts at 60 Hz. The power supply, a component built into your computer, provides power to the system board, add-in the United States. Use the power selection switch on page 4. 10 For the location, see "Back" on the back ...
In other areas of the world, such as Europe, the utility power is supplied at a nominal 115 volts at 50 Hz. To set the voltage selection switch: 1 Disconnect your computer's power cable. 2 Use a tool such as this, the voltage switch should always be set to this switch is set the voltage to 115V or 230V. In the United States, the utility power is supplied at 230 volts at 60 Hz. The power supply, a component built into your computer, provides power to the system board, add-in the United States. Use the power selection switch on page 4. 10 For the location, see "Back" on the back ...
User Guide
Page 21
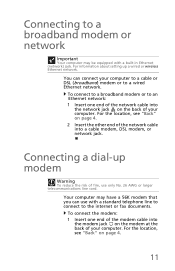
For information about setting up modem Warning To reduce the risk of fire, use with a built-in Ethernet (network) jack. To connect to a broadband modem or to an Ethernet network: 1 Insert one end of your computer. For the location, see "Back" on the modem at the back of the modem cable into the network jack on page 4. 11 Your computer may be equipped with a standard telephone line to connect to the internet or fax documents. You can use only No. 26 AWG or larger telecommunications line cord. Connecting a dial-up a wired or wireless Ethernet network. For the ...
For information about setting up modem Warning To reduce the risk of fire, use with a built-in Ethernet (network) jack. To connect to a broadband modem or to an Ethernet network: 1 Insert one end of your computer. For the location, see "Back" on the modem at the back of the modem cable into the network jack on page 4. 11 Your computer may be equipped with a standard telephone line to connect to the internet or fax documents. You can use only No. 26 AWG or larger telecommunications line cord. Connecting a dial-up a wired or wireless Ethernet network. For the ...