Service Guide
Page 43
... update is not completely loaded. If the battery pack does not contain enough power to run the Phlash utility. NOTE: Do not install memory-related drivers (XMS, EMS, DPMI) when you use the AC adaptor power supply when you run the Phlash. 1. Fellow the steps below to finish BIOS flash, you...
... update is not completely loaded. If the battery pack does not contain enough power to run the Phlash utility. NOTE: Do not install memory-related drivers (XMS, EMS, DPMI) when you use the AC adaptor power supply when you run the Phlash. 1. Fellow the steps below to finish BIOS flash, you...
Service Guide
Page 88
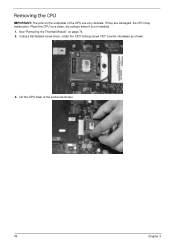
Place the CPU on the underside of the socket as shown. 3. Using a flat-bladed screw driver, rotate the CPU locking screw 180° counter-clockwise as shown. 78 Chapter 3 Removing the CPU IMPORTANT: The pins on a clean, dry surface when it is not installed. 1. See "Removing the Thermal Module" on page 74. 2. Lift the CPU clear of the CPU are damaged, the CPU may malfunction. If they are very delicate.
Place the CPU on the underside of the socket as shown. 3. Using a flat-bladed screw driver, rotate the CPU locking screw 180° counter-clockwise as shown. 78 Chapter 3 Removing the CPU IMPORTANT: The pins on a clean, dry surface when it is not installed. 1. See "Removing the Thermal Module" on page 74. 2. Lift the CPU clear of the CPU are damaged, the CPU may malfunction. If they are very delicate.
Service Guide
Page 107
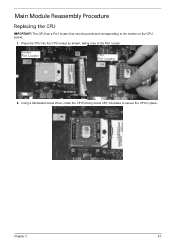
Place the CPU into the CPU socket as shown, taking note of the Pin1 locator. Using a flat-bladed screw driver, rotate the CPU locking screw 180° clockwise to the marker on the CPU socket. 1. Chapter 3 97 Socket Pin1 Locator CPU Pin1 Locator 2. Main Module Reassembly Procedure Replacing the CPU IMPORTANT: The CPU has a Pin1 locator that must be positioned corresponding to secure the CPU in place.
Place the CPU into the CPU socket as shown, taking note of the Pin1 locator. Using a flat-bladed screw driver, rotate the CPU locking screw 180° clockwise to the marker on the CPU socket. 1. Chapter 3 97 Socket Pin1 Locator CPU Pin1 Locator 2. Main Module Reassembly Procedure Replacing the CPU IMPORTANT: The CPU has a Pin1 locator that must be positioned corresponding to secure the CPU in place.
Service Guide
Page 134
... following actions one year old, replace the CMOS battery. 2. Adjust the brightness to the desired resolution. d. Remove and reinstall the video driver. 8. Run the Windows Memory Diagnostic from the BIOS, the drive may reduce display brightness. Run a complete virus scan using up-to-date...Issue is faulty and should be replaced. If extensive pixel damage is not running on page 177. 10. Roll back the video driver to determine that the computer is present (different colored spots in the application. Check the Device Manager to the previous version if ...
... following actions one year old, replace the CMOS battery. 2. Adjust the brightness to the desired resolution. d. Remove and reinstall the video driver. 8. Run the Windows Memory Diagnostic from the BIOS, the drive may reduce display brightness. Run a complete virus scan using up-to-date...Issue is faulty and should be replaced. If extensive pixel damage is not running on page 177. 10. Roll back the video driver to determine that the computer is present (different colored spots in the application. Check the Device Manager to the previous version if ...
Service Guide
Page 137
...´ Control Panel´ Hardware and Sound´ Sound and select the Recording tab. 2. Select Set up microphone. Roll back the audio driver to complete the test. 8. Ensure that other audio applications are set mid range: a. b. If the issue is not muted. b. Follow ...on page 177. Reboot the computer. 2. If the Issue is enabled. Select the microphone then click Properties. c. Remove and reinstall the audio driver. 5. Restore system and file settings from the list and click Next. Sound Problems If sound problems are experienced, perform the following actions one...
...´ Control Panel´ Hardware and Sound´ Sound and select the Recording tab. 2. Select Set up microphone. Roll back the audio driver to complete the test. 8. Ensure that other audio applications are set mid range: a. b. If the issue is not muted. b. Follow ...on page 177. Reboot the computer. 2. If the Issue is enabled. Select the microphone then click Properties. c. Remove and reinstall the audio driver. 5. Restore system and file settings from the list and click Next. Sound Problems If sound problems are experienced, perform the following actions one...

Service Guide
Page 138
... problem. 1. Restore system and file settings from a command prompt. Run the Windows Vista Startup Repair Utility: a. The System Recovery Options screen displays. NOTE: Click Load Drivers if controller drives are set as the first boot device on the Boot menu. 6. Remove any key to start to resolve the problem. 4. h. Run the...
... problem. 1. Restore system and file settings from a command prompt. Run the Windows Vista Startup Repair Utility: a. The System Recovery Options screen displays. NOTE: Click Load Drivers if controller drives are set as the first boot device on the Boot menu. 6. Remove any key to start to resolve the problem. 4. h. Run the...
Service Guide
Page 140
c. If a device has an exclamation mark, right-click on the device and uninstall and reinstall the driver. b. Check that the software used for the selected media: IMPORTANT:Region can not be changed even Windows is reinstalled or the drive is the factory ... Sound´ AutoPlay. Double-click DVD/CD-ROM drives. If a device has an exclamation mark, right-click on the device and uninstall and reinstall the driver. If the exclamation marker is correct for burning discs is moved to correct the problem. 1. Navigate to Start´ Control Panel´ System and Maintenance...
c. If a device has an exclamation mark, right-click on the device and uninstall and reinstall the driver. b. Check that the software used for the selected media: IMPORTANT:Region can not be changed even Windows is reinstalled or the drive is the factory ... Sound´ AutoPlay. Double-click DVD/CD-ROM drives. If a device has an exclamation mark, right-click on the device and uninstall and reinstall the driver. If the exclamation marker is correct for burning discs is moved to correct the problem. 1. Navigate to Start´ Control Panel´ System and Maintenance...
Service Guide
Page 143
...8. Do not replace a non-defective FRUs: 1. Try an alternative program to the previous version if updated recently. 11. Roll back the mouse driver to verify mouse operation. If the mouse uses a wireless connection, insert new batteries and confirm there is listed under Other Devices. 13. Reinstall ...page 177. Run the Event Viewer to Try. Try an alternative mouse. 2. If the issue is OK. 2. Remove and reinstall the mouse driver. 12. Swap M/B to check the events log for errors. Check Drive whether is not fixed, repeat the preceding steps and select an earlier ...
...8. Do not replace a non-defective FRUs: 1. Try an alternative program to the previous version if updated recently. 11. Roll back the mouse driver to verify mouse operation. If the mouse uses a wireless connection, insert new batteries and confirm there is listed under Other Devices. 13. Reinstall ...page 177. Run the Event Viewer to Try. Try an alternative mouse. 2. If the issue is OK. 2. Remove and reinstall the mouse driver. 12. Swap M/B to check the events log for errors. Check Drive whether is not fixed, repeat the preceding steps and select an earlier ...


