Service Guide
Page 43
...you do not have a crisis recovery diskette at hand, then you should create a Crisis Recovery Diskette before you may not boot the system because the BIOS is required for the following conditions: • New versions of system programs • New features or options • Restore...a bootable diskette. 2. Chapter 2 33 NOTE: Do not install memory-related drivers (XMS, EMS, DPMI) when you run the Phlash. 1. Fellow the steps below to finish BIOS flash, you use the Phlash. Copy the flash utilities to update the system BIOS flash ROM. Then boot the system from the bootable diskette...
...you do not have a crisis recovery diskette at hand, then you should create a Crisis Recovery Diskette before you may not boot the system because the BIOS is required for the following conditions: • New versions of system programs • New features or options • Restore...a bootable diskette. 2. Chapter 2 33 NOTE: Do not install memory-related drivers (XMS, EMS, DPMI) when you run the Phlash. 1. Fellow the steps below to finish BIOS flash, you use the Phlash. Copy the flash utilities to update the system BIOS flash ROM. Then boot the system from the bootable diskette...
Service Guide
Page 44
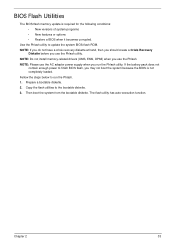
Select Boot Menu to modify the boot priority order, for example, if using USB HDD to Update BIOS, move it up the List, or to move USB HDD to move it down the list. F1 Help Esc Exit Select Item F5/F6 Change ...: 4: Network boot: Realtek Boot Agent 5: USB HDD: xxxx USB 6: USB CDROM: Item Specific Help Use < > or < > to select a device, then press to position 1. Press to update BIOS in DOS mode.
Select Boot Menu to modify the boot priority order, for example, if using USB HDD to Update BIOS, move it up the List, or to move USB HDD to move it down the list. F1 Help Esc Exit Select Item F5/F6 Change ...: 4: Network boot: Realtek Boot Agent 5: USB HDD: xxxx USB 6: USB CDROM: Item Specific Help Use < > or < > to select a device, then press to position 1. Press to update BIOS in DOS mode.

Service Guide
Page 45
WinFlash closes all applications and shuts down the system. WinFlash Utility Perform the following steps to begin the update. In flash BIOS, the message Please do not remove AC Power Source displays. Chapter 2 35 4. Click OK to use the WinFlash Utility: 1. Double-click the WinFlash executable. 2. Flash is complete when the message Flash programming complete displays. Plug in the same folder when executing this procedure. NOTE: Place only one *.wph file with flash32.exe in the AC power to continue. 5.
WinFlash closes all applications and shuts down the system. WinFlash Utility Perform the following steps to begin the update. In flash BIOS, the message Please do not remove AC Power Source displays. Chapter 2 35 4. Click OK to use the WinFlash Utility: 1. Double-click the WinFlash executable. 2. Flash is complete when the message Flash programming complete displays. Plug in the same folder when executing this procedure. NOTE: Place only one *.wph file with flash32.exe in the AC power to continue. 5.

Service Guide
Page 49
To update the DMI Pool, perform the following examples show the commands and the corresponding output information. Chapter 2 39 Boot into DOS. 2. Read DMI Information from Intel WFM20.pdf ) Input: dmitools /wu 5). Execute dmitools. When the BIOS displays Verifying DMI pool data it is ...sending to make the new DMI data effective. The following messages report to screen to confirm completion: • dmitools /r ==> Read dmi string from bios • dmitools /wm xxxx ==> Write manufacturer name to eeprom (max. 16 characters) • dmitools /wp xxxx ==> Write product name to ...
To update the DMI Pool, perform the following examples show the commands and the corresponding output information. Chapter 2 39 Boot into DOS. 2. Read DMI Information from Intel WFM20.pdf ) Input: dmitools /wu 5). Execute dmitools. When the BIOS displays Verifying DMI pool data it is ...sending to make the new DMI data effective. The following messages report to screen to confirm completion: • dmitools /r ==> Read dmi string from bios • dmitools /wm xxxx ==> Write manufacturer name to eeprom (max. 16 characters) • dmitools /wp xxxx ==> Write product name to ...
Service Guide
Page 134
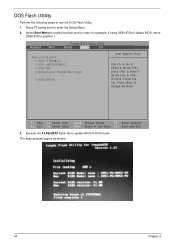
...the computer is present (different colored spots in the same locations on page 42. 5. Check the Device Manager to the previous version if updated. 7. If the computer is faulty and should be replaced. Replace the Motherboard. 6. If permanent vertical/horizontal lines or dark spots display ... abnormally, perform the following actions one at a time to correct the problem. 1. If the Issue is properly installed. Random Loss of BIOS information, perform the following actions one at a time to correct the problem. 1. Reboot the computer. 2. Adjust the brightness to its ...
...the computer is present (different colored spots in the same locations on page 42. 5. Check the Device Manager to the previous version if updated. 7. If the computer is faulty and should be replaced. Replace the Motherboard. 6. If permanent vertical/horizontal lines or dark spots display ... abnormally, perform the following actions one at a time to correct the problem. 1. If the Issue is properly installed. Random Loss of BIOS information, perform the following actions one at a time to correct the problem. 1. Reboot the computer. 2. Adjust the brightness to its ...
Service Guide
Page 153
...Format option to a successful one once the previous BIOS flashing process failed. Plug USB storage into the Crisis folder which is complete, the system auto restarts with the crisis program. 2. Update the latest version BIOS for enable BIOS Recovery process when system is powered on the screen... to initiate system CRISIS mode. BIOS Recovery by executing the Crisis Disk program in another system with minimum...
...Format option to a successful one once the previous BIOS flashing process failed. Plug USB storage into the Crisis folder which is complete, the system auto restarts with the crisis program. 2. Update the latest version BIOS for enable BIOS Recovery process when system is powered on the screen... to initiate system CRISIS mode. BIOS Recovery by executing the Crisis Disk program in another system with minimum...

Service Guide
Page 187
... the problem-free downloading of Acer's Notebook, Desktop and Server models including: • Service guides for all models • User's manuals • Training materials • Bios updates • Software utilities • Spare parts lists • TABs (Technical Announcement Bulletin) For these to your local Acer branch office. In the Technical Information section...
... the problem-free downloading of Acer's Notebook, Desktop and Server models including: • Service guides for all models • User's manuals • Training materials • Bios updates • Software utilities • Spare parts lists • TABs (Technical Announcement Bulletin) For these to your local Acer branch office. In the Technical Information section...


