Service Guide
Page 9
...Jumper and Connector Locations 139 Top View 139 Bottom View 140 Power Board 141 Clearing Password Check and BIOS Recovery 142 Clearing Password Check 142 Clear CMOS Jumper 142 BIOS Recovery by Crisis Disk 143 FRU (Field Replaceable Unit) List 145 eMachines E627 Exploded Diagrams ...146 Main Assembly 146 Base Assembly 148 Rear Assembly 149 eMachines E627 FRU List 150 Model Definition and Configuration ...
...Jumper and Connector Locations 139 Top View 139 Bottom View 140 Power Board 141 Clearing Password Check and BIOS Recovery 142 Clearing Password Check 142 Clear CMOS Jumper 142 BIOS Recovery by Crisis Disk 143 FRU (Field Replaceable Unit) List 145 eMachines E627 Exploded Diagrams ...146 Main Assembly 146 Base Assembly 148 Rear Assembly 149 eMachines E627 FRU List 150 Model Definition and Configuration ...
Service Guide
Page 134
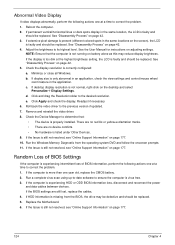
...to correct the problem. 1. If permanent vertical/horizontal lines or dark spots display in the same locations on page 177. If extensive pixel damage is present (different colored spots in the same location, the LCD is not running on adjusting settings. See "Disassembly Process" on page 177. ... display resolution is still not resolved, see "Online Support Information" on the screen), the LCD is more than one year old, replace the CMOS battery. 2. d. Click Apply and check the display. Remove and reinstall the video driver. 8. Check the Device Manager to determine that the ...
...to correct the problem. 1. If permanent vertical/horizontal lines or dark spots display in the same locations on page 177. If extensive pixel damage is present (different colored spots in the same location, the LCD is not running on adjusting settings. See "Disassembly Process" on page 177. ... display resolution is still not resolved, see "Online Support Information" on the screen), the LCD is more than one year old, replace the CMOS battery. 2. d. Click Apply and check the display. Remove and reinstall the video driver. 8. Check the Device Manager to determine that the ...
Service Guide
Page 152
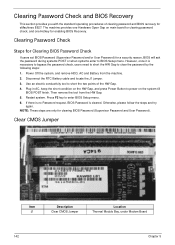
...the short condition on the HW Gap, and press Power Button to BIOS Setup menu. Clear CMOS Jumper Item J1 Description Clear CMOS Jumper Location Thermal Module Bay, under Modem Board 142 Chapter 5 Clearing Password Check Steps for Clearing BIOS ...Password Check If users set BIOS Password (Supervisor Password and/or User Password) for a security reason, BIOS will ask the password during systems POST or when systems enter to power on main board for eMachines E627...
...the short condition on the HW Gap, and press Power Button to BIOS Setup menu. Clear CMOS Jumper Item J1 Description Clear CMOS Jumper Location Thermal Module Bay, under Modem Board 142 Chapter 5 Clearing Password Check Steps for Clearing BIOS ...Password Check If users set BIOS Password (Supervisor Password and/or User Password) for a security reason, BIOS will ask the password during systems POST or when systems enter to power on main board for eMachines E627...


