eMachines Notebook User Guide (All Series)
Page 5
... work by the operating instructions, since improper adjustment of this product. • Use the product only with the supplied power supply cord set , make sure that is a safety feature. If the battery leaks and you come into the product • the product was spilled into Refer all servicing to replace the power cord set . Using a power outlet that the new power cord meets the following the operating instructions Note: Adjust...
... work by the operating instructions, since improper adjustment of this product. • Use the product only with the supplied power supply cord set , make sure that is a safety feature. If the battery leaks and you come into the product • the product was spilled into Refer all servicing to replace the power cord set . Using a power outlet that the new power cord meets the following the operating instructions Note: Adjust...

eMachines Notebook User Guide (All Series)
Page 10
... from Sleep mode by adjusting the viewing angle of the monitor, using a footrest, or raising your comfort zone by pushing power button. • More power management settings can be done through Windows power management. Tips and information for more than your vision Long viewing hours, wearing incorrect glasses or contact lenses, glare, excessive room lighting, poorly focused screens, very small typefaces and low-contrast Users are...
... from Sleep mode by adjusting the viewing angle of the monitor, using a footrest, or raising your comfort zone by pushing power button. • More power management settings can be done through Windows power management. Tips and information for more than your vision Long viewing hours, wearing incorrect glasses or contact lenses, glare, excessive room lighting, poorly focused screens, very small typefaces and low-contrast Users are...
eMachines Notebook User Guide (All Series)
Page 12
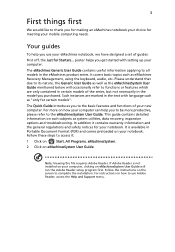
... eMachines notebook, we have designed a set of your notebook. Follow these steps to access it contains warranty information and the general regulations and safety notices for your new computer. Follow the instructions on such subjects as eMachines Recovery Management, using your computer Turning your mobile computing needs. Basic care and tips for using the keyboard, audio, etc. This guide contains detailed information on the screen to complete the installation...
... eMachines notebook, we have designed a set of your notebook. Follow these steps to access it contains warranty information and the general regulations and safety notices for your new computer. Follow the instructions on such subjects as eMachines Recovery Management, using your computer Turning your mobile computing needs. Basic care and tips for using the keyboard, audio, etc. This guide contains detailed information on the screen to complete the installation...
eMachines Notebook User Guide (All Series)
Page 16
...17 Entering passwords 18 Setting passwords 18 Expanding through options 19 Connectivity options 19 Built-in network feature 19 Universal Serial Bus (USB) 19 Installing memory 20 BIOS utility 21 Boot sequence 21 Enable disk-to RF fields (RSS-102) 38 LCD panel ergonomic specifications 39 Low-power license-exempt radio communication devices (RSS-210) 38 Exposure of humans to -disk recovery 21 Password 21 Using software 22 Playing DVD movies 22 Power management 23 eMachines Recovery Management 24 Burn backup discs 25 Restore 26 Restore Windows Vista from...
...17 Entering passwords 18 Setting passwords 18 Expanding through options 19 Connectivity options 19 Built-in network feature 19 Universal Serial Bus (USB) 19 Installing memory 20 BIOS utility 21 Boot sequence 21 Enable disk-to RF fields (RSS-102) 38 LCD panel ergonomic specifications 39 Low-power license-exempt radio communication devices (RSS-210) 38 Exposure of humans to -disk recovery 21 Password 21 Using software 22 Playing DVD movies 22 Power management 23 eMachines Recovery Management 24 Burn backup discs 25 Restore 26 Restore Windows Vista from...
eMachines Notebook User Guide (All Series)
Page 18
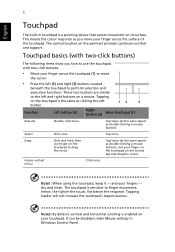
... left button. 12 3 Function Left button (2) Right button (3) Main touchpad (1) Execute Select Drag Access context menu Quickly click twice. dry and clean. rest your finger across the touchpad (1) to move your finger on the touchpad on its surface. These two buttons are similar to drag the cursor. It can be disabled under Mouse settings in touchpad is enabled on the palmrest provides optimum comfort and support. English 1 Touchpad...
... left button. 12 3 Function Left button (2) Right button (3) Main touchpad (1) Execute Select Drag Access context menu Quickly click twice. dry and clean. rest your finger across the touchpad (1) to move your finger on the touchpad on its surface. These two buttons are similar to drag the cursor. It can be disabled under Mouse settings in touchpad is enabled on the palmrest provides optimum comfort and support. English 1 Touchpad...
eMachines Notebook User Guide (All Series)
Page 19
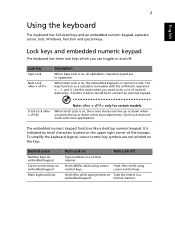
... keycaps. Scroll Lock does not work with the arithmetic operators +, -, *, and /). To simplify the keyboard legend, cursor-control key symbols are in numeric mode. Hold while using control keys. Hold while typing letters on Num Lock off . normal manner. English 2 Using the keyboard The keyboard has full-sized keys and an embedded numeric keypad, separate cursor, lock, Windows, function and special keys.. Use this mode when you need to connect an external keypad. Desired access Number keys on embedded...
... keycaps. Scroll Lock does not work with the arithmetic operators +, -, *, and /). To simplify the keyboard legend, cursor-control key symbols are in numeric mode. Hold while using control keys. Hold while typing letters on Num Lock off . normal manner. English 2 Using the keyboard The keyboard has full-sized keys and an embedded numeric keypad, separate cursor, lock, Windows, function and special keys.. Use this mode when you need to connect an external keypad. Desired access Number keys on embedded...

eMachines Notebook User Guide (All Series)
Page 20
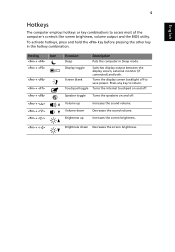
... also be used with other keys to provide a variety of functions: < > : Open or close the Start menu < > + : Display the desktop < > + : Open Windows Explore < > + : Search for a file or folder < > + : Cycle through Sidebar gadgets < > + : Lock your edition of Windows Vista or Windows XP, some shortcuts may not function as clicking the right mouse button; it opens the application's context menu. This key has the same effect as described. Key Description Windows key Pressed alone...
... also be used with other keys to provide a variety of functions: < > : Open or close the Start menu < > + : Display the desktop < > + : Open Windows Explore < > + : Search for a file or folder < > + : Cycle through Sidebar gadgets < > + : Lock your edition of Windows Vista or Windows XP, some shortcuts may not function as clicking the right mouse button; it opens the application's context menu. This key has the same effect as described. Key Description Windows key Pressed alone...
eMachines Notebook User Guide (All Series)
Page 21
Display toggle Screen blank Touchpad toggle Switches display output between the display screen, external monitor (if connected) and both. Press any key to access most of the computer's controls like screen brightness, volume output and the BIOS utility. Speaker toggle Turns the speakers on and off. Hotkey + + Icon + + + + < > + < > + < > Function Sleep Description Puts the computer in the hotkey combination. Turns the internal touchpad on and off to save power. Volume down Decreases the screen brightness. To activate hotkeys, press and hold the key...
Display toggle Screen blank Touchpad toggle Switches display output between the display screen, external monitor (if connected) and both. Press any key to access most of the computer's controls like screen brightness, volume output and the BIOS utility. Speaker toggle Turns the speakers on and off. Hotkey + + Icon + + + + < > + < > + < > Function Sleep Description Puts the computer in the hotkey combination. Turns the internal touchpad on and off to save power. Volume down Decreases the screen brightness. To activate hotkeys, press and hold the key...
eMachines Notebook User Guide (All Series)
Page 23
... in the external USB floppy drive? Remove or replace it is crossed-out, click on the taskbar. See "Hotkeys" on the screen. Nothing appears on page 4 for each one. If it with a system disk and press + + to an external monitor. In Windows, look at the power indicator: • If it is heard from the computer. Press + < > (increase) to adjust the brightness level. • The display device might...
... in the external USB floppy drive? Remove or replace it is crossed-out, click on the taskbar. See "Hotkeys" on the screen. Nothing appears on page 4 for each one. If it with a system disk and press + + to an external monitor. In Windows, look at the power indicator: • If it is heard from the computer. Press + < > (increase) to adjust the brightness level. • The display device might...
eMachines Notebook User Guide (All Series)
Page 24
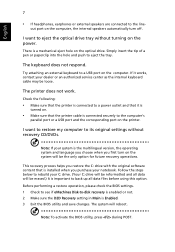
... not work. Note: To activate the BIOS utility, press during POST. This recovery process helps you first turn off. Before performing a restore operation, please check the BIOS settings. 1 Check to see if eMachines Disk-to-disk recovery is enabled or not. 2 Make sure the D2D Recovery setting in Main is connected securely to back up all data will reboot. Check the following: • Make sure that the printer cable is Enabled. 3 Exit the BIOS utility...
... not work. Note: To activate the BIOS utility, press during POST. This recovery process helps you first turn off. Before performing a restore operation, please check the BIOS settings. 1 Check to see if eMachines Disk-to-disk recovery is enabled or not. 2 Make sure the D2D Recovery setting in Main is connected securely to back up all data will reboot. Check the following: • Make sure that the printer cable is Enabled. 3 Exit the BIOS utility...
eMachines Notebook User Guide (All Series)
Page 30
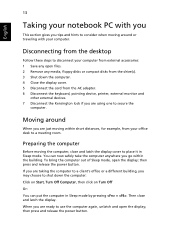
...: 1 Save any open files. 2 Remove any media, floppy disks or compact disks from the drive(s). 3 Shut down the computer: Click on Start, Turn Off Computer, then click on Turn Off Or: You can now safely take the computer anywhere you go within short distances, for example, from the AC adapter. 6 Disconnect the keyboard, pointing device, printer, external monitor and other external devices. 7 Disconnect the Kensington lock if you...
...: 1 Save any open files. 2 Remove any media, floppy disks or compact disks from the drive(s). 3 Shut down the computer: Click on Start, Turn Off Computer, then click on Turn Off Or: You can now safely take the computer anywhere you go within short distances, for example, from the AC adapter. 6 Disconnect the keyboard, pointing device, printer, external monitor and other external devices. 7 Disconnect the Kensington lock if you...
eMachines Notebook User Guide (All Series)
Page 34
... use . If you must enter this password with a Kensington-compatible security slot for maximum security. • Password on boot-up and resume from Hibernation for a security lock. Combine the use of this password to gain access to the BIOS utility. • User Password secures your computer against unauthorized use . a security notch and passwords. Setting these passwords creates several different levels of protection for maximum security. Security features include hardware and software locks - Using passwords Passwords...
... use . If you must enter this password with a Kensington-compatible security slot for maximum security. • Password on boot-up and resume from Hibernation for a security lock. Combine the use of this password to gain access to the BIOS utility. • User Password secures your computer against unauthorized use . a security notch and passwords. Setting these passwords creates several different levels of protection for maximum security. Security features include hardware and software locks - Using passwords Passwords...
eMachines Notebook User Guide (All Series)
Page 35
... enter the BIOS utility at boot-up . • Type the Supervisor Password and press to access the BIOS utility. Then turn on boot parameter is set passwords using the BIOS utility. Setting passwords You can set and the password on the computer again, and try again. If you enter the password incorrectly, a warning message appears. Try again and press . • When the User Password is enabled, a prompt appears at boot-up . • Type the User Password and press to use...
... enter the BIOS utility at boot-up . • Type the Supervisor Password and press to access the BIOS utility. Then turn on boot parameter is set passwords using the BIOS utility. Setting passwords You can set and the password on the computer again, and try again. If you enter the password incorrectly, a warning message appears. Try again and press . • When the User Password is enabled, a prompt appears at boot-up . • Type the User Password and press to use...
eMachines Notebook User Guide (All Series)
Page 36
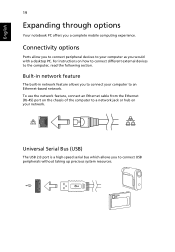
... instructions on how to connect different external devices to a network jack or hub on the chassis of the computer to the computer, read the following section. To use the network feature, connect an Ethernet cable from the Ethernet (RJ-45) port on your network. Built-in network feature The built-in network feature allows you a complete mobile computing experience. English 19 Expanding through options Your notebook...
... instructions on how to connect different external devices to a network jack or hub on the chassis of the computer to the computer, read the following section. To use the network feature, connect an Ethernet cable from the Ethernet (RJ-45) port on your network. Built-in network feature The built-in network feature allows you a complete mobile computing experience. English 19 Expanding through options Your notebook...
eMachines Notebook User Guide (All Series)
Page 38
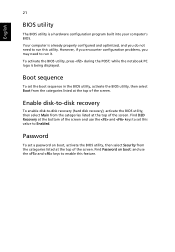
... optimized, and you may need to -disk recovery (hard disk recovery), activate the BIOS utility, then select Main from the categories listed at the top of the screen. To activate the BIOS utility, press during the POST; Enable disk-to-disk recovery To enable disk-to run it. while the notebook PC logo is a hardware configuration program built into your computer's BIOS. English 21 BIOS utility The BIOS utility is being displayed. Find Password on boot, activate the BIOS utility, then select Security from...
... optimized, and you may need to -disk recovery (hard disk recovery), activate the BIOS utility, then select Main from the categories listed at the top of the screen. To activate the BIOS utility, press during the POST; Enable disk-to-disk recovery To enable disk-to run it. while the notebook PC logo is a hardware configuration program built into your computer's BIOS. English 21 BIOS utility The BIOS utility is being displayed. Find Password on boot, activate the BIOS utility, then select Security from...
eMachines Notebook User Guide (All Series)
Page 58
... 11 removing 11 using the first time 9 BIOS utility 21 brightness hotkeys 4 C caps lock 2 care AC adapter xiii battery pack xiv computer xiii CD-ROM ejecting manually 7 troubleshooting 7 charging checking level 11 cleaning computer xiv computer caring for xiii cleaning xiv disconnecting 13 keyboards 2 moving around 13 security 17 setting up a home office 15 taking home 14 traveling internationally 16 traveling on local trips 15 troubleshooting 30 turning...
... 11 removing 11 using the first time 9 BIOS utility 21 brightness hotkeys 4 C caps lock 2 care AC adapter xiii battery pack xiv computer xiii CD-ROM ejecting manually 7 troubleshooting 7 charging checking level 11 cleaning computer xiv computer caring for xiii cleaning xiv disconnecting 13 keyboards 2 moving around 13 security 17 setting up a home office 15 taking home 14 traveling internationally 16 traveling on local trips 15 troubleshooting 30 turning...
eMachines E720/E520 Series Quick Guide
Page 3
... you to all models in Portable Document Format (PDF) and comes preloaded on such subjects as eMachines Recovery Management, using the keyboard, audio, etc. This guide contains detailed information on your notebook. If Adobe Reader is available in the eMachines product series. The eMachines Generic User Guide contains useful information applying to the basic features and functions of your new computer. The Quick Guide introduces you use Adobe Reader, access the Help and Support menu. Note: Viewing...
... you to all models in Portable Document Format (PDF) and comes preloaded on such subjects as eMachines Recovery Management, using the keyboard, audio, etc. This guide contains detailed information on your notebook. If Adobe Reader is available in the eMachines product series. The eMachines Generic User Guide contains useful information applying to the basic features and functions of your new computer. The Quick Guide introduces you use Adobe Reader, access the Help and Support menu. Note: Viewing...
eMachines E720/E520 Series Quick Guide
Page 5
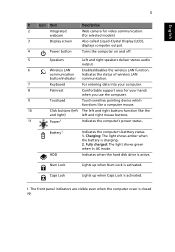
... deliver stereo audio output. 6 Wireless LAN Enables/disables the wireless LAN function. Battery1 HDD Indicates the computer's batttery status. 1. Fully charged: The light shows green when in AC mode. Indicates when the hard disk drive is closed up. The front panel indicators are visible even when the computer cover is active. English 5 # Icon Item 2 Integrated webcam 3 Display screen 4 Power button Description Web camera for video communication. (for your hands when you use the computer. 9 Touchpad Touch-sensitive pointing device which functions like...
... deliver stereo audio output. 6 Wireless LAN Enables/disables the wireless LAN function. Battery1 HDD Indicates the computer's batttery status. 1. Fully charged: The light shows green when in AC mode. Indicates when the hard disk drive is closed up. The front panel indicators are visible even when the computer cover is active. English 5 # Icon Item 2 Integrated webcam 3 Display screen 4 Power button Description Web camera for video communication. (for your hands when you use the computer. 9 Touchpad Touch-sensitive pointing device which functions like...
eMachines E720/E520 Series Quick Guide
Page 7
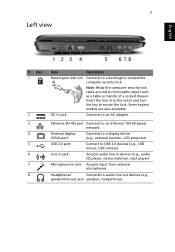
...USB 2.0 port Connect to a display device (e.g., external monitor, LCD projector). External display (VGA) port Connects to USB 2.0 devices (e.g., USB mouse, USB camera). Insert the lock into the notch and turn the key to audio line-out devices (e.g., speaker/line-out jack speakers, headphones). Headphones/ Connects to secure the lock. DC-in jack Accepts input from external microphones. Line-in jack Accepts audio line-in devices (e.g., audio CD player, stereo walkman, mp3 player) Microphone-in jack Connects to an Ethernet 10/100-based network. Ethernet (RJ-45) port...
...USB 2.0 port Connect to a display device (e.g., external monitor, LCD projector). External display (VGA) port Connects to USB 2.0 devices (e.g., USB mouse, USB camera). Insert the lock into the notch and turn the key to audio line-out devices (e.g., speaker/line-out jack speakers, headphones). Headphones/ Connects to secure the lock. DC-in jack Accepts input from external microphones. Line-in jack Accepts audio line-in devices (e.g., audio CD player, stereo walkman, mp3 player) Microphone-in jack Connects to an Ethernet 10/100-based network. Ethernet (RJ-45) port...
eMachines E720/E520 Series Quick Guide
Page 10
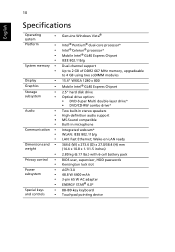
... BIOS user, supervisor, HDD passwords Kensington lock slot ACPI 3.0 48.8 W 4400 mAh 3-pin 65 W AC adapter ENERGY STAR® 4.0* 88-/89-key keyboard Touchpad pointing device 10 English Specifications Operating • system Platform • • • • System memory • • Display • Graphics • Storage • subsystem • Audio • • • • Communication • • • Dimensions and • weight • Privacy control • • Power...
... BIOS user, supervisor, HDD passwords Kensington lock slot ACPI 3.0 48.8 W 4400 mAh 3-pin 65 W AC adapter ENERGY STAR® 4.0* 88-/89-key keyboard Touchpad pointing device 10 English Specifications Operating • system Platform • • • • System memory • • Display • Graphics • Storage • subsystem • Audio • • • • Communication • • • Dimensions and • weight • Privacy control • • Power...


