

User Guide
Page 1
... bodily injury. Objects may fall, causing seriousdamage to the product. 4 Slots and openings in a builtin installation unless proper ventilation is provided. 5 Never push objects of the extension cord. Don't use an extension cord with a 3-wire grounding type plug, a plug having a third (grounding) pin. This product should only be connected to a power outlet that the total amperage rating of all of all...
... bodily injury. Objects may fall, causing seriousdamage to the product. 4 Slots and openings in a builtin installation unless proper ventilation is provided. 5 Never push objects of the extension cord. Don't use an extension cord with a 3-wire grounding type plug, a plug having a third (grounding) pin. This product should only be connected to a power outlet that the total amperage rating of all of all...
User Guide
Page 7
...On and Off 2-4 Turning On the Computer 2-4 Turning Off the Computer 2-4 Using Your Computer Using an Optional Floppy Disk Drive 3-1 Using an Optional Media Reader 3-2 Inserting the Media 3-2 Removing the Media 3-3 Using an Optical Drive 3-4 Using Special Keys on the Keyboard 3-5 Using a Mouse ...3-6 Changing the Display Resolution and Color Depth 3-7 Controlling the Audio Volume 3-7 vii CONTENTS Chapter 1 Chapter 2 Chapter 3 Introduction System Overview...1-1 Setting Up Your System 1. Checking the Voltage Selection 2-2 3. Selecting a Location 2-1 2. Connecting Your Peripheral...
...On and Off 2-4 Turning On the Computer 2-4 Turning Off the Computer 2-4 Using Your Computer Using an Optional Floppy Disk Drive 3-1 Using an Optional Media Reader 3-2 Inserting the Media 3-2 Removing the Media 3-3 Using an Optical Drive 3-4 Using Special Keys on the Keyboard 3-5 Using a Mouse ...3-6 Changing the Display Resolution and Color Depth 3-7 Controlling the Audio Volume 3-7 vii CONTENTS Chapter 1 Chapter 2 Chapter 3 Introduction System Overview...1-1 Setting Up Your System 1. Checking the Voltage Selection 2-2 3. Selecting a Location 2-1 2. Connecting Your Peripheral...

User Guide
Page 8
Solving Common Problems Power ...A-1 Hard Disk Drive ...A-1 Optical Drive ...A-2 Audio ...A-2 Floppy Disk Drive A-3 Display & Monitor A-3 Keyboard ...A-4 Mouse ...A-4 Appendix B. Chapter 4 Installing and Removing Drives Removing the Cover 4-1 Replacing the Cover 4-3 Installing an Expansion Card 4-4 Installing an Additional Hard Disk Drive 4-6 Installing the 5.25-inch Device in the Peripheral Bay 4-9 Chapter 5 Using the Restore CDs Restoring Your Original Software 5-1 Chapter 6 Using the PowerDVD About DVD ...6-1 Playing the PowerDVD 6-1 How to Run the PowerDVD 6-1 Buttons of...
Solving Common Problems Power ...A-1 Hard Disk Drive ...A-1 Optical Drive ...A-2 Audio ...A-2 Floppy Disk Drive A-3 Display & Monitor A-3 Keyboard ...A-4 Mouse ...A-4 Appendix B. Chapter 4 Installing and Removing Drives Removing the Cover 4-1 Replacing the Cover 4-3 Installing an Expansion Card 4-4 Installing an Additional Hard Disk Drive 4-6 Installing the 5.25-inch Device in the Peripheral Bay 4-9 Chapter 5 Using the Restore CDs Restoring Your Original Software 5-1 Chapter 6 Using the PowerDVD About DVD ...6-1 Playing the PowerDVD 6-1 How to Run the PowerDVD 6-1 Buttons of...

User Guide
Page 11
... environment conditions. Appropriate power sources. To prevent static charges, connect all of its components. You need one outlet for the computer, one for the monitor, and an additional outlet for a printer and any electrical device, such as a telephone, which can move freely. Setting Up Your System This chapter describes how to set up and turn on your system...
... environment conditions. Appropriate power sources. To prevent static charges, connect all of its components. You need one outlet for the computer, one for the monitor, and an additional outlet for a printer and any electrical device, such as a telephone, which can move freely. Setting Up Your System This chapter describes how to set up and turn on your system...

User Guide
Page 14
... the Start button, and then click Turn Off Computer. 3. Turn off your information and close all application programs you use. 2. Turn on the computer or to turn off the monitor and any other peripheral devices. 2-4 Setting Up Your System In this case, the "Microsoft Windows Startup Menu" menu will be booted with Restore CD. Turning the Computer On and Off Follow the instructions below to turn on the front panel of...
... the Start button, and then click Turn Off Computer. 3. Turn off your information and close all application programs you use. 2. Turn on the computer or to turn off the monitor and any other peripheral devices. 2-4 Setting Up Your System In this case, the "Microsoft Windows Startup Menu" menu will be booted with Restore CD. Turning the Computer On and Off Follow the instructions below to turn on the front panel of...
User Guide
Page 16
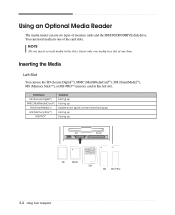
... MS MS-PRO 3-2 Using Your Computer Using an Optional Media Reader The media reader can use six types of the card slots. Inserting the Media Left Slot You can use the SD (Secure DigitalTM), MMC (MultiMediaCardTM), SM (SmartMediaTM), MS (Memory StickTM), or MS-PROTM memory card in one of memory cards and the IBM MICRODRIVE disk drive. NOTE Do not insert several media in a slot at one media in the slots. Insert only one time...
... MS MS-PRO 3-2 Using Your Computer Using an Optional Media Reader The media reader can use six types of the card slots. Inserting the Media Left Slot You can use the SD (Secure DigitalTM), MMC (MultiMediaCardTM), SM (SmartMediaTM), MS (Memory StickTM), or MS-PROTM memory card in one of memory cards and the IBM MICRODRIVE disk drive. NOTE Do not insert several media in a slot at one media in the slots. Insert only one time...
User Guide
Page 17
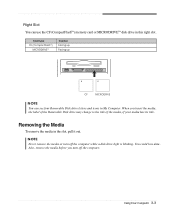
Removing the Media To remove the media in this right slot. NOTE Never remove the media or turn off the computer while a disk drive light is blinking. Right Slot You can see four Removable Disk drive letters and icons in My Computer. You could lose data. Using Your Computer 3-3 Card type CF (CompactFlashTM) MICRODRIVETM Insertion Facing up Facing up CF MICRODRIVE NOTE You can use the CF (CompactFlashTM) memory card or MICRODRIVETM disk drive in...
Removing the Media To remove the media in this right slot. NOTE Never remove the media or turn off the computer while a disk drive light is blinking. Right Slot You can see four Removable Disk drive letters and icons in My Computer. You could lose data. Using Your Computer 3-3 Card type CF (CompactFlashTM) MICRODRIVETM Insertion Facing up Facing up CF MICRODRIVE NOTE You can use the CF (CompactFlashTM) memory card or MICRODRIVETM disk drive in...
User Guide
Page 18
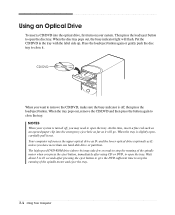
... one hard disk drive or partition. The high speed DVD-ROM drive (above 6x) may need to stop the running of the spindle motor when you press the eject button, immediately after using CD or DVD, to remove the CD/DVD, make sure the busy indicator is slightly open the tray. Your computer references the upper optical drive as D: and the lower optical drive (optional) as it . Using an Optical Drive To insert a CD/DVD into...
... one hard disk drive or partition. The high speed DVD-ROM drive (above 6x) may need to stop the running of the spindle motor when you press the eject button, immediately after using CD or DVD, to remove the CD/DVD, make sure the busy indicator is slightly open the tray. Your computer references the upper optical drive as D: and the lower optical drive (optional) as it . Using an Optical Drive To insert a CD/DVD into...
User Guide
Page 19
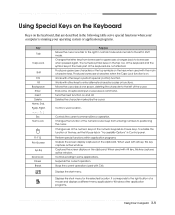
.... Using Your Computer 3-5 Changes the letter keys from entering numbers to perform special (control) function. Works with the main character keys. Perform special functions within application programs. Outputs the screen display captured on . Controls scrolling in Control panel. Displays the short menu for the selected location. Produces uppercase characters or the top symbols on the keys when used with other keys to the left in Shift mode. Stops the current operation (used...
.... Using Your Computer 3-5 Changes the letter keys from entering numbers to perform special (control) function. Works with the main character keys. Perform special functions within application programs. Outputs the screen display captured on . Controls scrolling in Control panel. Displays the short menu for the selected location. Produces uppercase characters or the top symbols on the keys when used with other keys to the left in Shift mode. Stops the current operation (used...
User Guide
Page 20
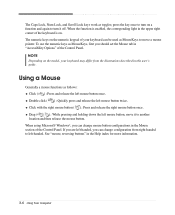
... should set the Mouse tab in the Mouse section of the Control Panel. The numeric keys on a function and again to turn it to left-handed. When using Microsoft® Windows®, you can change configuration from the illustrations described in this user's guide. Double click ( ) : Quickly press and release the left mouse button twice. If you are left-handed, you can change mouse button configurations in "Accessibility Options" of the Control Panel...
... should set the Mouse tab in the Mouse section of the Control Panel. The numeric keys on a function and again to turn it to left-handed. When using Microsoft® Windows®, you can change configuration from the illustrations described in this user's guide. Double click ( ) : Quickly press and release the left mouse button twice. If you are left-handed, you can change mouse button configurations in "Accessibility Options" of the Control Panel...

User Guide
Page 23
... and peripheral devices including the monitor and printer. Chapter 1 2. Then disconnect any of your computer. Turn off the computer. Removing the Cover You need to remove the cover of the procedures described in your system to access its power source and from the back panel. To remove the cover, follow these steps: 1. Installing and Removing Drives 4-1 Installing and Removing Drives This chapter describes how to install or remove system cover, optional drives, and optional cards in...
... and peripheral devices including the monitor and printer. Chapter 1 2. Then disconnect any of your computer. Turn off the computer. Removing the Cover You need to remove the cover of the procedures described in your system to access its power source and from the back panel. To remove the cover, follow these steps: 1. Installing and Removing Drives 4-1 Installing and Removing Drives This chapter describes how to install or remove system cover, optional drives, and optional cards in...

User Guide
Page 30
7. Connect the power and hard disk drive cable to the instructions in "Replacing the Cover" in this chapter. 4-8 Installing and Removing Drives Replace the system cover according to your hard disk drive. (If you removed the hard disk drive cable from the motherboard, replace it with the retaining screw, as shown below. 8. Slide the HDD bracket into the chassis and secure it .) 9.
7. Connect the power and hard disk drive cable to the instructions in "Replacing the Cover" in this chapter. 4-8 Installing and Removing Drives Replace the system cover according to your hard disk drive. (If you removed the hard disk drive cable from the motherboard, replace it with the retaining screw, as shown below. 8. Slide the HDD bracket into the chassis and secure it .) 9.

User Guide
Page 33
... a hard disk drive, most optional devices have jumpers that must set to CS (Cable Select). Remove the faceplate cover from the chassis using your optional device to use the spare connector of your finger. 7. Make sure the jumper of optional drive you want to CS (Cable Select). If you set for the drive to work properly with your system recognizes the device according to location of the cable connector that covers the 5.25-inch drive bay you can use the...
... a hard disk drive, most optional devices have jumpers that must set to CS (Cable Select). Remove the faceplate cover from the chassis using your optional device to use the spare connector of your finger. 7. Make sure the jumper of optional drive you want to CS (Cable Select). If you set for the drive to work properly with your system recognizes the device according to location of the cable connector that covers the 5.25-inch drive bay you can use the...
User Guide
Page 34
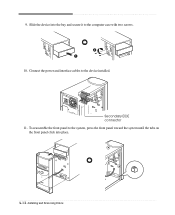
Slide the device into place. 4-12 Installing and Removing Drives Secondary EIDE connector 11. 9. To reassemble the front panel to the system, press the front panel toward the system until the tabs on the front panel click into the bay and secure it to the device installed. Connect the power and interface cables to the computer case with two screws. 10.
Slide the device into place. 4-12 Installing and Removing Drives Secondary EIDE connector 11. 9. To reassemble the front panel to the system, press the front panel toward the system until the tabs on the front panel click into the bay and secure it to the device installed. Connect the power and interface cables to the computer case with two screws. 10.
User Guide
Page 37
... on your hard disk since you must reinstall any software not originally installed on your system. Using the Restore CDs 5-1 And you don't want to restore your original preinstalled software: 1. Restoring Your Original Software The Restore CDs contain a copy of all software (e.g., Windows, drivers, and application programs) originally preinstalled on the computer. 2. After restoring, you purchased your hard disk. When the Microsoft Windows Startup Menu appears, type the number 1 and press Enter. Follow...
... on your hard disk since you must reinstall any software not originally installed on your system. Using the Restore CDs 5-1 And you don't want to restore your original preinstalled software: 1. Restoring Your Original Software The Restore CDs contain a copy of all software (e.g., Windows, drivers, and application programs) originally preinstalled on the computer. 2. After restoring, you purchased your hard disk. When the Microsoft Windows Startup Menu appears, type the number 1 and press Enter. Follow...

User Guide
Page 39
... next media and press enter to continue..." NOTE Depending on the model, your personal information. Press Enter to continue. 9. 7. And press Enter to restart your hard disk. 10. You can update drivers in the optical drive while your computer, follow the displayed messages. Using the Restore CDs 5-3 In this case, the "Microsoft Windows Startup Menu" menu will start. To register with #2 in the Drivers folder of you lose drivers, install these by using your...
... next media and press enter to continue..." NOTE Depending on the model, your personal information. Press Enter to continue. 9. 7. And press Enter to restart your hard disk. 10. You can update drivers in the optical drive while your computer, follow the displayed messages. Using the Restore CDs 5-3 In this case, the "Microsoft Windows Startup Menu" menu will start. To register with #2 in the Drivers folder of you lose drivers, install these by using your...

User Guide
Page 43
... outlet works, plug other wall outlet. Hard Disk Drive Cause Hard disk drive operation seems slow Hard disk drive access indicator light stays on Solution The files stored on the computer, refer to the followings: Unplug the power cord to turn on your computer and wait about 10 seconds for complete discharge and re-plug the power cord. Then press the power button. Make sure the power cord is not working , use other device (such...
... outlet works, plug other wall outlet. Hard Disk Drive Cause Hard disk drive operation seems slow Hard disk drive access indicator light stays on Solution The files stored on the computer, refer to the followings: Unplug the power cord to turn on your computer and wait about 10 seconds for complete discharge and re-plug the power cord. Then press the power button. Make sure the power cord is not working , use other device (such...
User Guide
Page 44
... click Volume Control. CD/DVD has been inserted upside down . Try another CD/DVD. Optical Drive Cause The optical drive cannot read CD The DVD-ROM drive takes about 5 to 10 seconds after using the Master Volume window. Volume is not properly seated in computer stores). A-2 Solving Common Problems Audio Cause How do I press the eject button Solution CD/DVD is turned down . Click the Start button, point to...
... click Volume Control. CD/DVD has been inserted upside down . Try another CD/DVD. Optical Drive Cause The optical drive cannot read CD The DVD-ROM drive takes about 5 to 10 seconds after using the Master Volume window. Volume is not properly seated in computer stores). A-2 Solving Common Problems Audio Cause How do I press the eject button Solution CD/DVD is turned down . Click the Start button, point to...

User Guide
Page 45
... not properly connected to the video connector of the diskette to your Windows Help in Windows. Use another diskette that the monitor connector is unformatted. Your current screen will reappear. You have a screen blanking utility installed or your mouse. Format the diskette. (Refer to the Windows Help. To open Windows Help, click the Start button, and then click Help and Support.) Display & Monitor Cause The monitor doesn't work How do I change the display resolution and...
... not properly connected to the video connector of the diskette to your Windows Help in Windows. Use another diskette that the monitor connector is unformatted. Your current screen will reappear. You have a screen blanking utility installed or your mouse. Format the diskette. (Refer to the Windows Help. To open Windows Help, click the Start button, and then click Help and Support.) Display & Monitor Cause The monitor doesn't work How do I change the display resolution and...
User Guide
Page 46
Keyboard Cause Keyboard doesn't work Solution Mouse isn't firmly or securely connected to the keyboard connector. Mouse Cause Mouse doesn't work Solution Keyboard isn't firmly or securely connected to the mouse connector. To clean the mouse ball, remove the mouse ball by unscrewing the bottom of your computer, not the keyboard connector. Then clean the mouse ball with a damp cloth and replace the mouse ball. Mouse needs cleaning. A-4 Solving Common Problems Check that the mouse is connected to...
Keyboard Cause Keyboard doesn't work Solution Mouse isn't firmly or securely connected to the keyboard connector. Mouse Cause Mouse doesn't work Solution Keyboard isn't firmly or securely connected to the mouse connector. To clean the mouse ball, remove the mouse ball by unscrewing the bottom of your computer, not the keyboard connector. Then clean the mouse ball with a damp cloth and replace the mouse ball. Mouse needs cleaning. A-4 Solving Common Problems Check that the mouse is connected to...


