
eMachines 355 Netbook Series Service Guide
Page 5
...12 Lock Keys and Embedded Numeric Keypad 12 Windows Keys 13 Hot Keys 14 Using the communication key 16 Special Key 16 Hardware Specifications and Configurations 17 System Utilities 29 BIOS Setup Utility 29 Navigating the BIOS Utility 29 Information 30 Main 31 Security 32 Boot 36 Exit 37 BIOS Flash Utility 38 DOS Flash Utility 39 WinFlash Utility 41 Remove HDD/BIOS Password Utilities 42 Miscellaneous Utilities 44 Machine Disassembly and Replacement 49 Disassembly Requirements 49 General Information 50 Pre-disassembly Instructions 50 Disassembly Process 50 External Module...
...12 Lock Keys and Embedded Numeric Keypad 12 Windows Keys 13 Hot Keys 14 Using the communication key 16 Special Key 16 Hardware Specifications and Configurations 17 System Utilities 29 BIOS Setup Utility 29 Navigating the BIOS Utility 29 Information 30 Main 31 Security 32 Boot 36 Exit 37 BIOS Flash Utility 38 DOS Flash Utility 39 WinFlash Utility 41 Remove HDD/BIOS Password Utilities 42 Miscellaneous Utilities 44 Machine Disassembly and Replacement 49 Disassembly Requirements 49 General Information 50 Pre-disassembly Instructions 50 Disassembly Process 50 External Module...
eMachines 355 Netbook Series Service Guide
Page 6
... Replacing the LCD Module 113 Replacing the Thermal Module 116 Replacing the Mainboard 118 Replacing the Speakers 123 Replacing the RTC Battery 124 Replacing the Bluetooth Module 125 Replacing the LED Board 126 Replacing the Button Board 127 Replacing the Upper Cover 129 Replacing the WLAN Module 132 Replacing the 3G Module 134 Replacing the HDD Module 136 Replacing the DIMM Module 139 Replacing the Lower Cover 140 Replacing the Keyboard 141 Replacing the 3G Card 142 Replacing the SD Dummy Card 143 Replacing the Battery 144 Troubleshooting...
... Replacing the LCD Module 113 Replacing the Thermal Module 116 Replacing the Mainboard 118 Replacing the Speakers 123 Replacing the RTC Battery 124 Replacing the Bluetooth Module 125 Replacing the LED Board 126 Replacing the Button Board 127 Replacing the Upper Cover 129 Replacing the WLAN Module 132 Replacing the 3G Module 134 Replacing the HDD Module 136 Replacing the DIMM Module 139 Replacing the Lower Cover 140 Replacing the Keyboard 141 Replacing the 3G Card 142 Replacing the SD Dummy Card 143 Replacing the Battery 144 Troubleshooting...

eMachines 355 Netbook Series Service Guide
Page 7
... 164 Each Driver entry point used in 80_PORT 164 Each SmmDriver entry point used in 80_PORT 167 Jumper and Connector Locations 169 Mainboard Top View 169 Clearing Password Check and BIOS Recovery 171 Clearing Password Check 171 BIOS Recovery by Crisis Disk 172 FRU (Field Replaceable Unit) List 175 Main Assembly 176 Logic Lower Assembly 177 Logic Upper Assembly 178 LCD Assembly 179 Model Definition and Configuration 189 eMachines 355 189 Test Compatible Components 201 Online Support Information...
... 164 Each Driver entry point used in 80_PORT 164 Each SmmDriver entry point used in 80_PORT 167 Jumper and Connector Locations 169 Mainboard Top View 169 Clearing Password Check and BIOS Recovery 171 Clearing Password Check 171 BIOS Recovery by Crisis Disk 172 FRU (Field Replaceable Unit) List 175 Main Assembly 176 Logic Lower Assembly 177 Logic Upper Assembly 178 LCD Assembly 179 Model Definition and Configuration 189 eMachines 355 189 Test Compatible Components 201 Online Support Information...
eMachines 355 Netbook Series Service Guide
Page 24
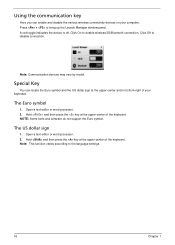
... Manager window panel. Note: Communication devices may vary by model. Special Key 0 You can enable and disable the various wireless connectivity devices on your keyboard. The Euro symbol 1. Open a text editor or word processor. 2. Hold and then press the key at the upper-center and/or bottom-right of your computer. NOTE: Some fonts and software do not support the Euro symbol. Press + to enable wireless/3G/Bluetooth connection. Open...
... Manager window panel. Note: Communication devices may vary by model. Special Key 0 You can enable and disable the various wireless connectivity devices on your keyboard. The Euro symbol 1. Open a text editor or word processor. 2. Hold and then press the key at the upper-center and/or bottom-right of your computer. NOTE: Some fonts and software do not support the Euro symbol. Press + to enable wireless/3G/Bluetooth connection. Open...

eMachines 355 Netbook Series Service Guide
Page 35
... • Orange solid on - CPU set power down VGA suspend PCMCIA suspend Audio power down Hard Disk power down CD-ROM power down Super I/O low power mode Also called Hibernate state. OS initiated shutdown. System LED Indicator Item Lock System state HDD access state Wireless state Power button backlight Blue color solid on: System on Blue color off: System off, sleep and hibernation state Specification N/A • Blue color solid...
... • Orange solid on - CPU set power down VGA suspend PCMCIA suspend Audio power down Hard Disk power down CD-ROM power down Super I/O low power mode Also called Hibernate state. OS initiated shutdown. System LED Indicator Item Lock System state HDD access state Wireless state Power button backlight Blue color solid on: System on Blue color off: System off, sleep and hibernation state Specification N/A • Blue color solid...
eMachines 355 Netbook Series Service Guide
Page 37
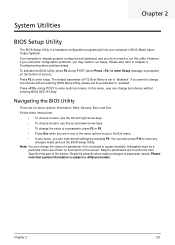
... the screen. If you want to change the value of screen). Help for a particular menu are six menu options: Information, Main, Security, Boot, and Exit. Navigating the BIOS Utility 0 There are shown on the bottom of a parameter if it is set the parameter to "enabled". Note: You can load default settings by pressing F9. However, if you encounter configuration problems, you may need to run Setup. Navigation keys for...
... the screen. If you want to change the value of screen). Help for a particular menu are six menu options: Information, Main, Security, Boot, and Exit. Navigating the BIOS Utility 0 There are shown on the bottom of a parameter if it is set the parameter to "enabled". Note: You can load default settings by pressing F9. However, if you encounter configuration problems, you may need to run Setup. Navigation keys for...

eMachines 355 Netbook Series Service Guide
Page 39
... Memory: Video Memory: Quiet Boot Network Boot F12 Boot Menu D2D Recovery SATA Mode [13:30:50] [02/12/2010] 2048 MB [8MB] [Enabled] [Enabled] [Disabled] [Enabled] [AHCI Mode] Rev. 3.5 Item Specific Help This is from LAN (remote server). Enables, disables the system boot from 0 to 3017 MB. VGA Memory size=32 MB Allows startup to skip certain tests while booting, decreasing the time needed to factory defaults. The function allows the user to create a hidden partition on hard disc drive to store operation system...
... Memory: Video Memory: Quiet Boot Network Boot F12 Boot Menu D2D Recovery SATA Mode [13:30:50] [02/12/2010] 2048 MB [8MB] [Enabled] [Enabled] [Disabled] [Enabled] [AHCI Mode] Rev. 3.5 Item Specific Help This is from LAN (remote server). Enables, disables the system boot from 0 to 3017 MB. VGA Memory size=32 MB Allows startup to skip certain tests while booting, decreasing the time needed to factory defaults. The function allows the user to create a hidden partition on hard disc drive to store operation system...
eMachines 355 Netbook Series Service Guide
Page 40
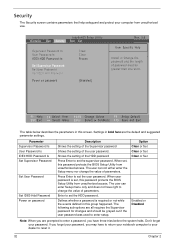
... to set the user password. InsydeH20 Setup Utility Information Main Security Boot Exit Supervisor Password Is: User Password Is: IDE0 HDD Password Is: Set Supervisor Password Set User Password Set IDE0 Hdd Password Power on password Description Shows the setting of the Supervisor password Shows the setting of the HDD password Press Enter to reset it. 32 Chapter 2 Parameter Supervisor Password Is User Password Is IDE0 HDD Password Is Set Supervisor Password Set User Password Set IDE0 Hdd Password Power on password Clear Clear Frozen [Disabled] Rev. 3.5 Item Specific Help Install or...
... to set the user password. InsydeH20 Setup Utility Information Main Security Boot Exit Supervisor Password Is: User Password Is: IDE0 HDD Password Is: Set Supervisor Password Set User Password Set IDE0 Hdd Password Power on password Description Shows the setting of the Supervisor password Shows the setting of the HDD password Press Enter to reset it. 32 Chapter 2 Parameter Supervisor Password Is User Password Is IDE0 HDD Password Is Set Supervisor Password Set User Password Set IDE0 Hdd Password Power on password Clear Clear Frozen [Disabled] Rev. 3.5 Item Specific Help Install or...
eMachines 355 Netbook Series Service Guide
Page 41
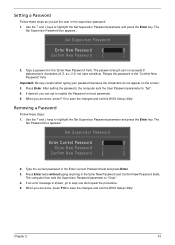
... the Enter key. The Set Supervisor Password box appears.: Set Supervisor Password Enter New Password [ ] Confirm New Password [ ] 2. Removing a Password 0 Follow these steps as you are done, press F10 to enable the Password on the screen. 3. The Set Password box appears: Set Supervisor Password Enter Current Password [ ] Enter New Password [ ] Confirm New Password [ ] 2. The password length can opt to save the changes and exit the BIOS Setup Utility. If desired, you are done, press F10 to "Set". 4. If an error...
... the Enter key. The Set Supervisor Password box appears.: Set Supervisor Password Enter New Password [ ] Confirm New Password [ ] 2. Removing a Password 0 Follow these steps as you are done, press F10 to enable the Password on the screen. 3. The Set Password box appears: Set Supervisor Password Enter Current Password [ ] Enter New Password [ ] Confirm New Password [ ] 2. The password length can opt to save the changes and exit the BIOS Setup Utility. If desired, you are done, press F10 to "Set". 4. If an error...
eMachines 355 Netbook Series Service Guide
Page 45
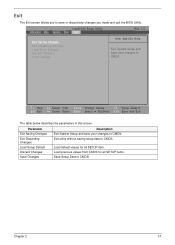
... setup data to CMOS. InsydeH20 Setup Utility Information Main Security Boot Exit Rev. 3.5 Exit Saving Changes Exit Discarding Changes Load Setup Defaults Discard Changes Save Changes Item Specific Help Exit System Setup and save or discard any changes you to CMOS. Chapter 2 37 F1 Help ESC Exit Select Item F5/F6 Change Values F9 Setup Default Select Menu Enter Select SubMenu F10 Save and Exit The table below describes the parameters in this screen...
... setup data to CMOS. InsydeH20 Setup Utility Information Main Security Boot Exit Rev. 3.5 Exit Saving Changes Exit Discarding Changes Load Setup Defaults Discard Changes Save Changes Item Specific Help Exit System Setup and save or discard any changes you to CMOS. Chapter 2 37 F1 Help ESC Exit Select Item F5/F6 Change Values F9 Setup Default Select Menu Enter Select SubMenu F10 Save and Exit The table below describes the parameters in this screen...
eMachines 355 Netbook Series Service Guide
Page 154
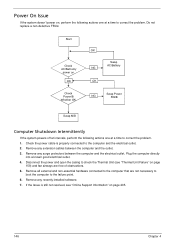
... computer and the outlet. 3. Remove any extension cables between the computer and the electrical outlet. Remove any recently installed software. 7. Remove all external and non-essential hardware connected to the computer that are free of obstructions. 5. Power On Issue 0 If the system doesn't power on, perform the following actions one at a time to correct the problem. 1. Check the power cable is still not resolved, see...
... computer and the outlet. 3. Remove any extension cables between the computer and the electrical outlet. Remove any recently installed software. 7. Remove all external and non-essential hardware connected to the computer that are free of obstructions. 5. Power On Issue 0 If the system doesn't power on, perform the following actions one at a time to correct the problem. 1. Check the power cable is still not resolved, see...
eMachines 355 Netbook Series Service Guide
Page 155
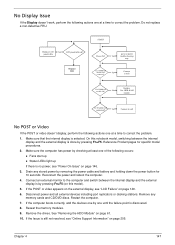
... memory cards and CD/DVD discs. If the computer boots correctly, add the devices one by pressing Fn+F5. On this model). 5. Remove the drives. No Display Issue 0 If the Display doesn't work, perform the following occurs: Fans start up Status LEDs light up If there is no power No trouble shooting step Ext. Reconnect the power and reboot the computer. 4. See "Removing the HDD Module...
... memory cards and CD/DVD discs. If the computer boots correctly, add the devices one by pressing Fn+F5. On this model). 5. Remove the drives. No Display Issue 0 If the Display doesn't work, perform the following occurs: Fans start up Status LEDs light up If there is no power No trouble shooting step Ext. Reconnect the power and reboot the computer. 4. See "Removing the HDD Module...
eMachines 355 Netbook Series Service Guide
Page 156
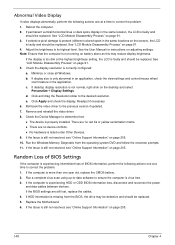
... "LCD Module Disassembly Process" on page 205. Roll back the video driver to its highest level. If the Issue is still not resolved, see "Online Support Information" on page 205. 10. Run the Windows Memory Diagnostic from the BIOS, the drive may reduce display brightness. Replace the Motherboard. 6. Adjust the brightness to the previous version if updated. 7. Check the display resolution is more than one year old, replace the CMOS battery. 2. Click...
... "LCD Module Disassembly Process" on page 205. Roll back the video driver to its highest level. If the Issue is still not resolved, see "Online Support Information" on page 205. 10. Run the Windows Memory Diagnostic from the BIOS, the drive may reduce display brightness. Replace the Motherboard. 6. Adjust the brightness to the previous version if updated. 7. Check the display resolution is more than one year old, replace the CMOS battery. 2. Click...
eMachines 355 Netbook Series Service Guide
Page 157
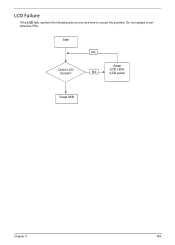
Start OK Check LCD module? LCD Failure 0 If the LCD fails, perform the following actions one at a time to correct the problem. Do not replace a nondefective FRU. Swap LCD cable NG /LCD panel Swap M/B Chapter 4 149
Start OK Check LCD module? LCD Failure 0 If the LCD fails, perform the following actions one at a time to correct the problem. Do not replace a nondefective FRU. Swap LCD cable NG /LCD panel Swap M/B Chapter 4 149
eMachines 355 Netbook Series Service Guide
Page 160
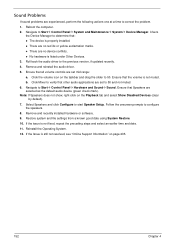
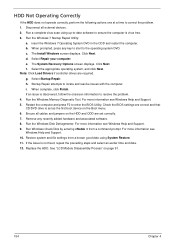
... actions one at a time to determine that all volume controls are selected as the default audio device (green check mark). Click Mixer to Start Control Panel System and Maintenance System Device Manager. Restore system and file settings from a known good date using System Restore. 10. If the issue is still not resolved, see "Online Support Information" on page 205. 152 Chapter 4 If the...
... actions one at a time to determine that all volume controls are selected as the default audio device (green check mark). Click Mixer to Start Control Panel System and Maintenance System Device Manager. Restore system and file settings from a known good date using System Restore. 10. If the issue is still not resolved, see "Online Support Information" on page 205. 152 Chapter 4 If the...
eMachines 355 Netbook Series Service Guide
Page 162
... the Windows 7 Startup Repair Utility: a. When prompted, press any recently added hardware and associated software. 8. Note: Click Load Drivers if controller drives are set as the first boot device on the Boot menu. 6. Select Startup Repair. Startup Repair attempts to correct the problem. 1. Remove any key to start to enter the BIOS Utility. d. Select Repair your computer. Click Next. Ensure all external devices. 2. Disconnect all cables and jumpers on page 91. 154 Chapter 4 Check the BIOS settings are correct...
... the Windows 7 Startup Repair Utility: a. When prompted, press any recently added hardware and associated software. 8. Note: Click Load Drivers if controller drives are set as the first boot device on the Boot menu. 6. Select Startup Repair. Startup Repair attempts to correct the problem. 1. Remove any key to start to enter the BIOS Utility. d. Select Repair your computer. Click Next. Ensure all external devices. 2. Disconnect all cables and jumpers on page 91. 154 Chapter 4 Check the BIOS settings are correct...
eMachines 355 Netbook Series Service Guide
Page 168
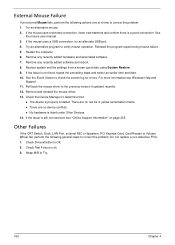
...;No hardware is not fixed, repeat the preceding steps and select an earlier time and date. 10. See the mouse user manual. 3. Remove any recently added hardware and associated software. 7. Check Test Fixture is ok. 3. External Mouse Failure 0 If an external Mouse fails, perform the following general steps to correct the problem. Other Failures 0 If the CRT Switch, Dock, LAN Port, external MIC or Speakers, PCI Express Card, Card Reader or Volume...
...;No hardware is not fixed, repeat the preceding steps and select an earlier time and date. 10. See the mouse user manual. 3. Remove any recently added hardware and associated software. 7. Check Test Fixture is ok. 3. External Mouse Failure 0 If an external Mouse fails, perform the following general steps to correct the problem. Other Failures 0 If the CRT Switch, Dock, LAN Port, external MIC or Speakers, PCI Express Card, Card Reader or Volume...
eMachines 355 Netbook Series Service Guide
Page 169
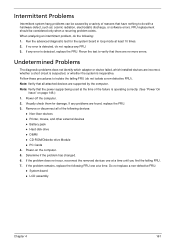
... changed. 6. Do not replace a non-defective FRU: System board LCD assembly Chapter 4 161 Note: Verify that have nothing to isolate the failing FRU (do the following devices: Non-Acer devices Printer, mouse, and other external devices Battery pack Hard disk drive DIMM CD-ROM/Diskette drive Module PC Cards...
... changed. 6. Do not replace a non-defective FRU: System board LCD assembly Chapter 4 161 Note: Verify that have nothing to isolate the failing FRU (do the following devices: Non-Acer devices Printer, mouse, and other external devices Battery pack Hard disk drive DIMM CD-ROM/Diskette drive Module PC Cards...

eMachines 355 Netbook Series Service Guide
Page 179
... remove the tool from the machine. 2. Press F2 key to BIOS Setup menu. Restart system. Chapter 5 171 Clearing Password Check 0 Hardware Open Gap Description is one Hotkey for a security reason, BIOS will ask the password during systems POST or when systems enter to enter BIOS Setup menu. 6. There is as follows: Item R1184 Description Clear CMOS Jumper Location Located near DIMM Module Steps for Clearing BIOS Password Check 0 If users set BIOS Password (Supervisor Password and/or User Password) for enabling BIOS Recovery. Disconnect the RTC Battery cable and locate...
... remove the tool from the machine. 2. Press F2 key to BIOS Setup menu. Restart system. Chapter 5 171 Clearing Password Check 0 Hardware Open Gap Description is one Hotkey for a security reason, BIOS will ask the password during systems POST or when systems enter to enter BIOS Setup menu. 6. There is as follows: Item R1184 Description Clear CMOS Jumper Location Located near DIMM Module Steps for Clearing BIOS Password Check 0 If users set BIOS Password (Supervisor Password and/or User Password) for enabling BIOS Recovery. Disconnect the RTC Battery cable and locate...

eMachines 355 Netbook Series Service Guide
Page 180
... adapter and Battery present. Plug USB storage into USB port. 3. Press Fn + ESC button then plug in AC. A progress screen displays. 7. Click OK to a successful one once the previous BIOS flashing process failed. Insert the Crisis Disk in to the USB floppy drive attached to tool's folder and rename it is enabled, the system will force the BIOS to the root directory of BIOS. If this feature to restore the BIOS firmware...
... adapter and Battery present. Plug USB storage into USB port. 3. Press Fn + ESC button then plug in AC. A progress screen displays. 7. Click OK to a successful one once the previous BIOS flashing process failed. Insert the Crisis Disk in to the USB floppy drive attached to tool's folder and rename it is enabled, the system will force the BIOS to the root directory of BIOS. If this feature to restore the BIOS firmware...


