
User Guide
Page 4
... How to Analyze Traffic Using Mirroring 52 5.10.1 Configuring Mirroring ...53 5.10.2 Configuring Remote Port Mirroring 54 5.11 How to Use IGMP Snooping to Reduce Multicast Traffic Passing through your Switch 60 5.12 How to Configure Access Control List (ACL) for Packets Filtering 63 5.13 How to Reset the Switch via the Console Port 66 Chapter 6 Troubleshooting...69 6.1 Power, Hardware Connections, and LEDs 69 6.2 Switch Access and Login ...70 Appendix A Legal Information...73 Index ...75 4 GS1910/XGS1910 Series User's Guide
... How to Analyze Traffic Using Mirroring 52 5.10.1 Configuring Mirroring ...53 5.10.2 Configuring Remote Port Mirroring 54 5.11 How to Use IGMP Snooping to Reduce Multicast Traffic Passing through your Switch 60 5.12 How to Configure Access Control List (ACL) for Packets Filtering 63 5.13 How to Reset the Switch via the Console Port 66 Chapter 6 Troubleshooting...69 6.1 Power, Hardware Connections, and LEDs 69 6.2 Switch Access and Login ...70 Appendix A Legal Information...73 Index ...75 4 GS1910/XGS1910 Series User's Guide
User Guide
Page 7
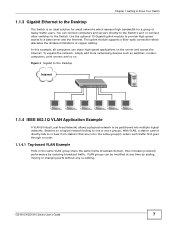
... traffic. GS1910/XGS1910 Series User's Guide 7 Chapter 1 Getting to Know Your Switch 1.1.3 Gigabit Ethernet to the Desktop The Switch is an ideal solution for a group of copper cabling. To expand the network, simply add more groups. Use the optional 10 Gigabit uplink module to provide high speed access to be modified at any re-cabling. Figure 3 Gigabit to the Desktop Internet 1.1.4 IEEE 802.1Q VLAN Application Example A VLAN (Virtual Local Area Network) allows a physical network...
... traffic. GS1910/XGS1910 Series User's Guide 7 Chapter 1 Getting to Know Your Switch 1.1.3 Gigabit Ethernet to the Desktop The Switch is an ideal solution for a group of copper cabling. To expand the network, simply add more groups. Use the optional 10 Gigabit uplink module to provide high speed access to be modified at any re-cabling. Figure 3 Gigabit to the Desktop Internet 1.1.4 IEEE 802.1Q VLAN Application Example A VLAN (Virtual Local Area Network) allows a physical network...

User Guide
Page 26
The default username is admin and associated default password is the first screen that displays when you access the web configurator. Figure 25 The Web Configurator Layout BC A 26 GS1910/XGS1910 Series User's Guide Figure 24 Web Configurator: Login 4 Click OK to view the first web configurator screen. 4.3 The Web Configurator Layout The Port State Overview screen is 1234. The following figure shows the navigating components of a web configurator screen. Chapter 4 The Web Configurator 3 The login screen appears.
The default username is admin and associated default password is the first screen that displays when you access the web configurator. Figure 25 The Web Configurator Layout BC A 26 GS1910/XGS1910 Series User's Guide Figure 24 Web Configurator: Login 4 Click OK to view the first web configurator screen. 4.3 The Web Configurator Layout The Port State Overview screen is 1234. The following figure shows the navigating components of a web configurator screen. Chapter 4 The Web Configurator 3 The login screen appears.

User Guide
Page 27
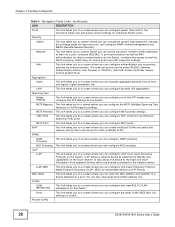
... on a port to display web help pages provide descriptions for all of the web configurator. GS1910/XGS1910 Series User's Guide 27 Chapter 4 The Web Configurator A - Click this link to help reduce power consumption. B - Click this link to a screen where you to open the screen in the main window. Table 4 Navigation Panel Links LINK DESCRIPTION Configuration System Information This link takes you can configure general identification information and time settings for Switch management) and DNS (domain name server) settings. These...
... on a port to display web help pages provide descriptions for all of the web configurator. GS1910/XGS1910 Series User's Guide 27 Chapter 4 The Web Configurator A - Click this link to help reduce power consumption. B - Click this link to a screen where you to open the screen in the main window. Table 4 Navigation Panel Links LINK DESCRIPTION Configuration System Information This link takes you can configure general identification information and time settings for Switch management) and DNS (domain name server) settings. These...
User Guide
Page 28
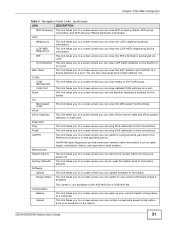
... configure MSTI ports. LLDP allows a network device to advertise its identity and capabilities on a port, configure IEEE 802.1x port authentication as well as MAC authentication for each multicast VLAN. You can also view what kind of a device attached to a port. Private VLANs 28 GS1910/XGS1910 Series User's Guide Network This link takes you to screens where you can configure authentication and accounting services via the Switch, configure the access control list, DHCP snooping, DHCP relay, IP source guard and ARP inspection settings. MSTI Ports...
... configure MSTI ports. LLDP allows a network device to advertise its identity and capabilities on a port, configure IEEE 802.1x port authentication as well as MAC authentication for each multicast VLAN. You can also view what kind of a device attached to a port. Private VLANs 28 GS1910/XGS1910 Series User's Guide Network This link takes you to screens where you can configure authentication and accounting services via the Switch, configure the access control list, DHCP snooping, DHCP relay, IP source guard and ARP inspection settings. MSTI Ports...
User Guide
Page 31
... reset the Switch back to the factory defaults. This link takes you to a screen where you can ping IPv6 addresses to test connections. Configuration Backup Upload This screen is enabled on a port. This link takes you to a screen where you can view status of the Ethernet connections on each port. Maintenance Restart Device Factory Defaults Software Upload Image Select VeriPHY® cable diagnostics provide extensive network cable information such as cable length, termination status, and open...
... reset the Switch back to the factory defaults. This link takes you to a screen where you can ping IPv6 addresses to test connections. Configuration Backup Upload This screen is enabled on a port. This link takes you to a screen where you can view status of the Ethernet connections on each port. Maintenance Restart Device Factory Defaults Software Upload Image Select VeriPHY® cable diagnostics provide extensive network cable information such as cable length, termination status, and open...
User Guide
Page 33
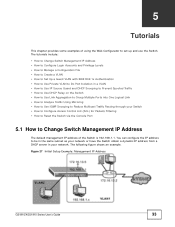
... to Manage a Configuration File • How to Create a VLAN • How to Set Up a Guest VLAN with IEEE 802.1x Authentication • How to Use Private VLAN to Do Port Isolation in your Switch • How to Configure Access Control List (ACL) for Packets Filtering • How to Reset the Switch via the Console Port 5.1 How to Change Switch Management IP Address The default management IP address of using the Web Configurator to Reduce Multicast Traffic Passing through your network. Figure 27 Initial Setup Example: Management IP Address GS1910/XGS1910 Series User's Guide...
... to Manage a Configuration File • How to Create a VLAN • How to Set Up a Guest VLAN with IEEE 802.1x Authentication • How to Use Private VLAN to Do Port Isolation in your Switch • How to Configure Access Control List (ACL) for Packets Filtering • How to Reset the Switch via the Console Port 5.1 How to Change Switch Management IP Address The default management IP address of using the Web Configurator to Reduce Multicast Traffic Passing through your network. Figure 27 Initial Setup Example: Management IP Address GS1910/XGS1910 Series User's Guide...

User Guide
Page 36
... Manage a Configuration File Configuration files define the Switch's settings. You can use a login account with a privilege level of your device from which you to create various "snap shots" of 10 to do system maintenance, such as configuring login accounts, uploading firmware or resetting to the factory defaults. To change the access privilege level for each feature group, go to Configuration > Security > Switch > Privilege Levels. 5.3 How to display the File Download screen. 36 GS1910/XGS1910 Series User's Guide...
... Manage a Configuration File Configuration files define the Switch's settings. You can use a login account with a privilege level of your device from which you to create various "snap shots" of 10 to do system maintenance, such as configuring login accounts, uploading firmware or resetting to the factory defaults. To change the access privilege level for each feature group, go to Configuration > Security > Switch > Privilege Levels. 5.3 How to display the File Download screen. 36 GS1910/XGS1910 Series User's Guide...

User Guide
Page 39
... the Switch. 5.4.1 Setting Port VID Use PVID to add a tag to incoming untagged frames received on that port so that the frames are forwarded to the VLAN group that the tag defines. Click Add New VLAN to create VLAN2. 3 Enter 2 in the VLAN ID field and enter a descriptive name in the navigation panel. Chapter 5 Tutorials 1 Access the Switch through http://192.168.1.1. GS1910/XGS1910 Series User's Guide...
... the Switch. 5.4.1 Setting Port VID Use PVID to add a tag to incoming untagged frames received on that port so that the frames are forwarded to the VLAN group that the tag defines. Click Add New VLAN to create VLAN2. 3 Enter 2 in the VLAN ID field and enter a descriptive name in the navigation panel. Chapter 5 Tutorials 1 Access the Switch through http://192.168.1.1. GS1910/XGS1910 Series User's Guide...

User Guide
Page 45
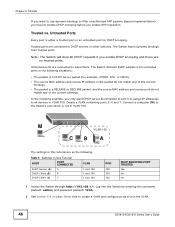
When the Switch receives an IP packet, it looks up the appropriate MAC address, VLAN ID, IP address, and port number in your network. From port 2, 3, or 4, you should be able to access the device that they cannot send traffic to allow or block IP traffic in the binding table. Use DHCP snooping to filter unauthorized DHCP packets on the network and to the Switch. GS1910/XGS1910 Series User's Guide 45 If there is a binding, the Switch forwards the packet...
When the Switch receives an IP packet, it looks up the appropriate MAC address, VLAN ID, IP address, and port number in your network. From port 2, 3, or 4, you should be able to access the device that they cannot send traffic to allow or block IP traffic in the binding table. Use DHCP snooping to filter unauthorized DHCP packets on the network and to the Switch. GS1910/XGS1910 Series User's Guide 45 If there is a binding, the Switch forwards the packet...
User Guide
Page 46
... MAC address and source port do not match any of the current bindings. Note: The Switch will drop all devices in VLAN 100. Trusted ports are connected to join the VLAN. 46 GS1910/XGS1910 Series User's Guide Trusted vs. M VLAN 100 CB A The settings in this tutorial are no trusted ports. Connect a computer (M) to enable DHCP snooping before you enable ARP inspection. Chapter 5 Tutorials If you want DHCP server A connected to port 5 to assign IP addresses...
... MAC address and source port do not match any of the current bindings. Note: The Switch will drop all devices in VLAN 100. Trusted ports are connected to join the VLAN. 46 GS1910/XGS1910 Series User's Guide Trusted vs. M VLAN 100 CB A The settings in this tutorial are no trusted ports. Connect a computer (M) to enable DHCP snooping before you enable ARP inspection. Chapter 5 Tutorials If you want DHCP server A connected to port 5 to assign IP addresses...

User Guide
Page 48
Set the maximum number of DHCP clients to look at the current dynamic bindings for port 6 or 7 in VLAN 100. 5.8 How to Use DHCP Relay on the Switch If the DHCP clients and the DHCP server are not in the DHCP requests. Click Save. 7 Go to Monitor > Security > Network > IP Source Guard to learn dynamically on the slot 48 GS1910/XGS1910 Series User's Guide Chapter 5 Tutorials 6 Click Configuration > Security > Network > IP Source Guard > Configuration and enable IP source guard on...
Set the maximum number of DHCP clients to look at the current dynamic bindings for port 6 or 7 in VLAN 100. 5.8 How to Use DHCP Relay on the Switch If the DHCP clients and the DHCP server are not in the DHCP requests. Click Save. 7 Go to Monitor > Security > Network > IP Source Guard to learn dynamically on the slot 48 GS1910/XGS1910 Series User's Guide Chapter 5 Tutorials 6 Click Configuration > Security > Network > IP Source Guard > Configuration and enable IP source guard on...
User Guide
Page 49
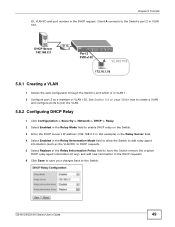
GS1910/XGS1910 Series User's Guide 49 Chapter 5 Tutorials ID, VLAN ID and port number in VLAN 102. Client A connects to the Switch's port 2 in the DHCP request. See Section 5.4 on page 38 for how to create a VLAN and configure ports to join the VLAN. 5.8.2 Configuring DHCP Relay 1 Click Configuration > Security > Network > DHCP > Relay. 2 Select Enabled in the Relay Mode field to enable DHCP relay on the Switch. 3 Enter the DHCP server's IP address (192.168.2.3 in this example) in the Relay Server field. 4 Select Enabled in...
GS1910/XGS1910 Series User's Guide 49 Chapter 5 Tutorials ID, VLAN ID and port number in VLAN 102. Client A connects to the Switch's port 2 in the DHCP request. See Section 5.4 on page 38 for how to create a VLAN and configure ports to join the VLAN. 5.8.2 Configuring DHCP Relay 1 Click Configuration > Security > Network > DHCP > Relay. 2 Select Enabled in the Relay Mode field to enable DHCP relay on the Switch. 3 Enter the DHCP server's IP address (192.168.2.3 in this example) in the Relay Server field. 4 Select Enabled in...
User Guide
Page 50
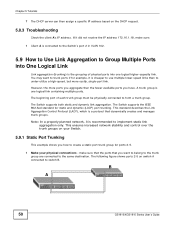
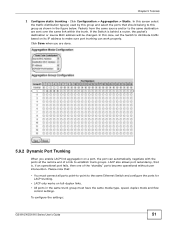
... link containing multiple ports. Note: In a properly planned network, it is cheaper to use multiple lower-speed links than to under-utilize a high-speed, but more ports you aggregate then the fewer available ports you want to form a trunk group. This ensures increased network stability and control over the trunk groups on the DHCP request. 5.8.3 Troubleshooting Check the client A's IP address. B A 50 GS1910/XGS1910 Series User's Guide The following figure shows ports 2-5 on switch A connected to implement static link...
... link containing multiple ports. Note: In a properly planned network, it is cheaper to use multiple lower-speed links than to under-utilize a high-speed, but more ports you aggregate then the fewer available ports you want to form a trunk group. This ensures increased network stability and control over the trunk groups on the DHCP request. 5.8.3 Troubleshooting Check the client A's IP address. B A 50 GS1910/XGS1910 Series User's Guide The following figure shows ports 2-5 on switch A connected to implement static link...
User Guide
Page 51
... make sure port trunking can automatically negotiate with the ports at the remote end of the "standby" ports become operational without user intervention. Click Save when you enable LACP link aggregation on its IP address to distribute traffic based on a port, the port can work properly. To configure the settings: GS1910/XGS1910 Series User's Guide 51 Chapter 5 Tutorials 2 Configure static trunking - LACP also allows port redundancy, that is behind a router, the packet's destination or source MAC address...
... make sure port trunking can automatically negotiate with the ports at the remote end of the "standby" ports become operational without user intervention. Click Save when you enable LACP link aggregation on its IP address to distribute traffic based on a port, the port can work properly. To configure the settings: GS1910/XGS1910 Series User's Guide 51 Chapter 5 Tutorials 2 Configure static trunking - LACP also allows port redundancy, that is behind a router, the packet's destination or source MAC address...

User Guide
Page 59
... Mode field to activate mirroring on Switch A for analysis. 7 Click Save. Log into the Switch by entering the username (default: admin) and password (default: 1234). 2 Go to configure the intermediate ports that receives the copy of traffic from the source port on the Switch. 3 Set Type to Destination to Configuration > Port Mirroring. Chapter 5 Tutorials In Switch C: 1 Access the Switch through http://192.168.1.1. GS1910/XGS1910 Series User's Guide 59 The Switch will automatically create the remote port mirroring VLAN...
... Mode field to activate mirroring on Switch A for analysis. 7 Click Save. Log into the Switch by entering the username (default: admin) and password (default: 1234). 2 Go to configure the intermediate ports that receives the copy of traffic from the source port on the Switch. 3 Set Type to Destination to Configuration > Port Mirroring. Chapter 5 Tutorials In Switch C: 1 Access the Switch through http://192.168.1.1. GS1910/XGS1910 Series User's Guide 59 The Switch will automatically create the remote port mirroring VLAN...

User Guide
Page 61
... group changes to join the same multicast group, it receives an unknown multicast frame. 4 In the IGMP SSM Range field, specify the source address range of multicast groups the ports can join. The Switch also replaces the source MAC address in a multicast group. GS1910/XGS1910 Series User's Guide 61 Select the Snooping Enabled check box to activate IGMP snooping on the ports that connects to the multicast router or switch. Chapter 5 Tutorials Follow the steps...
... group changes to join the same multicast group, it receives an unknown multicast frame. 4 In the IGMP SSM Range field, specify the source address range of multicast groups the ports can join. The Switch also replaces the source MAC address in a multicast group. GS1910/XGS1910 Series User's Guide 61 Select the Snooping Enabled check box to activate IGMP snooping on the ports that connects to the multicast router or switch. Chapter 5 Tutorials Follow the steps...
User Guide
Page 70
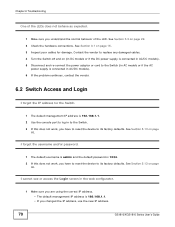
... hardware connections. I forgot the username and/or password. 1 The default username is admin and the default password is 1234. 2 If this does not work , you changed the IP address, use the new IP address. 70 GS1910/XGS1910 Series User's Guide See Section 3.3 on page 15. 3 Inspect your cables for the Switch. 1 The default management IP address is 192.168.1.1. • If you have to reset the device to the Switch (in AC models or if the AC power supply is connected in AC/DC models...
... hardware connections. I forgot the username and/or password. 1 The default username is admin and the default password is 1234. 2 If this does not work , you changed the IP address, use the new IP address. 70 GS1910/XGS1910 Series User's Guide See Section 3.3 on page 15. 3 Inspect your cables for the Switch. 1 The default management IP address is 192.168.1.1. • If you have to reset the device to the Switch (in AC models or if the AC power supply is connected in AC/DC models...
User Guide
Page 71
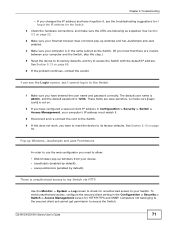
... the troubleshooting suggestions for I cannot log in the Configuration > Security > Switch > Access Management screen for unauthorized access to your device. • JavaScripts (enabled by default). • Java permissions (enabled by default). To avoid unauthorized access, configure the secured client setting in to the Switch. 1 Make sure you have entered the user name and password correctly. GS1910/XGS1910 Series User's Guide 71 See Section 5.13 on page 66. 6 If the problem continues, contact the vendor. There is 1234. Use...
... the troubleshooting suggestions for I cannot log in the Configuration > Security > Switch > Access Management screen for unauthorized access to your device. • JavaScripts (enabled by default). • Java permissions (enabled by default). To avoid unauthorized access, configure the secured client setting in to the Switch. 1 Make sure you have entered the user name and password correctly. GS1910/XGS1910 Series User's Guide 71 See Section 5.13 on page 66. 6 If the problem continues, contact the vendor. There is 1234. Use...
User Guide
Page 74
... the source code covered under GPL like licenses. Opening or removing covers can download the latest firmware at the discretion of firmware upgrades and information at www.zyxel.com for global products, or at http://www.zyxel.com/web/support_warranty_info.php. Connect it shall deem necessary to restore the product or components to order a new one will step on them or stumble over Ethernet) devices that no...
... the source code covered under GPL like licenses. Opening or removing covers can download the latest firmware at the discretion of firmware upgrades and information at www.zyxel.com for global products, or at http://www.zyxel.com/web/support_warranty_info.php. Connect it shall deem necessary to restore the product or components to order a new one will step on them or stumble over Ethernet) devices that no...


