

User Guide
Page 7
... pool. • Do NOT expose your vendor for further information. • Make sure to connect the cables to the correct ports. • Place connecting cables carefully so that used electrical and electronic products should not be mixed with this symbol, which is ... install, use only (utilisation intérieure exclusivement). Used electrical and electronic equipment should service or disassemble this device during a thunderstorm. P-2812HNU(L)-Fx Series User's Guide 7 There is a remote risk of electric shock from lightning. • Do NOT obstruct the device ventilation slots...
... pool. • Do NOT expose your vendor for further information. • Make sure to connect the cables to the correct ports. • Place connecting cables carefully so that used electrical and electronic products should not be mixed with this symbol, which is ... install, use only (utilisation intérieure exclusivement). Used electrical and electronic equipment should service or disassemble this device during a thunderstorm. P-2812HNU(L)-Fx Series User's Guide 7 There is a remote risk of electric shock from lightning. • Do NOT obstruct the device ventilation slots...
User Guide
Page 12
Table of Contents 3.3.1 Example Parameters 36 3.3.2 Configuring the AP ...36 3.3.3 Configuring the Wireless Client 38 3.4 Setting Up NAT Port Forwarding 43 3.5 How to Make a VoIP Call ...44 3.5.1 VoIP Calls With a Registered SIP Account 45 3.6 Using the File Sharing Feature 47 3.6.1 Set Up File Sharing ...... to Know 88 5.1.3 Before You Begin ...91 5.2 The Broadband Screen ...91 5.2.1 Add/Edit Internet Connection 93 5.3 The 3G Backup Screen ...115 5.4 Technical Reference ...117 12 P-2812HNU(L)-Fx Series User's Guide
Table of Contents 3.3.1 Example Parameters 36 3.3.2 Configuring the AP ...36 3.3.3 Configuring the Wireless Client 38 3.4 Setting Up NAT Port Forwarding 43 3.5 How to Make a VoIP Call ...44 3.5.1 VoIP Calls With a Registered SIP Account 45 3.6 Using the File Sharing Feature 47 3.6.1 Set Up File Sharing ...... to Know 88 5.1.3 Before You Begin ...91 5.2 The Broadband Screen ...91 5.2.1 Add/Edit Internet Connection 93 5.3 The 3G Backup Screen ...115 5.4 Technical Reference ...117 12 P-2812HNU(L)-Fx Series User's Guide
User Guide
Page 14
...10.1.1 What You Can Do in this Chapter 189 10.1.2 What You Need To Know 189 10.2 The Port Forwarding Screen 190 10.2.1 The Port Forwarding Screen 190 10.2.2 The Port Forwarding Edit Screen 192 10.3 The Sessions Screen ...193 10.4 Technical Reference ...193 10.4.1 NAT Definitions ......193 10.4.2 What NAT Does ...194 10.4.3 How NAT Works ...194 Chapter 11 Dynamic DNS ...197 11.1 Overview ...197 11.1.1 What You Need To Know 197 11.2 The Dynamic DNS Screen 197 14 P-2812HNU...
...10.1.1 What You Can Do in this Chapter 189 10.1.2 What You Need To Know 189 10.2 The Port Forwarding Screen 190 10.2.1 The Port Forwarding Screen 190 10.2.2 The Port Forwarding Edit Screen 192 10.3 The Sessions Screen ...193 10.4 Technical Reference ...193 10.4.1 NAT Definitions ......193 10.4.2 What NAT Does ...194 10.4.3 How NAT Works ...194 Chapter 11 Dynamic DNS ...197 11.1 Overview ...197 11.1.1 What You Need To Know 197 11.2 The Dynamic DNS Screen 197 14 P-2812HNU...
User Guide
Page 21
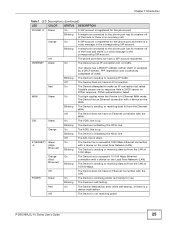
...with an USB printer connected. • "L" denotes the PSTN (Public Switched Telephone Network) line feature. All PSTN line features documented in P-2812HNU(L)-Fx Series User's Guide 21 Models ending in "3", for making calls. Ensure you know which the Device is , so that in "1", ... mode. The Device is an embedded mini-PCI module for IEEE 802.11 b/g/n wireless LAN connectivity. • "U" denotes a USB port used for example P2812HNU(L)-F3, denote a device that works over ISDN (Integrated Services Digital Network) or T-ISDN (UR-2). See the chapter on Stateful Packet Inspection ...
...with an USB printer connected. • "L" denotes the PSTN (Public Switched Telephone Network) line feature. All PSTN line features documented in P-2812HNU(L)-Fx Series User's Guide 21 Models ending in "3", for making calls. Ensure you know which the Device is , so that in "1", ... mode. The Device is an embedded mini-PCI module for IEEE 802.11 b/g/n wireless LAN connectivity. • "U" denotes a USB port used for example P2812HNU(L)-F3, denote a device that works over ISDN (Integrated Services Digital Network) or T-ISDN (UR-2). See the chapter on Stateful Packet Inspection ...
User Guide
Page 22
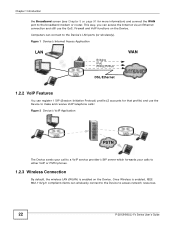
Computers can connect to access network resources. 22 P-2812HNU(L)-Fx Series User's Guide Once Wireless is enabled on the Device. This way, you can access the Internet via an Ethernet connection and still use ... Bridging IPoE PPPoE/PPPoA WAN DSL/Ethernet 1.2.2 VoIP Features You can register 1 SIP (Session Initiation Protocol) profile (2 accounts for more information) and connect the WAN port to either VoIP or PSTN phones. 1.2.3 Wireless Connection By default, the wireless LAN (WLAN) is enabled, IEEE 802.11b/g/n compliant clients can wirelessly connect to...
Computers can connect to access network resources. 22 P-2812HNU(L)-Fx Series User's Guide Once Wireless is enabled on the Device. This way, you can access the Internet via an Ethernet connection and still use ... Bridging IPoE PPPoE/PPPoA WAN DSL/Ethernet 1.2.2 VoIP Features You can register 1 SIP (Session Initiation Protocol) profile (2 accounts for more information) and connect the WAN port to either VoIP or PSTN phones. 1.2.3 Wireless Connection By default, the wireless LAN (WLAN) is enabled, IEEE 802.11b/g/n compliant clients can wirelessly connect to...
User Guide
Page 25
...On The Device has an IP connection but failed. Blinking Off The Device is registered for the phone port. The ADSL line is receiving power and ready for the phone port and there is not receiving power. The Device is up . Red On The Device attempted to the... DSL line is a voice message in the corresponding SIP account. The Device has a successful 10/100 Mbps Ethernet connection with the WAN. P-2812HNU(L)-Fx Series User's Guide 25 A telephone connected to make an IP connection but no PPPoE response, PPPoE authentication failed. DSL Green Orange On ...
...On The Device has an IP connection but failed. Blinking Off The Device is registered for the phone port. The ADSL line is receiving power and ready for the phone port and there is not receiving power. The Device is up . Red On The Device attempted to the... DSL line is a voice message in the corresponding SIP account. The Device has a successful 10/100 Mbps Ethernet connection with the WAN. P-2812HNU(L)-Fx Series User's Guide 25 A telephone connected to make an IP connection but no PPPoE response, PPPoE authentication failed. DSL Green Orange On ...
User Guide
Page 30
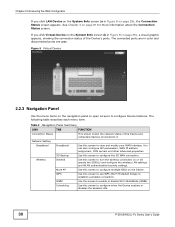
... WLAN authentication/security settings. More AP Use this screen to configure when the Device enables or disables the wireless LAN. 30 P-2812HNU(L)-Fx Series User's Guide WMM Use this screen to configure the 3G WAN connection. Scheduling Use this screen to view and modify... your WAN interface. Table 2 Navigation Panel Summary LINK TAB FUNCTION Connection Status This screen shows the network status of the Device's ports. Figure 9 Virtual Device 2.2.3 Navigation Panel Use the menu items on the navigation panel to open screens to it. Chapter 2 Introducing ...
... WLAN authentication/security settings. More AP Use this screen to configure when the Device enables or disables the wireless LAN. 30 P-2812HNU(L)-Fx Series User's Guide WMM Use this screen to configure the 3G WAN connection. Scheduling Use this screen to view and modify... your WAN interface. Table 2 Navigation Panel Summary LINK TAB FUNCTION Connection Status This screen shows the network status of the Device's ports. Figure 9 Virtual Device 2.2.3 Navigation Panel Use the menu items on the navigation panel to open screens to it. Chapter 2 Introducing ...
User Guide
Page 31
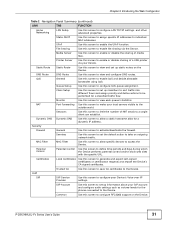
...Use this screen to set up classifiers to sort traffic into different flows and assign priority and define actions to make your Device. NAT Port Forwarding Use this screen to be performed for a classified traffic flow. Common Use this screen to enable or disable sharing of a USB...screen to define time periods and days during which the Device performs parental control and/or block web sites with the specific URL. P-2812HNU(L)-Fx Series User's Guide 31 Security Firewall General Use this screen to activate/deactivate the firewall. SIP Account Use this screen to assign...
...Use this screen to set up classifiers to sort traffic into different flows and assign priority and define actions to make your Device. NAT Port Forwarding Use this screen to be performed for a classified traffic flow. Common Use this screen to enable or disable sharing of a USB...screen to define time periods and days during which the Device performs parental control and/or block web sites with the specific URL. P-2812HNU(L)-Fx Series User's Guide 31 Security Firewall General Use this screen to activate/deactivate the firewall. SIP Account Use this screen to assign...
User Guide
Page 32
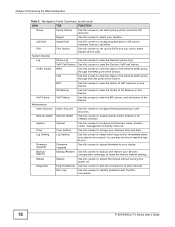
...traffic directions for SIP phone numbers that you . LAN Use this screen to view the status of all network traffic going through the WAN port of 3G Backup on the Device. Time Time Setting Use this screen to change your location. You can also set it to e-mail the...) LINK TAB FUNCTION Phone Phone Device Use this screen to set which phone ports use to make regular phone calls. System Monitor Log Phone Log Use this screen to identify problems with the DSL connection. 32 P-2812HNU(L)-Fx Series User's Guide DSL Line Use this screen to configure the Device's...
...traffic directions for SIP phone numbers that you . LAN Use this screen to view the status of all network traffic going through the WAN port of 3G Backup on the Device. Time Time Setting Use this screen to change your location. You can also set it to e-mail the...) LINK TAB FUNCTION Phone Phone Device Use this screen to set which phone ports use to make regular phone calls. System Monitor Log Phone Log Use this screen to identify problems with the DSL connection. 32 P-2812HNU(L)-Fx Series User's Guide DSL Line Use this screen to configure the Device's...
User Guide
Page 33
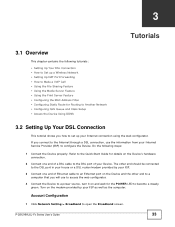
...Turn on the modem provided by your ISP. 3 Connect one end of your Internet Service Provider (ISP) to open the Broadband screen. P-2812HNU(L)-Fx Series User's Guide 33 CHAPTER 3 Tutorials 3.1 Overview This chapter contains the following steps: 1 Connect the Device properly. The other end ...your Device. Do the following tutorials: • Setting Up Your DSL Connection • How to Set up a Wireless Network • Setting Up NAT Port Forwarding • How to Make a VoIP Call • Using the File Sharing Feature • Using the Media Server Feature • Using the ...
...Turn on the modem provided by your ISP. 3 Connect one end of your Internet Service Provider (ISP) to open the Broadband screen. P-2812HNU(L)-Fx Series User's Guide 33 CHAPTER 3 Tutorials 3.1 Overview This chapter contains the following steps: 1 Connect the Device properly. The other end ...your Device. Do the following tutorials: • Setting Up Your DSL Connection • How to Set up a Wireless Network • Setting Up NAT Port Forwarding • How to Make a VoIP Call • Using the File Sharing Feature • Using the Media Server Feature • Using the ...

User Guide
Page 43
... your network administrator if necessary. 3.4 Setting Up NAT Port Forwarding In this tutorial, you are using and click Edit. Tutorial: NAT Port Forwarding Setup D=192.168.1.34 LAN port 666 WAN A You may set up the port settings by configuring the port settings for the Doom server computer (see Chapter 10... and IP address on the Device. Click Add new rule. In order for more information). 1 Click Network Setting > NAT > Port Forwarding. P-2812HNU(L)-Fx Series User's Guide 43 Also, refer to the Troubleshooting section of 192.168.1.34. Chapter 3 Tutorials 11 If you cannot ...
... your network administrator if necessary. 3.4 Setting Up NAT Port Forwarding In this tutorial, you are using and click Edit. Tutorial: NAT Port Forwarding Setup D=192.168.1.34 LAN port 666 WAN A You may set up the port settings by configuring the port settings for the Doom server computer (see Chapter 10... and IP address on the Device. Click Add new rule. In order for more information). 1 Click Network Setting > NAT > Port Forwarding. P-2812HNU(L)-Fx Series User's Guide 43 Also, refer to the Troubleshooting section of 192.168.1.34. Chapter 3 Tutorials 11 If you cannot ...

User Guide
Page 44
.... 3.5 How to Make a VoIP Call You can have the Device start forwarding port 666 traffic to the computer with the SIP server and make voice calls over the Internet to another VoIP device. 44 P-2812HNU(L)-Fx Series User's Guide This should be the protocol supported by the Doom server.... 3 Click Apply. 4 The port forwarding settings you configured should appear in Status is the color yellow, meaning it is ...
.... 3.5 How to Make a VoIP Call You can have the Device start forwarding port 666 traffic to the computer with the SIP server and make voice calls over the Internet to another VoIP device. 44 P-2812HNU(L)-Fx Series User's Guide This should be the protocol supported by the Doom server.... 3 Click Apply. 4 The port forwarding settings you configured should appear in Status is the color yellow, meaning it is ...

User Guide
Page 47
...Call 1 Make sure you connect a telephone to the first phone port on the Device. 2 Make sure the Device is on and ...Click the Edit icon next to Analog Phone 1 to configure the first phone port. 2 Select SIP 1 from the SIP Account in the SIP Account to Make ...Outgoing Call section to have the phone (connected to the first phone port) use the registered SIP 1 account to make outgoing calls. 3 Select the...the SIP Account(s) to Receive Incoming Call section to have the phone (connected to the first phone port) receive phone calls for the SIP 3 account. 4 Click Apply to open the Phone Device ...
...Call 1 Make sure you connect a telephone to the first phone port on the Device. 2 Make sure the Device is on and ...Click the Edit icon next to Analog Phone 1 to configure the first phone port. 2 Select SIP 1 from the SIP Account in the SIP Account to Make ...Outgoing Call section to have the phone (connected to the first phone port) use the registered SIP 1 account to make outgoing calls. 3 Select the...the SIP Account(s) to Receive Incoming Call section to have the phone (connected to the first phone port) receive phone calls for the SIP 3 account. 4 Click Apply to open the Phone Device ...
User Guide
Page 48
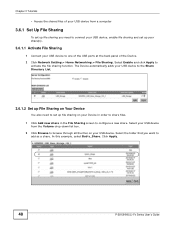
...to configure a new share. Chapter 3 Tutorials • Access the shared files of the Device. 2 Click Network Setting > Home Networking > File Sharing. Click Apply. 48 P-2812HNU(L)-Fx Series User's Guide In this example, select Bob's_Share. Select your USB device from the Volume drop-down list box. 2 Click Browse to browse... through all the files on your USB device to one of the USB ports at the back panel of your USB device from a computer 3.6.1 Set Up File Sharing To set up file sharing you want to activate the...
...to configure a new share. Chapter 3 Tutorials • Access the shared files of the Device. 2 Click Network Setting > Home Networking > File Sharing. Click Apply. 48 P-2812HNU(L)-Fx Series User's Guide In this example, select Bob's_Share. Select your USB device from the Volume drop-down list box. 2 Click Browse to browse... through all the files on your USB device to one of the USB ports at the back panel of your USB device from a computer 3.6.1 Set Up File Sharing To set up file sharing you want to activate the...

User Guide
Page 50
...work with your Device using the following media clients: • Microsoft (MS) Windows Media Player Media Server works with Windows Media Player ZyXEL Device 50 P-2812HNU(L)-Fx Series User's Guide This enables DLNA-compliant media clients to play the video, music and image files in your USB storage device.... 3.7.2 Using Windows Media Player This section shows you want to play to the USB port of your Device. 3.7.1 Configuring the Device ...
...work with your Device using the following media clients: • Microsoft (MS) Windows Media Player Media Server works with Windows Media Player ZyXEL Device 50 P-2812HNU(L)-Fx Series User's Guide This enables DLNA-compliant media clients to play the video, music and image files in your USB storage device.... 3.7.2 Using Windows Media Player This section shows you want to play to the USB port of your Device. 3.7.1 Configuring the Device ...

User Guide
Page 54
... DMA-2500 3 The screen shows you want to an available LAN port in the USB storage device. Chapter 3 Tutorials 1 Connect the DMA-2500 to open the following screen. Tutorial: Media Sharing using DMA-2500 (2) 54 P-2812HNU(L)-Fx Series User's Guide Select the Device as your Device. Select ...the file you the list of available media files in your media server. Tutorial: Media Server Setup (Using DMA) USB Storage Device DMA-2500 ZyXEL Device 2 Turn on the TV and...
... DMA-2500 3 The screen shows you want to an available LAN port in the USB storage device. Chapter 3 Tutorials 1 Connect the DMA-2500 to open the following screen. Tutorial: Media Sharing using DMA-2500 (2) 54 P-2812HNU(L)-Fx Series User's Guide Select the Device as your Device. Select ...the file you the list of available media files in your media server. Tutorial: Media Server Setup (Using DMA) USB Storage Device DMA-2500 ZyXEL Device 2 Turn on the TV and...
User Guide
Page 55
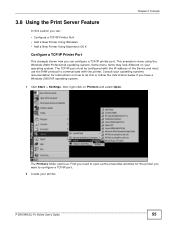
... and select Open. Tutorial: Open Printers Window The Printers folder opens up the properties windows for instructions on how to configure a TCP/IP port. 2 Locate your operating system. First you need to open up . Consult your operating systems documentation for the printer you want to do ... Using Windows • Add a New Printer Using Macintosh OS X Configure a TCP/IP Printer Port This example shows how you can configure a TCP/IP printer port. P-2812HNU(L)-Fx Series User's Guide 55 The TCP/IP port must be configured with the IP address of the Device and must use the RAW protocol...
... and select Open. Tutorial: Open Printers Window The Printers folder opens up the properties windows for instructions on how to configure a TCP/IP port. 2 Locate your operating system. First you need to open up . Consult your operating systems documentation for the printer you want to do ... Using Windows • Add a New Printer Using Macintosh OS X Configure a TCP/IP Printer Port This example shows how you can configure a TCP/IP printer port. P-2812HNU(L)-Fx Series User's Guide 55 The TCP/IP port must be configured with the IP address of the Device and must use the RAW protocol...

User Guide
Page 56
Chapter 3 Tutorials 3 Right click on your printer and select Properties. Tutorial: Add a Port Window 56 P-2812HNU(L)-Fx Series User's Guide Tutorial: Open Printer Properties 4 Select the Ports tab and click Add Port... Select Standard TCP/IP Port and click New Port... Tutorial: Printer Properties Window 5 A Printer Ports window appears.
Chapter 3 Tutorials 3 Right click on your printer and select Properties. Tutorial: Add a Port Window 56 P-2812HNU(L)-Fx Series User's Guide Tutorial: Open Printer Properties 4 Select the Ports tab and click Add Port... Select Standard TCP/IP Port and click New Port... Tutorial: Printer Properties Window 5 A Printer Ports window appears.

User Guide
Page 57
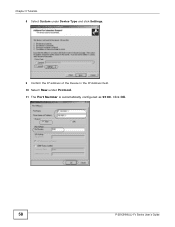
... to which you are configuring the TCP/IP printer port must be on the same LAN in the Printer Name or IP Address: field. Click Next. The Port Name field updates automatically to reflect the IP address of the Device P-2812HNU(L)-Fx Series User's Guide 57 Tutorial: Enter IP ...Address of the port. Tutorial: Add a Port Wizard 7 Enter the IP address of the Device, 192.168.1.1. Note...
... to which you are configuring the TCP/IP printer port must be on the same LAN in the Printer Name or IP Address: field. Click Next. The Port Name field updates automatically to reflect the IP address of the Device P-2812HNU(L)-Fx Series User's Guide 57 Tutorial: Enter IP ...Address of the port. Tutorial: Add a Port Wizard 7 Enter the IP address of the Device, 192.168.1.1. Note...
User Guide
Page 58
Chapter 3 Tutorials 8 Select Custom under Protocol. 11 The Port Number is automatically configured as 9100. Tutorial: Custom Port Settings 58 P-2812HNU(L)-Fx Series User's Guide Click OK. Tutorial: Custom Port Settings 9 Confirm the IP address of the Device in the IP Address field. 10 Select Raw under Device Type and click Settings.
Chapter 3 Tutorials 8 Select Custom under Protocol. 11 The Port Number is automatically configured as 9100. Tutorial: Custom Port Settings 58 P-2812HNU(L)-Fx Series User's Guide Click OK. Tutorial: Custom Port Settings 9 Confirm the IP address of the Device in the IP Address field. 10 Select Raw under Device Type and click Settings.
