

User Guide
Page 28
... web configurator for five minutes (default). alternatively click Skip to proceed to the main menu if you change the password now. Type "admin" (default) as the username and "1234" as the password, and click Login. Enter a new password, retype it to change ... and click Apply; Figure 5 Password Screen Note: For security reasons, the ZyXEL Device automatically logs you out if you have not yet changed the password, enter your password. Figure 6 Change Password Screen 28 P-2601HN(L)-F1 Series User's Guide Chapter 2 Introducing the Web Configurator 4 A password screen displays...
... web configurator for five minutes (default). alternatively click Skip to proceed to the main menu if you change the password now. Type "admin" (default) as the username and "1234" as the password, and click Login. Enter a new password, retype it to change ... and click Apply; Figure 5 Password Screen Note: For security reasons, the ZyXEL Device automatically logs you out if you have not yet changed the password, enter your password. Figure 6 Change Password Screen 28 P-2601HN(L)-F1 Series User's Guide Chapter 2 Introducing the Web Configurator 4 A password screen displays...

User Guide
Page 213
...following table describes the labels in the User Account screen. 19.2 The User Account Screen Use the User Account screen to access the ZyXEL Device. After you type. Retype to Confirm Type the new password again for different user accounts in this field. CHAPTER 19 User ...Account 19.1 Overview You can configure the password for the admin or user account . Note that as you type a password, the screen displays a (*) for each character you change the password, use to 30 characters). P-2601HN(L)-F1 Series User's Guide 213 Old Password Type the default password or ...
...following table describes the labels in the User Account screen. 19.2 The User Account Screen Use the User Account screen to access the ZyXEL Device. After you type. Retype to Confirm Type the new password again for different user accounts in this field. CHAPTER 19 User ...Account 19.1 Overview You can configure the password for the admin or user account . Note that as you type a password, the screen displays a (*) for each character you change the password, use to 30 characters). P-2601HN(L)-F1 Series User's Guide 213 Old Password Type the default password or ...

User Guide
Page 239
...ask the person who is admin. The default user name is logged in to log out. 3 Turn the ZyXEL Device off and on page 25. 5 If the problem continues, contact the network administrator or vendor, or try to access the ZyXEL Device. P-2601HN(L)-F1 Series User's Guide 239 See... the Quick Start Guide. 3 Make sure your browser. Advanced Suggestions • Try to access the ZyXEL Device using Telnet to access the ZyXEL Device with the default IP address. Chapter 28 Troubleshooting...
...ask the person who is admin. The default user name is logged in to log out. 3 Turn the ZyXEL Device off and on page 25. 5 If the problem continues, contact the network administrator or vendor, or try to access the ZyXEL Device. P-2601HN(L)-F1 Series User's Guide 239 See... the Quick Start Guide. 3 Make sure your browser. Advanced Suggestions • Try to access the ZyXEL Device using Telnet to access the ZyXEL Device with the default IP address. Chapter 28 Troubleshooting...

User Guide
Page 244
...use the web configurator to protect your wireless network. Use this feature to the ZyXEL Device wirelessly. DHCP Server IP Pool Starting Address: 192.168.1.64 Static DHCP ...a copy of features on your public IP address(es) to the clients. 244 P-2601HN(L)-F1 Series User's Guide Chapter 29 Product Specifications Firmware Specifications Table 75 Firmware Specifications Default IP ... 192.168.1.1 Default Subnet Mask 255.255.255.0 (24 bits) Default User Name admin Default Password 1234. Configuration Backup & Restoration Pass-through Traffic Type Network Address Translation (NAT...
...use the web configurator to protect your wireless network. Use this feature to the ZyXEL Device wirelessly. DHCP Server IP Pool Starting Address: 192.168.1.64 Static DHCP ...a copy of features on your public IP address(es) to the clients. 244 P-2601HN(L)-F1 Series User's Guide Chapter 29 Product Specifications Firmware Specifications Table 75 Firmware Specifications Default IP ... 192.168.1.1 Default Subnet Mask 255.255.255.0 (24 bits) Default User Name admin Default Password 1234. Configuration Backup & Restoration Pass-through Traffic Type Network Address Translation (NAT...

User Guide
Page 282
Note: Make sure you first enter your admin password. Figure 153 Ubuntu 8: System > Administration Menu 2 When the Network Settings window opens, click Unlock to open the Authenticate window. (By default, ...default Ubuntu 8 installation. Follow the steps below to configure your specific distribution, release version, and individual configuration. Figure 154 Ubuntu 8: Network Settings > Connections 282 P-2601HN(L)-F1 Series User's Guide The procedure, screens and file locations may vary depending on your computer IP address in GNOME: 1 Click System > Administration > Network. Appendix B...
Note: Make sure you first enter your admin password. Figure 153 Ubuntu 8: System > Administration Menu 2 When the Network Settings window opens, click Unlock to open the Authenticate window. (By default, ...default Ubuntu 8 installation. Follow the steps below to configure your specific distribution, release version, and individual configuration. Figure 154 Ubuntu 8: Network Settings > Connections 282 P-2601HN(L)-F1 Series User's Guide The procedure, screens and file locations may vary depending on your computer IP address in GNOME: 1 Click System > Administration > Network. Appendix B...

User Guide
Page 283
Appendix B Setting Up Your Computer's IP Address 3 In the Authenticate window, enter your admin account name and password then click the Authenticate button. Figure 155 Ubuntu 8: Administrator Account Authentication 4 In the Network Settings window, select the connection that you want to configure, then click Properties. Figure 156 Ubuntu 8: Network Settings > Connections P-2601HN(L)-F1 Series User's Guide 283
Appendix B Setting Up Your Computer's IP Address 3 In the Authenticate window, enter your admin account name and password then click the Authenticate button. Figure 155 Ubuntu 8: Administrator Account Authentication 4 In the Network Settings window, select the connection that you want to configure, then click Properties. Figure 156 Ubuntu 8: Network Settings > Connections P-2601HN(L)-F1 Series User's Guide 283
User Guide
Page 286
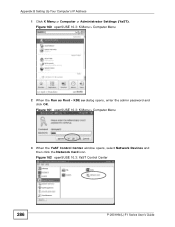
Figure 160 openSUSE 10.3: K Menu > Computer Menu 2 When the Run as Root - Figure 162 openSUSE 10.3: YaST Control Center 286 P-2601HN(L)-F1 Series User's Guide Appendix B Setting Up Your Computer's IP Address 1 Click K Menu > Computer > Administrator Settings (YaST). KDE su dialog opens, enter the admin password and click OK. Figure 161 openSUSE 10.3: K Menu > Computer Menu 3 When the YaST Control Center window opens, select Network Devices and then click the Network Card icon.
Figure 160 openSUSE 10.3: K Menu > Computer Menu 2 When the Run as Root - Figure 162 openSUSE 10.3: YaST Control Center 286 P-2601HN(L)-F1 Series User's Guide Appendix B Setting Up Your Computer's IP Address 1 Click K Menu > Computer > Administrator Settings (YaST). KDE su dialog opens, enter the admin password and click OK. Figure 161 openSUSE 10.3: K Menu > Computer Menu 3 When the YaST Control Center window opens, select Network Devices and then click the Network Card icon.