
Operation Guide
Page 4
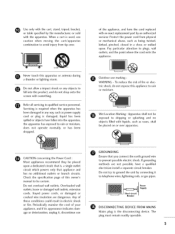
.... ® Refer all servicing to qualified service personnel. of fire or elec- @ Use only with the cart, stand, tripod, bracket, or table specified by the manufacturer, or sold with an exact replacement part by connecting it , discontinue use caution when moving the cart/apparatus combination to avoid injury from physical or mechanical abuse, such as power-supply cord or plug is used, use 0 GROUNDING Ensure...
.... ® Refer all servicing to qualified service personnel. of fire or elec- @ Use only with the cart, stand, tripod, bracket, or table specified by the manufacturer, or sold with an exact replacement part by connecting it , discontinue use caution when moving the cart/apparatus combination to avoid injury from physical or mechanical abuse, such as power-supply cord or plug is used, use 0 GROUNDING Ensure...

Operation Guide
Page 5
... 47 Picture Reset 48 Auto Volume Leveler (Auto Volume 49 Preset Sound Settings (Sound Mode 50 Sound Setting Adjustment - Analog Broadcasting System Captions ....... 58 - User Mode 44 DB - Channel Editing 36 Input List 37 Input Label 38 Key Lock 39 4 Picture Size (Aspect Ratio) Control 40 Preset Picture Settings - Color Tone - Picture Improvement Technology 45 Advanced - User Mode 51 Balance 52 TV Speakers On/Off Setup 53 Stereo/SAP Broadcasts Setup 54 Audio Language 55 On-Screen Menus Language Selection 56 Caption Mode 57 - Color Tone - Caption Option...
... 47 Picture Reset 48 Auto Volume Leveler (Auto Volume 49 Preset Sound Settings (Sound Mode 50 Sound Setting Adjustment - Analog Broadcasting System Captions ....... 58 - User Mode 44 DB - Channel Editing 36 Input List 37 Input Label 38 Key Lock 39 4 Picture Size (Aspect Ratio) Control 40 Preset Picture Settings - Color Tone - Picture Improvement Technology 45 Advanced - User Mode 51 Balance 52 TV Speakers On/Off Setup 53 Stereo/SAP Broadcasts Setup 54 Audio Language 55 On-Screen Menus Language Selection 56 Caption Mode 57 - Color Tone - Caption Option...

Operation Guide
Page 8
... pin cable) PC connection, the user must use shielded signal interface cables with ferrite cores to P.13) Power Cord Polishing Cloth * Wipe spots on the exterior only with your TV. The accessories included may cause scratch or discoloration. "o _o _o © or z i®®® i®®® i®®® Owner's Manual CD Manual Remote Control Batteries Cable Management Clip 4-Bolts for stand assembly...
... pin cable) PC connection, the user must use shielded signal interface cables with ferrite cores to P.13) Power Cord Polishing Cloth * Wipe spots on the exterior only with your TV. The accessories included may cause scratch or discoloration. "o _o _o © or z i®®® i®®® i®®® Owner's Manual CD Manual Remote Control Batteries Cable Management Clip 4-Bolts for stand assembly...

Operation Guide
Page 10
...AC power. REMOTE CONTROL PORT For a wired remote control. @ DIGITAL AUDIO OUT Digital audio output for software updates. Uses a red, green, and blue cable for video & red and white for use with amps and home theater systems. Includes an optical and/or coaxial connection. Note: In standby mode, these ports do not work. @ RS-232C IN (CONTROL & SERVICE) PORT Used by third party devices. @ AUDIO OUT Analog audio output for audio. @ RGB (PC) Analog PC Connection. S-VIDEO -O r'l-i © z ANTENNA/ CABLE N @ HDMI/DVI IN, HDMI IN Digital Connection. AUDIO (RGB/DVI) I/8" headphone...
...AC power. REMOTE CONTROL PORT For a wired remote control. @ DIGITAL AUDIO OUT Digital audio output for software updates. Uses a red, green, and blue cable for video & red and white for use with amps and home theater systems. Includes an optical and/or coaxial connection. Note: In standby mode, these ports do not work. @ RS-232C IN (CONTROL & SERVICE) PORT Used by third party devices. @ AUDIO OUT Analog audio output for audio. @ RGB (PC) Analog PC Connection. S-VIDEO -O r'l-i © z ANTENNA/ CABLE N @ HDMI/DVI IN, HDMI IN Digital Connection. AUDIO (RGB/DVI) I/8" headphone...

Operation Guide
Page 17
... INPUT button on the TV. However, if you have finished connecting all equipment. Match the jack colors (Y = green, PB = blue, and c PR = red). Component Connection r_3 x I. "O z O onnect the audio output of the digital set top box to COMPONENT IN2 input, select the Component 2 input source on the digital set-top box. (Referto the owner'smanualfor the digital set-top box. How to the COMPONENT IN AUDIO 1 jacks on the remote control. EXTERNAL EQUIPMENT SETUP 01T_o prevent the equipment damage, never plug in any power cords...
... INPUT button on the TV. However, if you have finished connecting all equipment. Match the jack colors (Y = green, PB = blue, and c PR = red). Component Connection r_3 x I. "O z O onnect the audio output of the digital set top box to COMPONENT IN2 input, select the Component 2 input source on the digital set-top box. (Referto the owner'smanualfor the digital set-top box. How to the COMPONENT IN AUDIO 1 jacks on the remote control. EXTERNAL EQUIPMENT SETUP 01T_o prevent the equipment damage, never plug in any power cords...
Operation Guide
Page 18
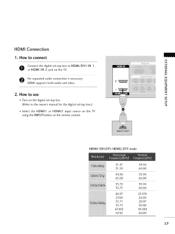
How to the owner's manual for the digital set -top box. HDMI Connection 1. HDMI1/DVI-DTV, HDMI2-DTV mode 31.47 31.50 44.96 45.00 35.72 33.75 26.97 2Z00 33.71 33.75 6Z432 6Z50 ... 24.00 29.97 30.00 59.939 60.00 17 m c (Refer to use 01_Turn on the digital set -top box.) "O 01_Select the HDMI1 or HDMI2 input source on the TV using the INPUT button on the remote control. to connect m x m O CoronHnDeMctI thIeN d2igijtaacl kseotn-tothpe bToVx. How to HDMI/DVI IN 1 _o z m No separated audio connection is necessary. 2 HDMI supports both audio and video. X:) c m z 2.
How to the owner's manual for the digital set -top box. HDMI Connection 1. HDMI1/DVI-DTV, HDMI2-DTV mode 31.47 31.50 44.96 45.00 35.72 33.75 26.97 2Z00 33.71 33.75 6Z432 6Z50 ... 24.00 29.97 30.00 59.939 60.00 17 m c (Refer to use 01_Turn on the digital set -top box.) "O 01_Select the HDMI1 or HDMI2 input source on the TV using the INPUT button on the remote control. to connect m x m O CoronHnDeMctI thIeN d2igijtaacl kseotn-tothpe bToVx. How to HDMI/DVI IN 1 _o z m No separated audio connection is necessary. 2 HDMI supports both audio and video. X:) c m z 2.

Operation Guide
Page 19
How to connect O Connect the DVI output of the digital set-top box to the HDMI/DVI IN 1 jack on the TV. O Connect the audio output of the digital set-top box to the AUDIO (RGB/DVI) jack on the TV. 2. How to use 01T_urn on the digital set-top box. (Refer to HDMI Connection m x m _o z m X:) c "O m z m c "O 1. EXTERNALEQUIPMENT SETUP DVI to the owner's manual for the digital set-top box.) 01S1e_lect the HDMI1 input source on the TV using the INPUT button on the remote control. 18
How to connect O Connect the DVI output of the digital set-top box to the HDMI/DVI IN 1 jack on the TV. O Connect the audio output of the digital set-top box to the AUDIO (RGB/DVI) jack on the TV. 2. How to use 01T_urn on the digital set-top box. (Refer to HDMI Connection m x m _o z m X:) c "O m z m c "O 1. EXTERNALEQUIPMENT SETUP DVI to the owner's manual for the digital set-top box.) 01S1e_lect the HDMI1 input source on the TV using the INPUT button on the remote control. 18

Operation Guide
Page 22
... to connect O Connect the RF antenna out socket of the screen may remain visible on the screen. This phenomenon is common to the VCR owner's manual.) 21 If the 4:3 picture format is not covered by warranty. IN socket on the VCR. (Refer to all TVs and is used; the fixed images on the sides of the VCR to the ANTENNA/CABLE O Connect the antenna cable to the same channel number. VCR SETUP To avoid picture noise...
... to connect O Connect the RF antenna out socket of the screen may remain visible on the screen. This phenomenon is common to the VCR owner's manual.) 21 If the 4:3 picture format is not covered by warranty. IN socket on the VCR. (Refer to all TVs and is used; the fixed images on the sides of the VCR to the ANTENNA/CABLE O Connect the antenna cable to the same channel number. VCR SETUP To avoid picture noise...
Operation Guide
Page 28
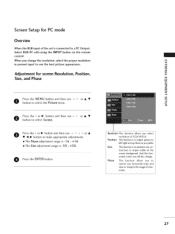
Adjustment for PC mode Overview When the RGB input of the set is connected to make appropriate adjustments. • The Phase adjustment range is -16 ~ +16. • The Size adjustment range is -30 ~ +30. Position This function is to adjust picture to remove any ver- And the hori- zontal screen size will also change the resolution, select the proper resolution in present input to minimize any horizontal noise and clear...
Adjustment for PC mode Overview When the RGB input of the set is connected to make appropriate adjustments. • The Phase adjustment range is -16 ~ +16. • The Size adjustment range is -30 ~ +30. Position This function is to adjust picture to remove any ver- And the hori- zontal screen size will also change the resolution, select the proper resolution in present input to minimize any horizontal noise and clear...

Operation Guide
Page 31
.... _ p.41 SOUND Selects the factory preset sound for multiple program channels such as 2-1,2-2, etc. MENU Displays the main menu. N I > RIGHT, TIMER BRIGHT+ z z fT1 N © Z © BRIGHT -/+ Adjust the brightness on -screen displays and return to TV viewing from any menu. Control buttons Control video cassette recorders or DVD players. Stereo, or a CC Select a closed caption. _ p.57 30 INPUT External input modes rotate in regular sequence. VCR/DVD -- iiill i i i i ii TV/STB/DVD/VCR Select the remote operating mode: TV, STB, DVD, or VCR. RETURN MENU INPUT...
.... _ p.41 SOUND Selects the factory preset sound for multiple program channels such as 2-1,2-2, etc. MENU Displays the main menu. N I > RIGHT, TIMER BRIGHT+ z z fT1 N © Z © BRIGHT -/+ Adjust the brightness on -screen displays and return to TV viewing from any menu. Control buttons Control video cassette recorders or DVD players. Stereo, or a CC Select a closed caption. _ p.57 30 INPUT External input modes rotate in regular sequence. VCR/DVD -- iiill i i i i ii TV/STB/DVD/VCR Select the remote operating mode: TV, STB, DVD, or VCR. RETURN MENU INPUT...

Operation Guide
Page 32
... Switch the sound on or off automatically. _ p.64 THUMBSTICK (Up/Down/Left Right/ENTER) Navigate the on -screen displays and return to your TV or any menu. J 31 BRIGHT -/+ Adjust the brightness on the viewing environment, b p.41 SOUND Selects the factory preset sound for type of time before your TV turns off . _ p.32 0 Z SAP Analog mode: Selects MTS sound (Mono, Stereo, or a _m SAP) _ p.S4 0 DTV mode: Changes the audio language. POWER Turns your preference. INPUT External input modes...
... Switch the sound on or off automatically. _ p.64 THUMBSTICK (Up/Down/Left Right/ENTER) Navigate the on -screen displays and return to your TV or any menu. J 31 BRIGHT -/+ Adjust the brightness on the viewing environment, b p.41 SOUND Selects the factory preset sound for type of time before your TV turns off . _ p.32 0 Z SAP Analog mode: Selects MTS sound (Mono, Stereo, or a _m SAP) _ p.S4 0 DTV mode: Changes the audio language. POWER Turns your preference. INPUT External input modes...

Operation Guide
Page 33
... sound off, press the MUTE button. WATCHING TV / CHANNEL CONTROL TURNING ON TV @ First, connect power cord correctly. The TV reverts to select a channel number. N I > z z fT1 N © Z © CHANNEL SELECTION O PresstheCH(^ v or+-) or NUMBER buttons to standby mode. At this moment, the TV switches to standby mode. 01I_n standby mode to turn TV on, press the (b/l , INPUT, CH (A or T) button on the TV or press the POWER, INPUT, CH(^ v or ÷ -), Number (0~9) button on the remote control. @ Select the viewing...
... sound off, press the MUTE button. WATCHING TV / CHANNEL CONTROL TURNING ON TV @ First, connect power cord correctly. The TV reverts to select a channel number. N I > z z fT1 N © Z © CHANNEL SELECTION O PresstheCH(^ v or+-) or NUMBER buttons to standby mode. At this moment, the TV switches to standby mode. 01I_n standby mode to turn TV on, press the (b/l , INPUT, CH (A or T) button on the TV or press the POWER, INPUT, CH(^ v or ÷ -), Number (0~9) button on the remote control. @ Select the viewing...

Operation Guide
Page 41
... want to select the desired picture format. PICTURE CONTROL PICTURE SIZE (ASPECT RATIO) CONTROL This feature lets you can see the noise at the edge. Notes: If there are noise in high resolution image. Choose Zoom 2 when you want the picture to select Aspect Ratio. Just Scan operates only in a linear proportion to fill the entire screen. O Press the > or I_ button and then use ^ v or A • button to view the picture without loss...
... want to select the desired picture format. PICTURE CONTROL PICTURE SIZE (ASPECT RATIO) CONTROL This feature lets you can see the noise at the edge. Notes: If there are noise in high resolution image. Choose Zoom 2 when you want the picture to select Aspect Ratio. Just Scan operates only in a linear proportion to fill the entire screen. O Press the > or I_ button and then use ^ v or A • button to view the picture without loss...
Operation Guide
Page 42
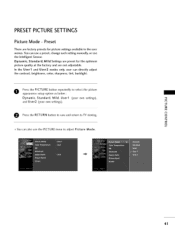
... own settings), "0 and User2 (your own settings). You can directly adjust the contrast, brightness, color, sharpness, tint, backlight. O Press the PICTURE button repeatedly to TV viewing. In the User1 and User2 modes only, user can use a preset, change each setting manually, or use the PICTURE menu to adjust Picture Mode. 41 Dynamic, Standard, Mild Settings are preset for the optimum picture quality at the factory and are factory presets for picture settings available in the user menus...
... own settings), "0 and User2 (your own settings). You can directly adjust the contrast, brightness, color, sharpness, tint, backlight. O Press the PICTURE button repeatedly to TV viewing. In the User1 and User2 modes only, user can use a preset, change each setting manually, or use the PICTURE menu to adjust Picture Mode. 41 Dynamic, Standard, Mild Settings are preset for the optimum picture quality at the factory and are factory presets for picture settings available in the user menus...

Operation Guide
Page 54
use ^ v orA • O Press the >or I_ button and then use ^ v orA • button to select On or Off. O ress the >orl_ button and then use ^ v orA • button to the previous menu. O c Z _o z c l'rl N 0 Z .-I 0 @@ 53 O Press RETU RN button to return to TV viewing or press MENU button to return to select TV Speaker. O Pburettsosn thteo MseEleNcUt thebuAttUonDIOand mtheennu. TV SPEAKERSONIOFF SETUP Turn the TV speakers off if using external audio equipment.
use ^ v orA • O Press the >or I_ button and then use ^ v orA • button to select On or Off. O ress the >orl_ button and then use ^ v orA • button to the previous menu. O c Z _o z c l'rl N 0 Z .-I 0 @@ 53 O Press RETU RN button to return to TV viewing or press MENU button to return to select TV Speaker. O Pburettsosn thteo MseEleNcUt thebuAttUonDIOand mtheennu. TV SPEAKERSONIOFF SETUP Turn the TV speakers off if using external audio equipment.

Operation Guide
Page 59
... TV. This TV is set when you turned the power off. O burettsosn thteo sMeEleNctU thebuOttoPnTIOaNnd thmenenuu.se ^ v orA • O c Z O Press the >orl_ button and then use ^ v orA • l'rl button to the previous menu. 58 @@@ This function is only available when Caption Mode is programmed to select Caption. SOUND & LANGUAGE CONTROL Analog Broadcasting System Captions Caption must be available for both digital and analog channels on the Antenna/Cable. Caption/Text, if provided...
... TV. This TV is set when you turned the power off. O burettsosn thteo sMeEleNctU thebuOttoPnTIOaNnd thmenenuu.se ^ v orA • O c Z O Press the >orl_ button and then use ^ v orA • l'rl button to the previous menu. 58 @@@ This function is only available when Caption Mode is programmed to select Caption. SOUND & LANGUAGE CONTROL Analog Broadcasting System Captions Caption must be available for both digital and analog channels on the Antenna/Cable. Caption/Text, if provided...

Operation Guide
Page 67
... > or I_ button. 01E_nter the password as requested. 01T_he TV is to block program viewing based on the ratings sent by choosing the type of the program and the categories. The default setting is set up blocking schemes to block specific channels, ratings, and external viewing sources. _o A password is used to this function, the following must be blocked by broadcasting stations. PARENTALCONTROL / RATINGS Parental Control can be...
... > or I_ button. 01E_nter the password as requested. 01T_he TV is to block program viewing based on the ratings sent by choosing the type of the program and the categories. The default setting is set up blocking schemes to block specific channels, ratings, and external viewing sources. _o A password is used to this function, the following must be blocked by broadcasting stations. PARENTALCONTROL / RATINGS Parental Control can be...

Operation Guide
Page 85
... based on this format, Acknowledgement data feedback presents status about each function. * Note: In this model, TV will send the Acknowledge after power on remote control or in the Picture menu. You can also adjust contrast in the Picture menu. Contrast (Command: k g) To adjust screen contrast. See page 85. See page 85. Transmission[k] [h][] [set ID] [ ] [OKZNG] [Data] [x] * If you select input source, we recommend "command x b'. 03. Input Select...
... based on this format, Acknowledgement data feedback presents status about each function. * Note: In this model, TV will send the Acknowledge after power on remote control or in the Picture menu. You can also adjust contrast in the Picture menu. Contrast (Command: k g) To adjust screen contrast. See page 85. See page 85. Transmission[k] [h][] [set ID] [ ] [OKZNG] [Data] [x] * If you select input source, we recommend "command x b'. 03. Input Select...

Operation Guide
Page 86
... the Audio menu. TransmiSsion [k] [j][ ][Set ID][ ][Data] [cr] Data Red: 0 - You can also adjust sharpness in color temperature Transmission [k] [v][] [Set ID][] Data Min: 0 - You can also adjust balance in the Audio menu. Transmission[k] [I][] [Setl D] [ ] [Data] [Cr] Data 0: OSD off . Red Adjustment (Command: k v) To adjust red in the Picture menu. Remote Control Lock Mode (Command: k m) To adjust green in the Picture menu. C7 X Acknowledgement [W][] [set ID][] [OKiNG] [Data] [x] If you're not using the remote control and front panel...
... the Audio menu. TransmiSsion [k] [j][ ][Set ID][ ][Data] [cr] Data Red: 0 - You can also adjust sharpness in color temperature Transmission [k] [v][] [Set ID][] Data Min: 0 - You can also adjust balance in the Audio menu. Transmission[k] [I][] [Setl D] [ ] [Data] [Cr] Data 0: OSD off . Red Adjustment (Command: k v) To adjust red in the Picture menu. Remote Control Lock Mode (Command: k m) To adjust green in the Picture menu. C7 X Acknowledgement [W][] [set ID][] [OKiNG] [Data] [x] If you're not using the remote control and front panel...

Operation Guide
Page 88
... lists the binary code which source do you want to change the channel. * 6th bit: Use a two part or one part channel. Most cases just use the physical channel number. Back Light (Command: m g) To adjust screen back light. See page 85. Tune to 0. * 3-0 bits: Choose signal type. 25. Data 0 = Don't know Physical = 00 Data 1 &2 = Major is . Acknowledgement [c][ ][Set ID][ ][OK/NG] [Data] [x] * 4th bit: Set to the digital (ATSC) local channel...
... lists the binary code which source do you want to change the channel. * 6th bit: Use a two part or one part channel. Most cases just use the physical channel number. Back Light (Command: m g) To adjust screen back light. See page 85. Tune to 0. * 3-0 bits: Choose signal type. 25. Data 0 = Don't know Physical = 00 Data 1 &2 = Major is . Acknowledgement [c][ ][Set ID][ ][OK/NG] [Data] [x] * 4th bit: Set to the digital (ATSC) local channel...


